How to Save Message History from Windows Live Messenger
Can You Save Messages in Windows Live Messenger?
If you wish you could save message history from Windows Live Messenger so that you could refer to it later, there is good news! This feature is not only available in the very popular instant messaging service, it is also very simple to turn on.
Never again will you have to remember exactly what was communicated via IM or jot down notes to refer back to later. With history turned on, it's easy to go back and review whenever you want to.
Why Save Windows Live History?
The main reason to turn this feature on is to remember what you wrote or read in an instant messaging session. This is particularly useful in business situations or in any event where agreements were made, directions were given, or actionable items were discussed.
With message history turned on, you won't have to use a pen and paper to jot down notes to make sure you remember something. Just bring up the history at any time and re-read it or copy and paste it to a document or email.
Steps to Save Windows Live Messenger Messages
Saving all of your chats is very easy to turn on. To begin, click the "Tools" menu, then click "Options".

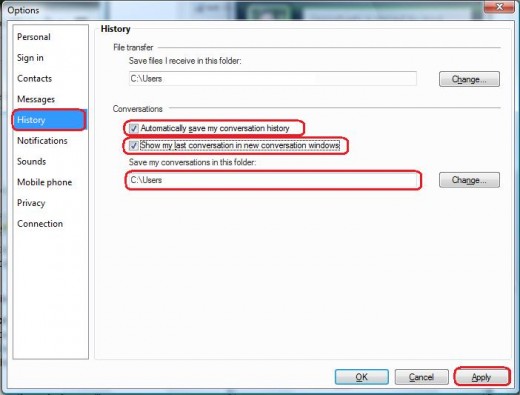
Now that the options menu has been opened, click the "History" menu option to bring up the history options page. Here, you can see the location that your instant messages will be saved and you can change it if you like.
In the "Conversations" section, check the boxes that you'd like to turn on.
The option to automatically save my conversation history will turn the history feature on. When this is turned on, all conversations that you have in Windows Live Messenger will be recorded and saved to the location indicated on this page. This includes both what you type and everything that the other person types as well.
The option to show my last conversation in new conversation windows will bring up your last conversation when you begin chatting with someone. For example, if you had an IM session with a friend a week ago, and then they send you an IM today, you will see the new IM immediately preceded by your conversation from last week. This can be helpful if you routinely chat with the same person about a topic, where review of an earlier conversation is beneficial.
When you are done, click the "Apply" button at the bottom of the screen. Now you are all set up to save your message history.
Live Messenger Move to Skype
Windows Live Messenger's move to Skype in March of 2013 means that the Skype platform is the new way to instant message for professionals. Skype has been a leader in cheap computer-to-landline calls for many years, and it's a great way to make free computer to computer calls around the world. Now, with the merger between Windows Live and Skype, instant messaging will be a primary focus as well.
Two things that you will want to know about Skype before you convert your Windows Live software to Skype is that the message history must be turned on separately and your old message history won't be attached to Skype.
Save Message History in Skype
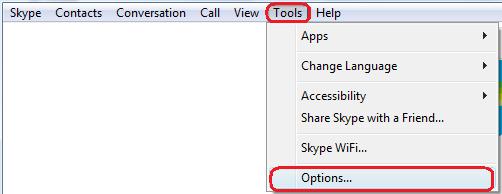
To turn on message history in Skype, select "Tools" from the menu, then select "Options".
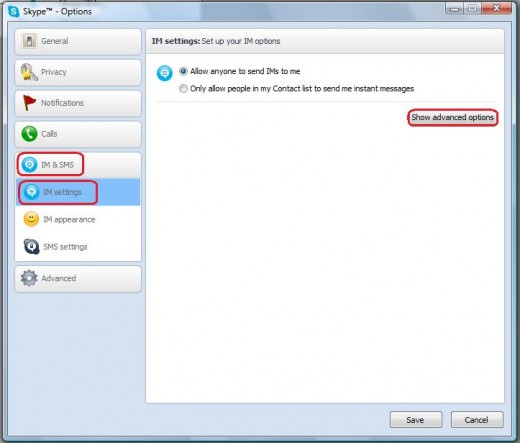
Once the options screen opens, select the "IM & SMS" tab on the left, then the "IM Settings" sub-tab. This will present a window with a button to "Show advanced options". Click this button to expand the page.
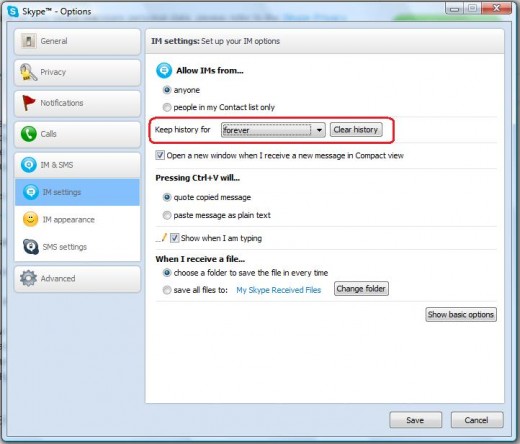
Once you have expanded the page to show the advanced options, you will see the history option. You can select to save no history, all history, or certain time periods from the menu. That's it! If you set up Skype to save messages, you'll be able to review what was typed whenever you like.
Saving Instant Messaging History
With these very simple options in both Windows Live Messenger and in Skype, you will never need to write down a chat sequence again. Just turn on the history tracking feature and forget it. Your conversations will be there when you need them.

