How to insert clip-art in Microsoft excel?
Clip-arts are small but effective graphical arts and animation available with the software and applicable in the associated files types. Microsoft Office Software contains many interesting clip arts in its software database. Moreover, in the online resource storage we can find even more clip arts. In this tutorial we will find out the easiest process to insert clip-arts in excel.
Get yourself ready
To do the process, we are using a computer which has Microsoft Excel installed in it. It would be better if you have an active internet connection with your computer.
Steps to insert clip-art in excel:
Step 1: Select the cell/s where you want to get the Clip-art to be inserted.
Step 2: Click on the Insert Tab from the Excel Ribbon.
Step 3: From the Illustrations portion of Microsoft Excel, Click on Clip-Art Option.
Step 4: A Column for Clip-arts will appear at the right side of the screen. Tick the Check-box beside the portion where it’s written- ‘Include Office.com content’.
Step 5: Type down the kind of clip art you are looking for in the text box of Search for.
Step 6: Click on Go button on the right side of the text box.
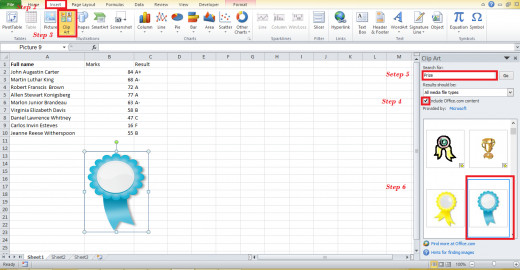
Step 7: After a short while at the blank box underneath will show up some clip arts. Now browse the list by scrawling and if you find something to insert- Double Click on the particular clip art.
Within seconds- the clip art will show up in your excel workbook. Now resize the clip art as you need.
Think more
If you do not tick the checkbox before searching, it will search and show results only from its small clip art database and produce less results. When we are ticking the tick box and allowing the software to collect clip art from Microsoft Office’s website’s resources- we will be able to find more and more Clip-Art results.

