How to install Linksys Wired Print Server Manually

How to configure Linksys Wired Print Server.
Many of us will be searching for step by step procedure for installation for Print Server. Here are steps which personally worked for me as well as for many of them.
1)Turn off your print server
2)Connect the print server to any of the available Lan port in your router.
3)Turn on your print server.Wait for the lights on your printer to be steady.
4)Connect the printer to the print server(Make sure the USB light on the print server is glowing).Now you press the reset button on the print server for 16secs.
5)We will get a test page with the ip address, subnet mask and default gateway.
6)If no test page is printed out turn off the router, print server and printer and leave it for 30 secs.
7)Then turn on the router and allow the lights on the router to be steady.
8)Now repeat the steps 4 and 5.
9)In the test page you will find an ip address like 192.168.1.x or 192.168.2.x(ex.192.168.1.102)
10)Open an internet explorer in the address bar type the same ip address http://192.168.1.101 and hit enter
11)Now it will prompt for an username and password.
Try username:space blank password:admin or username:admin and password:blank
12)Now you will be in the Linksys Print Server setup page.
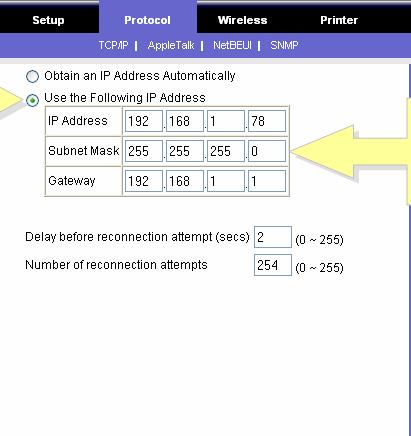
13)Click on Protocol tab and then select "Use the following IP Address"
14)Fill the details as below
Ip Address 192.168.1.78 Subnet Mask:255.255.255.0 GateWay:192.168.1.1
All these settings are valid if you are using Linksys router and print server.(Else verify the ip address of the router if it is in range 192.168.1.x then use 192.168.1.78.If it is in the range of 192.168.2.x then use 192.168.2.78.Assign the ip address to the print server in the range of your router)
15)Once the details are filled. Click Save.
16)Turn off both the router and print server once again.Wait for 39secs.
17)Turn the router first and then the print server. Wait for the all the lights to be steady on both router and print server.
18)Print server is configured.Next phase is to configure the LPR port.
19)In your Windows Computer,Go to Control Panel-->printers and faxes
You can see your printer listed with a tick mark like the one on the right side.
20)If you dont see a ticket mark then. Right click on the printer click on the option "Use printer online".
21)Now Right Click on the printer then click on properties.You will get a new window.
22)Click on the "Ports" tab.At the bottom click on "Add Port" button.
23)Now you will get "Add Standard TCP/IP Printer Port Wizard" dialogue in that select the type of port as Standard TCP/IP port.
24) Click Next
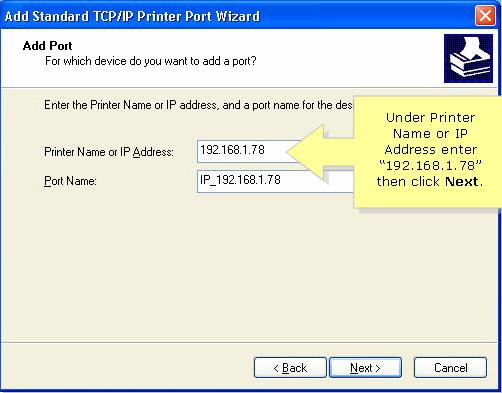
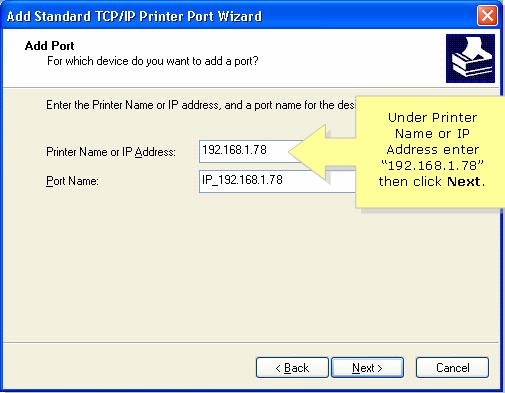
25)Now type the ip address of the print server in the Printer Name or IP_Address field:192.168.1.78. Port Name will be populate automatically.
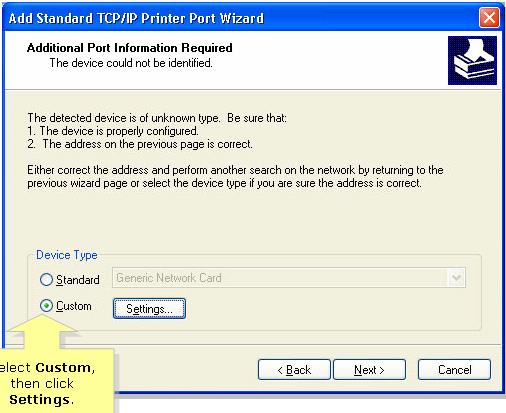
26)Click Next then select custom then click settings.
27)Under protocol select LPR. Click OK, then Next and Finish.
28) Try to Shoot a print out from your computer which is connected to your router. It should work.
Any further problem try calling the tech support 18005465797


