- HubPages»
- Technology»
- Internet & the Web»
- Social Networking»
How to use the NOTES application on Facebook - a step by step pictorial guide


Facebook Applications 101 - Using the Notes application
Facebook is the social networking giant so many of us use every day. Its created a stir no one denies anymore. It's changed the way online company's do business and communicate. It's also changed how the average user communicates with their family and friends. In this step by step pictorial article we're going to learn how to use the basics of the Facebook Notes application.
I work with a lot of first time Facebook users and people who are a little older or removed from social networking and don't understand all that Facebook has to offer. I'm asked all the time how to use features like Facebook notes. I'm writing this Hub to outline the basic features of the Notes application and help those users be able to begin to understand and use this tool. The notes application is a handy tool that many people don't take advantage of. I use it all the time.
A Facebook Notes fan page describes the notes application this way "With Facebook Notes, you can share your life with your friends through written entries. You can tag your friends in notes, and they can leave comments. The Notes application page displays notes recently written by
your friends, notes in which your friends have been tagged, and links to your own notes."
(source Facebook Notes Forum)
To start go to your Facebook profile page. Make sure you are not on the home page but your profile page. Once you're there, just follow this step by step how to guide and you'll be posting notes in no time.
Step One - Go to your Facebook Profile View
.")
Step Two - Click the Notes button
Once you are on your profile look right under your profile picture for the click-able Notes button. Circled here in yellow. Click on that button.

Step Three - Click the Write a Note button
The next step is to click on the Write a Note button, located in the upper right hand corner of the page you are now on. Identified in this pictorial by the yellow circle. Once you locate the button click it for the next step.
Write a note button shown here circled yellow

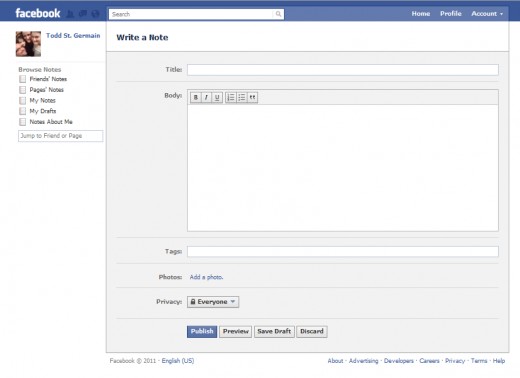
Step Four - Begin to Write your Note
In this step use the Notes page much like you would an email. Use the title line like you would the subject line in an email to inform your reader what you are writing about. Maybe it will be something personable or just something you are up to for that day. Regardless just write in the body area like you would an email. You may choose at this time to add bold, italic, or underline style to your text. This is not necessary but if you feel comfortable go ahead and do that too. It's a good way to cause your text to stand out on its own and draw attention to certain key words. Just don't over do it.
Facebook note - Looks much like an email
Step Five - Adding a picture to your post
This is where you can add a little personality to your note by adding a picture. If this is your first time you may want to skip this procedure and try it on your next note. If that's your decision skip down to the next step.
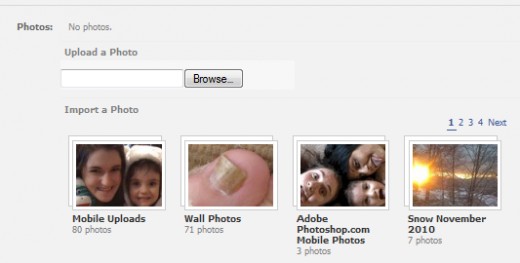
If you would like to add a picture start by either clicking the Browse box or by choosing one of your pictures you have uploaded earlier that are all shown here on this page. These albums are indicated below by the four picture thumbnails. Click on one of your photo album thumbnails to search your online Facebook library.
(If you have never uploaded a picture than you will need to just click the Browse Box).
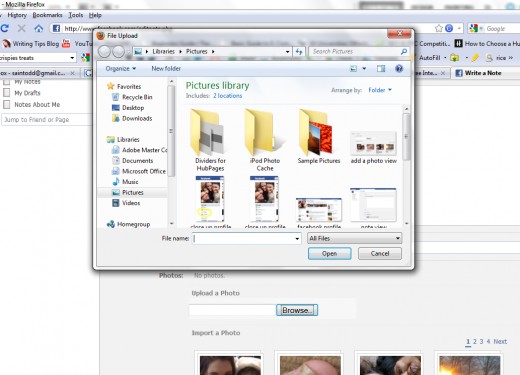
Once you click the Browse box another window will appear (see Adding picture step two screen shot below). Locate the picture on your computer you want to add and simply double click it on your PC, or the equivalent on your Mac. The picture will now appear in your post.
Add a picture step one
Adding a Picture Step Two - Computer photo library window
A little more about pictures
As you see in the picture below the picture you added is now show with the code <Photo 1> (indicated here by the yellow circle. This is showing you where the photo is in your notes post.
The red circle is a thumbnail of the picture also identified with the code <Photo 1>. If you were to add more than one picture these pictures would also appear here as a thumbnail and would be labeled appropriately. (ie <Photo 2> <Photo 3> etc.)
The green circle indicates the choices you have in the location of your picture in your post. Just follow the click-able graphic to place each photo where you would like it to be. Its simple and user friendly. Don't be afraid to play with it. If you make a mistake just delete the picture and upload it again where you want it to be in your notes post.

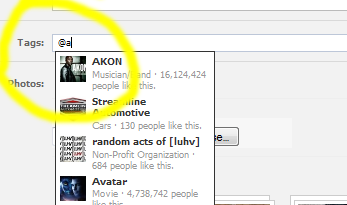
Step Six - tagging your friends in your note
If you would like to tag your friends(s) in your note simply use the tag feature. On the line that says Tags: (indicated here by the yellow circle) insert the @ symbol. Once you add a single letter after the @ symbol your address book will appear. Simply click on the friends you would like to add. To add additional friends just keep following this procedure.
Facebook changes the number of friends you can tag so be advised you will only be able to add the number Facebook allows at that time.
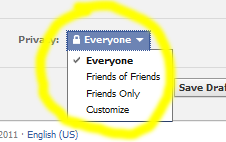
Step Seven - setting your privacy settings
By default your note is set so Everyone can read it once you publish it. The Privacy area is the area where you change that setting if you want to. You can set the Privacy settings so Friends of Friends can see it - meaning the Friends of your Friends can read your note even if they are not your Friends. You can set it so Friends Only can view it or you can set it to Customize which lets you set the Friends who can view it. This last Privacy setting is a good way to write a private note to just those who you'd like to read it. Click on your desired Privacy setting and go to the next step.
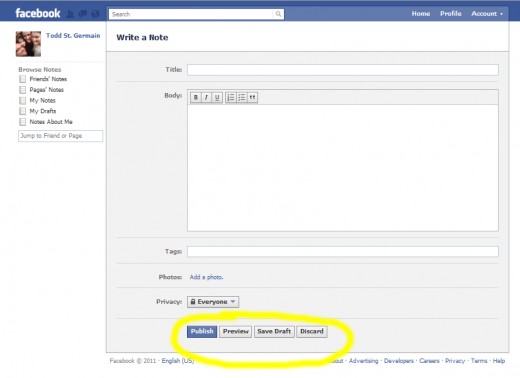
Step Eight - Preview and Publish
This is the stage where you check your spelling and make any adjustments you need to make. BEFORE you click the publish button I highly recommend you click the Preview button. Your note will appear in Preview as you will see it once you publish it. If you are happy with what you see close out the Preview view.
If you desire you can also Save Draft till later if there is some more editing or additions you need to make.
Now its time to click the Publish button. Are you ready? OK go ahead click it. Click it!
The Social Network Trailer
Step Nine - You're all done
That's it. You're done. Painless right. Now you're on your way to using a powerful tool on Facebook that is overlooked by most users. Your note will now appear on all of your friends News Feed as well as on the wall of those you tagged.
Enjoy this new feature. You'll be amazed on how much you use it. I hope this tutorial helped you out.
To learn more about this feature use the Facebook help area. Here is the link >Facebook Notes.
Happy Facebooking!
Facebook poll
What do you like most about Facebook
If you found this article helpful
Please VOTE it up, RANK it, and SHARE with your network.
Thank you!