HOWTO: Configure Multiple Static Public IP using Tomato by shibby

There are a lot of resources regarding multiple public IPs using tomato firmware in the internet but they do not provide detailed steps on how to do them or that most people just copy and paste then hope that it will work out for them.
So I have written another one of those guide to simplify them. The objective is help understand the concept so that the settings can be adjusted depending on your setup.
THE SETUP
Device and Firmware
Router: Linksys E2500
Router Firmware: Tomato by shibby ( Tomato Firmware 1.28.0000 MIPSR2-123 K26 USB Max )
Network
ISP Static IPs
xxx.xxx.xxx.10 - Router WAN Port
xxx.xxx.xxx.11 - Public IP for Mail Server
xxx.xxx.xxx.12 - Public IP for Web Server
xxx.xxx.xxx.13
xxx.xxx.xxx.14
Internal IP
192.168.10.11 - Mail Server
192.168.10.12 - Web Server
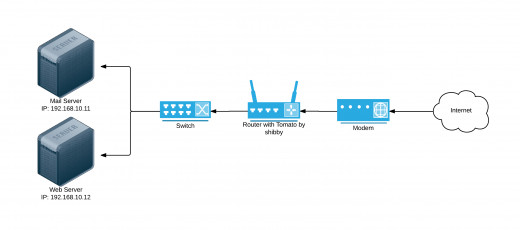
Below is a simple graphical illustration on how the network devices are connected. The setup can get complicated as you add more network devices but the concept on how they should be connected remains the same.
THE STEPS
Step 1: Verify VLAN ID
Check the VLAN ID (VID) of your WAN port. This can be done in
Advanced -> VLAN
In the picture below, the VID of my WAN port is VLAN2
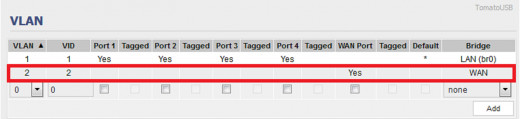
It is very important to know the VLAN ID because we will be creating additional virtual interfaces in the WAN port in order to use the extra IPs provided by the ISP.
This way, we can have multiple IPs in a single interface.
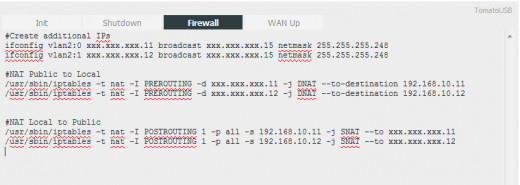
Step 2: Create Virtual Interface and NAT
To create additional virtual interface and set the IP Address,we will be using the ifconfig command.
This will be placed in
Administration -> Scripts -> Firewall
#Create additional IPs
ifconfig vlan2:0 xxx.xxx.xxx.11 broadcast xxx.xxx.xxx.15 netmask 255.255.255.248
ifconfig vlan2:1 xxx.xxx.xxx.12 broadcast xxx.xxx.xxx.15 netmask 255.255.255.248
Our network is /29 therefore there are 6 usable IPs. In this example our network is xxx.xxx.xxx.8 and xxx.xxx.xxx.9 would most probably be used by the modem as a gateway IP. The remaining 5 IPs are usable as outlined in our setup at the beginning of this tutorial.
Take note that our virtual interfaces are tagged as vlan2:(number). If you plan to use the remaining IPs in this setup, it should be assigned to vlan2:2 and vlan2:3.
Create Public to Local NAT
#NAT Public to Local
/usr/sbin/iptables -t nat -I PREROUTING -d xxx.xxx.xxx.11 -j DNAT --to-destination 192.168.10.11
/usr/sbin/iptables -t nat -I PREROUTING -d xxx.xxx.xxx.12 -j DNAT --to-destination 192.168.10.12
Create Local to Public NAT
#NAT Local to Public
/usr/sbin/iptables -t nat -I POSTROUTING 1 -p all -s 192.168.10.11 -j SNAT --to xxx.xxx.xxx.11
/usr/sbin/iptables -t nat -I POSTROUTING 1 -p all -s 192.168.10.12 -j SNAT --to xxx.xxx.xxx.12
Below is the actual screen shot
The ifconfig command can also be placed in
Administration -> Scripts -> WAN Up
I have tried and tested it. But the iptables should remain in Firewall.
Reboot the router to apply the changes.
Note: Every time that you make changes in the scripts section, the router needs to be rebooted to effectively apply these changes.
Step 3: Forward Ports
Now that everything has been created, the last step is to forward the ports that are going to be used. Without this, no service in your internal network can be access from the outside.
The example below will be able to provide SMTP, POP3 and IMAP service from your Mail Server. HTTP and HTTPS from the Web Server.
Aside from the added Forwarding Rules, the rest are default rules and is meant to serve as an example.
After the rules are defined, just press the Save button to apply the changes. No need to reboot the router.
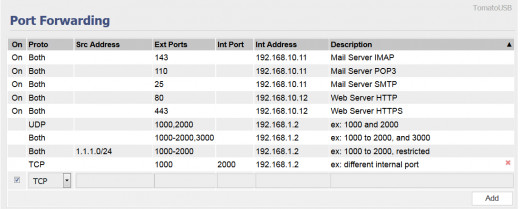
The last forwarding rule in this screen shot is an example wherein you can forward any other port to the actual ports that your server uses. Define a different port in the Ext Ports field and define the actual server port in the Int Port field.
With this, the setup is done. Anyone from the internet will be able to access services that you provide inside your private network.
Hopefully I have provided a simplified version of this tutorial to what is already out there. If you have any questions or comment/s, please provide them on the comment section below.
Related

How to Start a Wi-Fi Hotspot Business
 Part-II(Subnetting)")
Step-by-Step tutorial by expert to understand IP adressing and subnetting (CCNA context) Part-II(Subnetting)

How to Blanket or Cover a Large Area With Strong Wi-Fi

What is iPhone Baseband, Sim Lock and Jailbreak?

Installing Asterisk NOW and Configuring Soft Phones - Setup a simple VOIP system at home or office


