- HubPages»
- Technology»
- Computers & Software»
- Operating Systems
Install mysql and php on Ubuntu Server 12.04 LTS


Installing php, mysql is pretty straight-forward and easy in Ubuntu Server. You can download and install php, mysql by typing some simple commands.
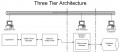
Here we will be installing php, mysql on Apache webserver. This will enable us to host our own website and web applications. Nowadays web applications are quite often seen instead of desktop applications for managing day-to-day operations in many places. Web applications are easy to deploy and maintain. Instead of having to maintain and install application on each client computer, web application resides on the server only. You can access the application from any computer on the network as easily as you would access websites.
php: - Allows us to program websites, instead of just displaying static web pages. php helps us in doing useful tasks like retrieving information such as user profile, contents, other information from databases. php adds the power of programming to web site, by this way your website would be more interactive and gives the user the power to do a lot of stuffs normally you would do manually, like making bookings, reservations, register user information or allow users to buy products from your website.
mysql: - The database which we are going to connect to our website. One of the most popular database that makes the backbone of many websites we use daily. Very frequently MySQL is used with php.
apache: - A very popular free open-source webserver which enables us to host websites on server.
phpmyadmin: - Very user-friendly web interface which allows you to manage MySQL databases using a Graphical User Interface (GUI). You can create databases, modify. Upload existing databases to server without knowing any SQL commands. SQL is the language of many databases including MySQL. phpmyadmin translates the information you input from the GUI to SQL. And you could also extract useful information as different formats like excel, pdf, sql. Monitor the usage and performance of database.
First let's update the software repository.

sudo apt-get update
Download and install Apache Webserver
Type the following commands to install Apache
sudo apt-get install apache2
Download and install php
Type the following commands to install php
sudo apt-get install php5
Connect Apache and PHP
This step is not required for this version of Ubuntu and php installation. However this step maybe required in older versions.
The actual purpose of this component is to connect php with Apache webserver.
sudo apt-get install libapache2-mod-php5
Download and install mysql
Install mysql server and php module for mysql5.
MySQL server is the application which manages database. When the Server is up, it keeps on running all the time, listening for database requests and returns data.
Enter a password when prompted, this will be required later when setting up phpmyadmin
sudo apt-get install mysql-server

sudo apt-get install php5-mysql
MySQL client sends queries to MySQL server for accessing the database. For this example we will be having both the client and server on the same machine. In some situations you might want to have a separate application server and a MySQL database server. In such situations you will have MySQL client on the application server which will connect to the MySQL database which is a separate machine.
Type this to install mysql-client.
sudo apt-get install mysql-client
Restart Web Server
Type the following command to restart Apache Server.
To test if your webserver is working. Type the IP Address of the Server from another computer and make sure the two computers are in the same network with the same range of IP addresses.
To find the IP address of the Server type "ifconfig" from it's terminal window. The name of the network adapter will start with the letters "eth", if it's the default network connection it will be "eth0". When you add another network adapter later on, it will read as "eth1".
sudo /etc/init.d/apache2 restart
Uploading website to your new server
So now php,mysql and apache is up and running. Here is the webserver directory where our website files should be placed.
/var/www/
We will create a shared directory for copying our website files and after copying we will transfer it to webserver's directory. Click the link below for information on how to create a shared directory
- How to make a File Server in Ubuntu Server 12.04 LTS
Make a File Server in Ubuntu Server which will enable to share files between Linux, Windows and other Operating Systems.
The shared directory is /myfiles.
To access the shared directory from another machines type: \\<server_name or ip>\Home Shared Folder
To copy any data to web server. First access the shared directory from another machine and copy data to it. Then from there we will use commandline from server to copy web pages to webserver or upload to database.
To copy a directory.
The command below will copy the directory "mynewsite" from the shared directory to web server.
sudo cp -r /myfiles/mynewsite /var/www
To copy multiple files and directories: In some cases you might want to copy all the files and directories you just copied to your shared directory and not just the files only.
The command below will copy everything in the shared directory "Home Shared Folder"
sudo cp -r /myfiles/* /var/www
To copy files only, excluding directories:
The command below will copy all the files in the root of shared directory "Home Shared Folder", excluding sub-directories and files that are within sub-directories.
sudo cp /myfiles/*.* /var/www
Accessing MySQL with terminal
Type "mysql" in the terminal to login to mysql, though logging like this might not grant you many privileges.
To login as the root or another user:
If you don't have a password no need to include the part after yourusername.
Syntax for logging to mysql:
mysql -h host -u yourusername -p yourpassword
In this example we won't be needing the part "-h host", because we have the client and server on the same machine. Now login to mysql.
mysql -u root -p
If you don't have a password, then try this
mysql -u root
Once you have logged into mysql, you can manage databases or create, edit, view using command line.
Install phpmyadmin
To install phpmyadmin, type the following command. Installation will guide you through a few steps and your setup is finished
sudo apt-get install phpmyadmin
Select web server
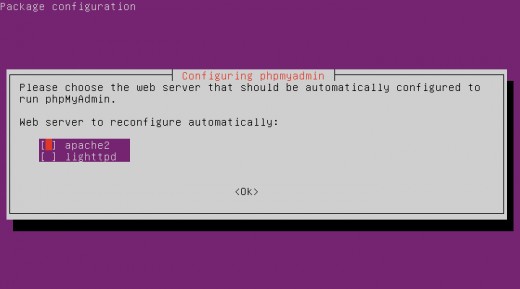
1. Select apache and press enter.
Connect Database
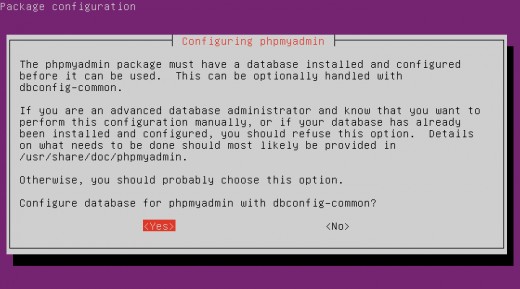
2. Select yes for database connection.
Enter MySQL password
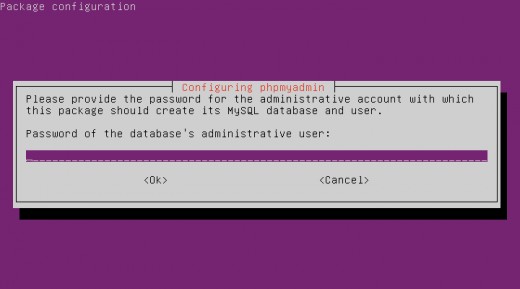
3. Enter the password, you entered during MySQL installation.
Set phpmyadmin password
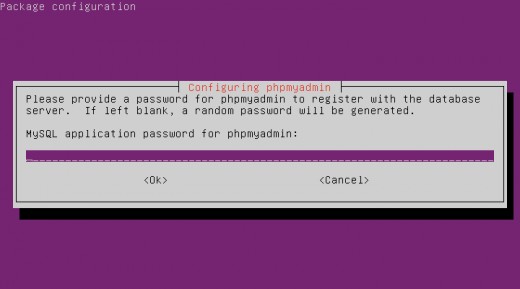
4. Enter a password for phpmyadmin. This will be used to access the phpmyadmin web page.
Upload Database using Terminal
To upload files, first copy the sql files to the shared directory we have created in the section "Uploading Website files"
And login as the root account
mysql -u root -p
After logging into mysql, create a new database.
create database testdb;
Now select our newly created database
use testdb;
And finally upload our database from the sql file to the new database.
source /myfiles/yoursqlfile.sql;
Hope this guide helped you in setting up your web server. This is a very simplified and basic setup. Learn more about fine tuning mysql, php and apache. Configuration settings are kept in text files and are very straight-forward which enables you to control the features easily. Web servers are easy to deploy and setup. It can be a perfect solution to automate the workflow of your office environment.