Programming Internet of Things (IoT) using CloudMQTT - Part 1

What is MQTT
MQTT (Message Queuing Telemetry Transport) is publish-subscribe-based messaging protocol for IoT. It is designed for Machine-to-Machine (M2M) communication, therefore it promises fast communication speed. It also lightweight protocol suitable for low resource constraint devices. More information on MQTT protocol can be found here.
The CloudMQTT Platform
For using MQTT protocol you need to have an MQTT broker installed. The CloudMQTT platform is managed, ready to use MQTT broker for IoT. All you need is to have an account on this platform. For initial project it offers a free account called 'Cute Cat' which has some limited features but a right place to get started.
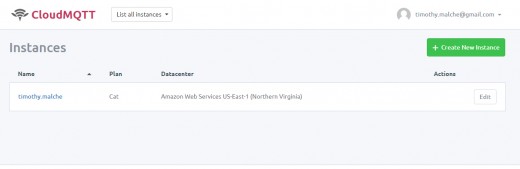
After login you will see an instance created for you. If it doesn't then you need to create one. You can create an instance by clicking 'Create New Instance' button as shown in following figure.
when you click the button, a dialog box will open for creating new instance. Select the fre 'Cute Cat' plan, specify region and confirm.

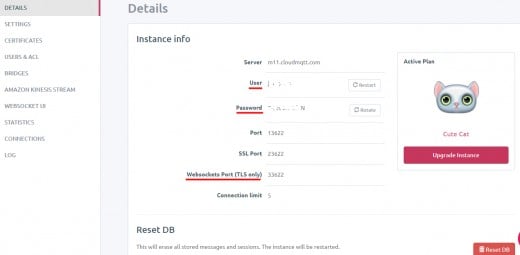
click on the instance and note down your user id, password and websocket port number and shown in following figure. It is the configuration information that we will use in our code.
In this example I'll be using Paho-MQTT Javascript library. I have created to modules, the publisher and the subscriber. The published module publishes a message on MQTT topic and the subscriber is subscribing to the same MQTT topic. The code for publisher and subscriber is given below.
Publish.html
<!DOCTYPE html>
<html>
<head>
        <script src="https://cdnjs.cloudflare.com/ajax/libs/paho-mqtt/1.0.1/mqttws31.js" type="text/javascript"></script>

</head>
<body>

<h1>MQTT Client 1 : Publisher</h1>
Input Message to Send: <input type="text" id="txtMSG">
<button onclick="sendMessage(document.getElementById('txtMSG').value)">SEND</button>

<script type="text/javascript">


 client = new Paho.MQTT.Client("m11.cloudmqtt.com", 33622,"web_" + parseInt(Math.random() * 100, 10));


  client.onConnectionLost = onConnectionLost;
  client.onMessageArrived = onMessageArrived;

 var options = {
    useSSL: true,
    userName: "**********",
    password: "**********",
    onSuccess:onConnect,
    onFailure:doFail
  }


  client.connect(options);

  function onConnect() {
    console.log("onConnect");
    client.subscribe("esp/test");

  }

  function sendMessage(msg) {
    message = new Paho.MQTT.Message(msg.toString());
    message.destinationName = "test/msg";
    client.send(message);
  }

  function doFail(e){
    console.log(e);
  }


  function onConnectionLost(responseObject) {
    if (responseObject.errorCode !== 0) {
      console.log("onConnectionLost:"+responseObject.errorMessage);
    }
  }

  function onMessageArrived(message) {
    console.log("onMessageArrived:"+message.payloadString);
  }
</script>

</body>
</html>
Please specify websocket port number in following code as i have specified 33622
client = new Paho.MQTT.Client("m11.cloudmqtt.com", 33622,"web_" + parseInt(Math.random() * 100, 10));Please specifi your user id and password instead of **********
var options = {
    useSSL: true,
    userName: "**********",
    password: "**********",
    onSuccess:onConnect,
    onFailure:doFail
  }
Subscribe.html
<!DOCTYPE html>
<html>
<head>
<script src="https://cdnjs.cloudflare.com/ajax/libs/paho-mqtt/1.0.1/mqttws31.js" type="text/javascript"></script>
</head>
<body>
<h1>MQTT Client 2 : Subscriber</h1>
Message From Broker: <h2 id="msg"></h2>


<script type="text/javascript">
client = new Paho.MQTT.Client("m11.cloudmqtt.com", 33622 ,"web_" + parseInt(Math.random() * 100, 10));


client.onConnectionLost = onConnectionLost;
client.onMessageArrived = onMessageArrived;

var options = {
useSSL: true,
userName: "**********",
password: "**********",
onSuccess:onConnect,
onFailure:doFail
}

client.connect(options);


function onConnect() {
console.log("onConnect");
client.subscribe("test/msg");
}


function onConnectionLost(responseObject) {
if (responseObject.errorCode !== 0) {
console.log("onConnectionLost:"+responseObject.errorMessage);
}
}

function doFail(e){
console.log(e);
}

function onMessageArrived(message) {
console.log("onMessageArrived:"+message.payloadString);

document.getElementById("msg").innerHTML = message.payloadString;

}

</script>

</body>

</html>
please do not forget to specify same user id, password and websocket number in both code. Also remember that I am using topic 'test/msg' in this examples which both the module uses.
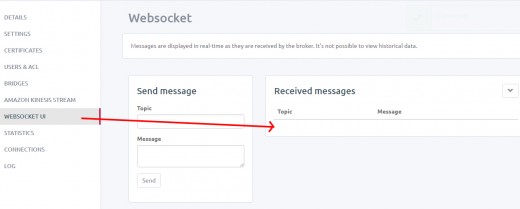
To check whether the message has arrived on CloudMQTT server you may use the WebSocket UI on CloudMQTT platform as shown in figure below.
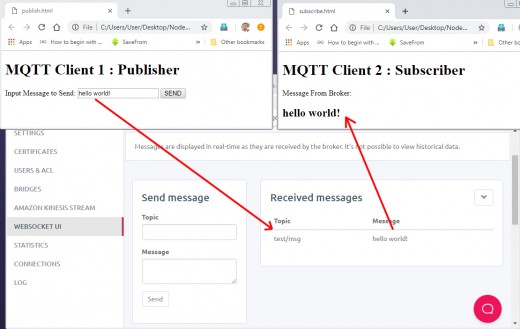
Now first run the publish.html and then subscribe.html and also make sure that you are logged in to CloudMQTT server's WebSocket UI to check message.
Enter any message in the text box in publish.html and click send. You will see that the message will be published to CloudMQTT broker and at the same time the scribe.html client also display the same message. The whole process in represented in following figure.
In this example I have used simple JavaScript based client to publish a message to MQTT broker. In a typical IoT system this will be your IoT Sensor Node publishing data (i.e. Temperature data) collected from attached sensor to the broker.


