Introduction to C Sharp Programming


INDEX
- Introduction
- What You’ll Need
- Starting a New Project
- Objects and Properties
- Writing Code
- Hello World Conclusion
- Back to Basic
- Variables
- Declaring and Defining Variables
- Casting Types
- Converting Between Strings and Numbers
- Adding Methods to a Class
- Value Types vs Reference Types
- Arrays, Lists, and Collections
- Constants and Enumerations
- Flow-Control Statements
- Structures
- Classes and Objects
- Other Class Methods
- Finally
Introduction
The C# language is one of the most popular application development languages in the commercial arena. It's implementation ranges from professional business applications to web services and games, with platforms such as PC, Windows Store, Windows Phone, and even Xbox.
What You'll Need
We'll be using Microsoft's Visual Studio IDE (Integrated Development Environment), which is the most commonly used tool for developing C# applications. You can download and install Visual Studio Express for free from the link below. In this tutorial, we'll be using Visual Studio 2013.
- Downloads | Visual Studio
Download free 90-day trials of Visual Studio products, free Visual Studio Express products, and additional Visual Studio software.
Starting a New Project
Let's jump in and create a simple application to give you a feel for C# and the IDE.
- Open Visual Studio.
- From the menu, select File > New > Project
- In the New Project dialog, select Windows Desktop from the templates and Windows Forms Application from the available template list.
- Name your project "HelloWorld" (without the quotes) and click Ok.

You’ve just created a new windows application called "HelloWorld" which will be located in your \documents\visual studio\Projects folder. This is the standard template for a windows application. Full versions of Visual Studio may include templates for Store Apps, Web Apps, Windows Phone, and more.
Once the project has loaded you’ll be presented with the development environment. A typical layout would include the following components. If you cannot see them, they may be minimized to a side. You can also activate them from the View menu.

- Menu – The IDE menu.
- Toolbox – A list of tools you can drop into your application like buttons and text boxes etc.
- Error List – A list displaying errors in your code.
- Solution Explorer – Shows all the files in your project.
- Properties – Displays the properties and events of the current selected object.
- Edit Area - This is where you'll change the user interface and code of your application.
At this point you can run your application by clicking the Start button (green play arrow) on the top menu. Even without much functionality, this is still a complete Windows application. You can close the application with the X button on the window or click the Stop button (red square) on the IDE's menu.
Objects and Properties
Close your application if it is still running to place you back in edit mode in the IDE.
First, let’s rename “Form1” to give it more meaning in the project. Right-click on "form1.cs" in the Solution Explorer pane and rename it to “frmMain.cs” (take note of the abbreviation and casing). A popup message will ask to rename all references to this element. Click Yes.
You’ll notice that your form (window) still has a title of "Form1". We can change this in the form’s properties.
- Select the form in the edit area to make it the active object. The Properties pane will reflect properties related to the current selected object.
- In the Properties pane, scroll down to the Text property and change its value from "Form1" to "Hello World". The new title will appear on the form once you click away from the property.
Now it’s time to make the application do something. We’ll add four objects (tools) to the form; a Label displaying "Name", a Textbox for entering a name, a Button to click, and a central Label for display the result.

- Resize the form using the corner handle to give you more space for adding the objects.
- In the Toolbox, find and double-click Label. A Label will be added in the upper left corner of the form. This will be the "Name" label.
- Drag it to a more appropriate position as shown in the example above.
- In the label’s properties (make sure the label is selected), change its (Name) property (the third property in the list) to "lblName" without the quotes.
- Change its Text property to "Name", also without quotes.
- Next, from the Toolbox, double-click Textbox and drag the added object next to the Name label. You may also want to stretch it a bit longer.
- In the new Textbox’s properties, change (Name) to "txtName".
- Add a Button from the Toolbox, by double clicking it, and drag it next to the Textbox as shown in the example.
- Change the Button’s (Name) property to "btnSayHello" and its Text property to "Say Hello".
- Finally, add another Label to the form and drag it to below the three objects already added.
- Change its (name) property to "lblSayHello".
- Change its AutoSize property to false by simply double-clicking on the true.
- In its BorderStyle property, select FixedSingle from the list.
- Set its Font property to a larger size, like 16.
- Empty its Text property so it displays no text.
- Size the label as shown in the example and resize the form to neatly surround the added objects.
Wow, that’s quite a list of property changes, but did you notice we gave a unique name to every object we added. This is important for referencing a specific object in code. Also, when changing properties of an object, we change its behaviour and the way it’s rendered.
If we clicked the Start button on the menu, it will automatically save, build (compile) and then run the application. Before we do that, let’s do a build just to see if everything is working. Select Build > Build Solution from the menu. If everything is working, the words “Build succeeded” will appear in the very bottom blue bar of the IDE. You can open the Output pane from the bottom of the IDE or from the View menu to see the results of the build.
When the IDE builds / compiles your application, it checks for any errors in your code and generates a binary executable file of your application. This means you can run your application on any other Windows computer. The executable, in this case “HelloWorld.exe” will be located in your documents\visual studio\Projects\HelloWorld\HelloWorld\bin\Debug folder. For this project, the .exe file is all you require to run your application.
If the build failed, recheck the steps above again. Once the build succeeded, click Start on the IDE menu to run your application. You’ll be able to enter text into the Textbox, but nothing seems to happen when you click the Button. This is because we haven’t given it any instructions yet. Here is where you’ll write your first line of C# code.
Writing Code
Close your application to put the IDE back in edit mode. Then double-click on the button on your form to open the code associated with this form.

kIf you’re new to C#, the code may seem daunting but it’s simple once you understand its different parts. At the top there’s a list of using statements. These are libraries containing prewritten code such as rendering and handling forms, buttons, textboxes etc. So you don’t need to reinvent the wheel.
Below that, is a namespace. This simply says everything here belongs to the “HelloWorld” project. Notice C# uses curly brackets to indicate blocks which contains code belonging to that element.
Inside the namespace block is a class. A class is a description / template of an object. In this case our form “frmMain” is the object. The class block in turn, holds all the functionality of our form object. We’ll discuss classes and objects in more detail in the coming sections.
Notice there are two smaller blocks of code inside the class. These are called methods of the object. In other words, they’re the actions of the object. The first method, public frmMain, is a constructor method. This simply gets your form and its added objects started.
The second method, private void btnSayHello_Click, was added when you double-clicked the button on your form. This will tell the application what to do once the button is clicked. Notice its name contains the unique name we gave the button and the word “Click” to indicate this is a click event. An event is something that happens with an object and the object responds by telling the application something happened to me. In this case, the button was clicked. More about events in the coming sections.
When the button is clicked, we want to change the Text property of the label lblSayHello. We do this by assigning a value to lblSayHello.Text. This has the same effect as changing its Text property in the Properties pane, except here we do it with C# code.
We assign the textbox’s Text property, txtName.Text, plus a literal string “says, Hello World!” to lblSayHello.Text. Notice that a literal string in C# is enclosed in double quotes and also, a statement always ends with a semi-colon (see red highlighted text above).
Once you’ve entered the code correctly, you can run your application again, enter a name in the textbox and click on the "Say Hello" button. The name and added literal string will be displayed in the central label. If an error occurred during the build, check that you entered the line of code exactly as shown. Casing is very important in C#, so LblNAME means something different than lblName.
Hello World Conclusion
That was quite a quick and basic introduction to Windows Forms Applications. There’s still a bunch of tools in the Toolbox to play with like the List, Dropdown, Picture, Menu, etc. We encourage you to play around with these tools. A good reference book is “Windows Forms Development” by Microsoft Press or you can visit the Microsoft Developer Network (MSDN) for up-to-date information about the various tools and the C# language.
- Learn to Develop with Microsoft Developer Network | MSDN
Find the latest resources for developers. On Microsoft Developer Network, you can learn to build apps for the web, Windows Phone, and Xbox.
In this tutorial however, we want to focus on the C# language itself. So, we’ll be using the Console Application template to create simple text based applications without the overheads of Windows Forms.
NOTE To turn on line numbers in your editor; on the IDE menu go to Tools > Options > Text Editor > C# and tick the Line Numbers box.
Back to Basics
In this tutorial however, we want to focus on the C# language itself. So, we’ll be using the Console Application template to create simple text based applications without the overheads of Windows Forms.
You are presented with the very bare minimum of a C# program. But there are still a bunch of using statements at the top. Most of those libraries we won’t be using at this time. You can remove unused libraries by right-clicking on the class name, in this case "Program", and select Organize Usings, then Remove Unused Usings. Even if you left the unused usings in your application, the compiler will only include those functions it requires in the final binary executable file.


You can also remove string[] arg from inside the Main method’s parantheses. This leaves you with a clean empty C# program. As you can see from the example, it still requires the System library, which contains the fundamentals of the language. The System using is almost always present.
NOTE Your project is actually known as a Solution, as you can see in the Solution Explorer pane. The program is known as an Assembly. A solution may contain more than one assembly. For example, you may have one assembly dedicated to data access and another your main assembly that consumes the data.
The namespace again specifies that everything in this block belongs to the "Basics" assembly (program), and inside its block you’ll find the starting class Program. Inside the Program class is its first member, the method Main. This is the starting point of your program. Let’s have a closer look at this line.
The Main method has two words preceding it; static and void. The static means there can only be one instance of Main and it is always loaded and present while the application is running. The void indicated what the method will return if called. Since Main returns no value, it’s return type is void. You’ll get more familiar with this when we start adding our own methods to the class.
Inside the Main method we’ve added two statements. Both are calls to methods in the Console class. Just like Main is a member of the Program class, so WriteLine and ReadLine are members of the Console class. The Console class resides in the System library.
The WriteLine method writes a line of text to the console window. The ReadLine in this case, simply waits for you to press Enter before exiting the program. Without the ReadLine the program will simply run and exit before you have a chance to view the results.

Variables
Variables are containers that hold values which, as the name implies, changes during the course of an applications lifetime. A variable has a name, a value and a type.
Name – The name may be anything you choose, with the following restrictions; it may only contain characters a-z, A-Z, 0-9, and underscore, and it may only start with an alphabetic character or the underscore. Convention amongst C# developers is to use camel casing where the first letter is always lower-case and following words start with upper-case, for example: myAccount, _ageRestriction, loginName. Class and method names however, start with upper-case letters.
Type – Following is a table with the C# language’s build-in value types and their range of values. C# is a highly typed language. It needs to know what kind of data you’re going to store so it can optimize memory usage. You may combine these types to build custom types as you’ll see when we start writing classes and structures.
.NET Framework Build-in Value Types
Keyword
| Bytes
| Range
|
|---|---|---|
sbyte
| 1
| -128 to 128
|
byte
| 1
| 0 to 255
|
short
| 2
| -32768 to 32767
|
ushort
| 2
| 0 to 65535
|
int
| 4
| -2147483648 to 2147483647
|
uint
| 4
| 0 to 4 294 967 295
|
long
| 8
| -9.223E+18 to 9.223E+18
|
ulong
| 8
| 0 to 1.844E+19
|
float
| 4
| -3.402E+38 to 3.402E+38
|
double
| 8
| -5.0E+324 to 1.7E+308
|
decimal
| 16
| -7.923E+28 to 7.923E+28
|
bool
| true or false
| |
char (unicode)
| 2
| 0 to 65535
|
string
|
Declaring and Defining Variables
The code below declares one string variable called name. Then the Console writes a message, asking for the user’s name. Notice it uses Write, not WriteLine. The Write method won’t automatically jump to the next line so it waits after the question mark for the user’s input.
using System;

namespace Basics
{
   class Program
   {
      static void Main()
      {
         string name;

         Console.Write(“What is your name? “);
         name = Console.ReadLine();

         Console.WriteLine(“\nHello, “ + name);
         Console.ReadLine();
      }
   }
}

// What is your name? James
//
// Hello, James
The ReadLine method, now assigns the user’s input to the variable name and displays a greeting message. This WriteLine includes a “\n” in the message. These are called Escape Characters and this particular one is the new line escape character. It will skip a line before writing the rest of the message.
At the bottom we have one line comments. Anything following "//" is a comment for yourself or other developers. The compiler will ignore any comments. You may also create a block of comments by starting with "/*" and ending the block of text with "*/". Everything between will be treated as a comment.
Variables can be declared and defined in various ways as shown in the example below.
int calc;
int b = 5, result;

result = b * 10;
calc = result / 5;

// result will be 50
// calc will be 10
The variable types sbyte to ulong, as shown in the table, are all integers (whole numbers) and can simply be assign a value within their relative ranges.
The float, double, and decimal types are floating-point variables that can have decimal digits after a point. For the compiler to know which value is what type, the float and decimal uses suffix characters to mark them. A float is followed by an “f” and a decimal is followed by an “m”. A good way to remember that decimal values must be suffixed with an “m” is to know that decimal types are almost always used for money values, hence the “m”.
float myFloatValue = 1.56f;
double myDoubleValue = 1.56;
decimal myDecimalValue = 1.56m;
Casting Types
Sometimes it’s necessary to assign one type of variable to another type. A rule of thumb is that you can always assign a smaller type to a larger type, otherwise you need to do an explicit cast.
// byte to integer needs no cast
byte myByte = 56;
int myInt;

myInt = myByte;

// Integer to the smaller byte type requires a cast
myInt = 250;
myByte = (byte)myInt;
To cast the integer above to a byte type we placed the type we want to cast to in front of the integer in parentheses. Important to note is that if the integer value exceeded the range of the byte type, the byte will contain corrupted data. This could also be used to our advantage.
float value = 15.88
int wholeNumber;
float fraction;

// casting the float value to an int
// will drop the fraction part, giving us 15
wholeNumber = (int)value;

// subtracting the whole number from the
// float value will retrun only the fraction part 0.88
fraction = value – wholeNumber;
In a calculation statement, C# will automatically cast all values to the biggest type in the statement. In the example below, we have to explicitly cast the calculated value back to a byte since b is the bigger integer type, making the entire calculation an integer result.
byte a = 10;
int b = 25;
byte result;

result = (byte)(a + b);
The bool, char, and string types have their own specific ways of assigning values to them; the bool will only accept true or false (in lower-case), the character must be in single quotes, and the string must be in double quotes.
bool isEmpty = false;
char firstInitial = ‘J’;
string name = “James”;
Converting Between Strings and Numbers
C# is an Object Oriented Programming (OOP) language. Meaning, just about everything in C# is an object. That includes the variable types. Since objects have methods, as we’ve seen so far, variable types have methods too.
Here we’ll see that the type int has a TryParse method which will attempt to convert a string into an integer. We also see that a variable of type int has a ToString method which converts the integer to a string.
using System;

namespace Basics
{
   class Program
   {
      string userInput;
      int value;

      // get input from user
      Console.Write(“Enter a value: “);
      userInput = Console.ReadLine();

      // value will be zero if userInput is not a valid integer
      int.TryParse(userInput, out value);

      // convert value back to a string
      userInput = value.ToString();

      Console.WriteLine(“\nValue = “ + userInput);
      Console.ReadLine();
   }
}
The TryParse method has two parameters; the string to convert, and the integer variable that will store the result. The out keyword is used because the method definition specifies this is an output only parameter. More about parameters in the next sections.
Adding Methods to a Class
A method contains code you want to reuse over and over without having to retype the code every time. In the following example, we create a method called FullName, which accepts two string variables, adds them together, and returns the resulting new string.
using System;

namespace Basics
{
    class Program
    {
        static void Main()
        {
            string firstName, lastName;

            // get user input
            Console.Write("What is your first name? ");
            firstName = Console.ReadLine();
            Console.Write("What is your last name? ");
            lastName = Console.ReadLine();

            // call method FullName
            string yourName = FullName(firstName, lastName);
            Console.WriteLine("\nYour Name =  " + yourName);
            Console.ReadLine();
        }

        static string FullName(string first, string last)
        {
            string full = last + ", " + first;

            return full;
        }
    }
}
The method FullName is defined as a static method because it is called from a static method Main. It will return a string variable and it has two string parameters. In the Main method, we call the FullName method and pass firstName and lastName as arguments for its parameters. FullName then does its thing and returns the new string value to the yourName variable.
Value Types vs Reference Types
When you pass a value type variable (see build-in value types table) to a method, you are actually only passing the value, not the variable itself. So if you were to make changes to the variable inside the method, the variable will still hold its original value after the method call.
static void Main()
{
   string someValue = "John Doe";

   Console.WriteLine("Before method call, value =  " +
                      someValue);  // John Doe

   // Call the method
   ChangeValue(someValue);

   Console.WriteLine("After method call, value =  " +
                      someValue);  // Still John Doe

   Console.ReadLine();
}

static void ChangeValue(string value)
{
   value = "Unknwon";
}
If we wanted the value to change, we need to pass its reference to the method. To do this, we specify the method’s parameter as a reference type and we pass the value as a reference type, using the ref keyword.
static void Main()
{
   string someValue = "John Doe";

   Console.WriteLine("Before method call, value =  " +
                      someValue);  // John Doe

   // Call the method
   ChangeValue(ref someValue);

   Console.WriteLine("After method call, value =  " +
                      someValue);  // Still John Doe

   Console.ReadLine();
}

static void ChangeValue(ref string value)
{
   value = "Unknown";
}
The classes / objects are by default reference types so you need not use the ref keyword. More about that when we discuss classes and objects.
Arrays, Lists, and Collections
Often you would like to store a list of similar data, like the test results of 30 students. We could create 30 variables, one for each student, but that’s really unproductive.
Arrays
In the following code we create two arrays, one that holds int variables and another to hold char variables.
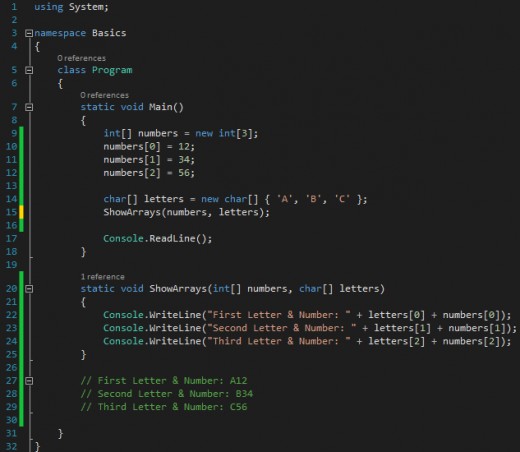
In line 9, we declare the numbers array. First we specify the type of data it will hold followed by closing square brackets, then we give the array a name like we do with any variable name. Following the assignment operator (=), we create a new int array and specify the number of values it must hold. In this case it can hold three values.
Following the array declaration, we add actual values to each one of its indexed positions. Take note that all arrays and lists are zero based, meaning their indices begin at 0. So for our numbers array that holds 3 ints, the index range is 0, 1, and 2.
Line 20 shows a different way to initialize an array. We specify the values in the array in-line with the array declaration. Notice we do not specify the size of the array since this will be derived from the number of elements in the suffixed list.
A problem with arrays is that they are fixed in size. You cannot change its size once created unless you completely recreate it. Other problems are; you cannot search the array, and you cannot sort the array. Arrays are good for holding a fixed number of changeable values.
Multi-dimensional Arrays
Arrays can also be multi-dimensional consisting of two or more dimensions. Here we created a two dimensional array, like a grid or table with columns and rows that represents the numbers on a keypad. Notice the comma used in the array declaration and the method’s parameter.
static void Main()
{
   int[,] numbers = new int[3,3];
   numbers[0,0] = 1;
   numbers[1,0] = 2;
   numbers[2,0] = 3;
   numbers[0, 1] = 4;
   numbers[1, 1] = 5;
   numbers[2, 1] = 6;
   numbers[0, 2] = 7;
   numbers[1, 2] = 8;
   numbers[2, 2] = 9;

   ShowArray(numbers);

   Console.ReadLine();
}

static void ShowArray(int[,] numbers)
{
   Console.WriteLine(numbers[0, 0] + " " + numbers[1, 0]
                     + " " + numbers[2, 0]);
   Console.WriteLine(numbers[0, 1] + " " + numbers[1, 1]
                     + " " + numbers[2, 1]);
   Console.WriteLine(numbers[0, 2] + " " + numbers[1, 2]
                     + " " + numbers[2, 2]);
 }

 // 1 2 3
 // 4 5 6
 // 7 8 9
Staggered Arrays
You may also want to create different lengths for each dimension. This is called a staggered array because it doesn’t form a neat square grid, but instead have a different number of columns for each row. Notice how the declaration has more than one set of square brackets for each dimension. The last dimension does not have a size since you’ll initialize each row independently with its own number of columns.
static void Main()
{
   int[][] numbers = new int[3][];
   numbers[0] = new int[2] { 9, 8 };
   numbers[1] = new int[4] { 7, 6, 5, 4 };
   numbers[2] = new int[3] { 3, 2, 1};

   numbers[1][2] = 14;

   Console.ReadLine();
}
Lists
Lists are very powerful structures in the C# language. Unlike arrays, lists can be added onto, inserted into, removed from, sorted and searched. Lists are generic collections (see MSDN). You will have to add a using statement to your code as shown below.
using System;
using System.Collections.Generic;

namespace Basics
{
    class Program
    {
        static void Main()
        {
            List<string> people = new List<string>();

            people.Clear();  // empties the list
            people.Add("John Doe");
            people.Add("Jane Doe");

            Console.WriteLine(people[0]);
            Console.WriteLine(people[1]);

            Console.ReadLine();
        }
    }
}
Notice the angled brackets in its declaration which specifies the type of data it holds.. Also, creating the new list is almost like calling a method. The List is an object with methods. Here we call the Clear and the Add methods.
We’ll show how to loop more efficiently through these lists and arrays in a following section. Other collection types you may want to explore are ArrayList, SortedList, Queue, Stack, Hashtable, BitArray, StringCollection, and StringDictionary.
Constants and Enumerations
Constants
A constant is simply a name with a value that never changes. The name is usually all capitals. Notice you have to use the keyword const and specify a type in the declaration.
static void Main()
{
   const int LIGHTSPEED = 299793458;

   Console.WriteLine(“Light Speed = “ + LIGHTSPEED + “ m/s”);
   Console.ReadLine();
}
Enumerations
An enumeration is a list of names associated with a group, like the months of a year or the days of the week as shown in the following example. Notice the use of the enum keyword. Also, enumerations usually starts with a capital letter.
class Program
{
   public enum WeekDay { Sun, Mon, Tue, Wed, Thu = 101, Fri, Sat };

   static void Main()
   {
      WeekDay monday = WeekDay.Mon;
      WeekDay sunday = (WeekDay)0;
      WeekDay friday = (WeekDay)102;

      Console.WriteLine(monday); // Mon
      Console.WriteLine(sunday); // Sun
      Console.WriteLine(friday); // Fri

      Console.ReadLine();
    }
}
The enumeration assigns values to each name in its list, starting from 0. You may however assign your own values. Here we assigned Thu the value 101. Every name following will increment from 101, so Fri is 102 and Sat is 103. When we declare variables with our new WeekDay type, we can either assign a name from the WeekDay list, or cast its corresponding value.
Flow-Control Statements
Flow-control statements are what makes a program a program and not just a list of instructions. It allows your program to make decisions to determine what code to run next. It also permits you to repeat or loop certain sections of code. Flow-control statements are generally divided into decision statements and loop statements.
The if Statement
The if statement is the most fundamental and most used flow-control statement in a program. It allows you to evaluate if an argument is true or false and then respond accordingly.
static void Main()
{
   string password = "knight";
   string userInput;

   Console.Write("Enter Password: ");
   userInput = Console.ReadLine();

   if (userInput == password)
   {
      Console.WriteLine("\nWelcome Sir.");
   }
   else
   {
      Console.WriteLine("\nAccess Denied!");
   }

   Console.ReadLine();
}
Following the if keyword are parentheses which evaluates an argument. If the result is true, the block following the if is executed. Optionally, you may add the else keyword which will execute a block of code if the argument resulted in false. Notice the double equal sign is used to test equality. This is part of the Relational Operators. They always evaluate to a Boolean value, either true or false.
(A < B) Is A less than B
(A <= B) Is A less than or equal to B
(A > B) Is A greater than B
(A >= B) Is A greater or equal to B
(A == B) Is A equal to B
(A != B) Is A not equal to B
(!A) Is A false (given A is a Boolean argument)
static void Main()
{
   int a = 10;
   int b = 5;

   if (a > b) Console.WriteLine("A is greater than B.");

   int biggest = (a > b) ? a : b;
   Console.WriteLine("Biggest value = " + biggest);

   Console.ReadLine();
}
In the above example, we didn’t create a block of code for the if statement, simply because we only have one statement to execute. The next statement uses an inline evaluation to return the biggest of the two values. First it does an evaluation, followed by a question mark. If the result is true it will assign the value of a to the variable biggest. Else, indicated by the colon, it will assign the value of b to the variable biggest.
A Boolean expression may also contain Logical Operators such as AND and OR, respectively represented with && and || in code. They combine two Boolean arguments in a logical way. In the case of AND, both arguments must be true for the result to be true. In the OR case, only one argument or the other needs to be true for the result to be true.
static void Main()
{
   string carColor = "Red";
   int carTankSize = 25;

   if (carColor == "Red" || carColor == "Green")
      Console.WriteLine("The car is either red or
                         green.");

   if (carTankSize >= 25 && carTankSize <= 50)
      Console.WriteLine("The car's tank size is between
                         25 and 50 (inclusive).");

   Console.ReadLine();
}
The AND operator has been optimized so that if the first Boolean argument resolves to false it need not evaluate the second argument. The result will be false.
The switch Statement
When testing for multiple values, you may be tempted to use nested if else statements as follows.
if (val == 0 || val == 1) Console.Write(“Zero or One”);
else if (val == 2) Console.Write(“Two”);
else if (val == 3) Console.Write(“Three”);
There’s a more eloquent and readable way of doing this by using a switch statement.
switch (val)
{
   case 0:
   case 1:
      Console.Write(“Zero or One”);
      break;
   case 2:
      Console.Write(“Two”);
      break;
   case 3:
      Console.Write(“Three”);
      Break;
   default:
      Console.Write(“None of the above.”);
      break;
}
The switch statement compares the value of a given variable to a list of cases. In the example above the case 0 has no statements so it falls through to the next case 1. This means it checks whether the value is either 0 or 1. If so, it will execute the code under case 1. Any case with statements must end with the break statement to leave the switch immediately.
At the bottom of the switch statement is a default case. This is optional and allows you to perform any tasks if none of the cases matched.
The while Loop
The while loop will loop continuously through a block of code while a Boolean argument is true.
int count = 1;
while (count <= 10)
{
   Console.Write(count + “ “);
   count++;
}
// 1 2 3 4 5 6 7 8 9 10
First we setup a variable to evaluate; in this case count. While count is smaller or equal to 10 it will write the count value to the console window. Next we used C# shorthand to add 1 to the variable count. The statement count++ is the same as count=count+1. The shorthand for subtracting 1 from count would be count--.
If you did not increment count, it would never exceed 10 and the block of code would run continuously until the program crashes, the machine shuts down, or the program is manually stopped. This is called an infinite loop.
The do-while Loop
The do-while loop will execute the block of code at least once before evaluating the Boolean argument.
string password = “knight”;
string userInput;

do
{
   Console.Write(“Enter password: “);
   userInput = Console.ReadLine();
} while (userInput != password);

Console.WriteLine(“\nWelcome, Sir.”);
The above code will continuously ask for the password until the user gets it right.
The for Loop
The for loop is another very commonly used flow-control. It loops a set number of times. The following example gives the same output as our while loop did earlier.
int count;
for (count = 1; count <= 10; count++)
{
   Console.Write(count + “ “);
}
// 1 2 3 4 5 6 7 8 9 10
In the parentheses that follows the for keyword, we have a set of three statements. The first tells the variable were to start. The second tells the for loop if it should continue. In other words, while count is smaller or equal to 10, keep looping. The last statement of the three, says that the variable count must increment by one after every loop. Here’s how to the reverse the above output.
for (int i=10; i>0; i--) Console.Write(i + “ “);

// 10 9 8 7 6 5 4 3 2 1
We removed the curly block brackets because there’s only one statement to execute in the loop. In the for parentheses, we declared and defined a variable in the first statement. The second statement now checks that the variable is still above 0, and the last statement decreases the variable by 1. Here’s another example that shows only the odd numbers between 1 and 9.
for (int i=1; i<10; i+=2) Console.Write(i + “ “);

// 1 3 5 7 9
In the third statement in parentheses, we used another C# shorthand to add 2 to the variable. The statement i += 2 is the same as i = i + 2. The opposite would be i -= 2. The for loop is very useful to loop through arrays and lists.
string[] names = new string[] { “John”, “Max”, “Jimmy” };
int[] ages = new int[] { “12”, “18”, “16” };

for (int i = 0; i < 3; i++)
{
   Console.WriteLine(names[i] + “ is “ + ages[i]);
}

// John is 12
// Max is 18
// Jimmy is 16
Now see how easily we can assign 50 even numbers to a list.
List<int> evenNumbers = new List<int>();

for (int i = 2; i <= 100; i += 2) evenNumbers.Add(i);
Structures
A structure is a custom variable that is defined as a combination of other variable types. An example of this may be a map coordinate, which consists of a longitude and latitude. Here we use the struct keyword to define a new variable type that consists of other variables.
class Program
{
   struct Coordinate
   {
      public string PlaceName;
      public float Longitude;
      public float Latitude;
   }

   static void Main()
   {
      Coordinate somewhere;

      somewhere.PlaceName = “Los Angeles”;
      somewhere.Longitude = -118.25f;
      somewhere.Latitude = 34.0f;

      Console.WriteLine(somewhere.PlaceName + “ [“ +
                        somewhere.Logitude + “, “ +
                        somewhere.Latitude + “]”);

      // Los Angeles [-118.25, 34]
   }
}
Structures behave like value types and should generally be used only for small constructs. For larger and more complex structure, it’s best to construct classes.
Classes and Objects
Since C# is a fully object-oriented programming language (OOP), classes and objects are crucial in writing complex C# applications. A class is a template of an object. It specifies what properties and methods an object will have. These are the attributes and actions respectively. An object is the incarnation of a class, or more correctly, it is an instance of the class, and there can be many instances of the same class.
Imagine a class that needs to represent a circle. Its properties could be radius, color, and position. Its methods could be draw the circle or move the circle. Remember that the class is not an object yet, it’s simple a template of what the object should be. You can instantiate as many circle objects as you need, each with its own radius, color, and position values.
public class Person
{
   public string FirstName { get; set; }
   public string LastName { get; set; }
   public int Age { get; set; }

   public string FullName()
   {
      return (LastName + “, “ + FirstName);
   }
}
This class is prefixed with a modifier called public. This means that this class is accessible from anywhere in your assembly and from other assemblies. If the public was omitted or replaced by private, it would only be accessible to the assembly it resides in.
Our Person class has three properties; FirstName, LastName, and Age. Property, class, and method names, by convention always start with a capital letter. Properties and methods are in general always public, if you want access to them from code outside the class.
The get and set that follows the property names are what makes them properties. This is the shorthand for quickly declaring a property, but we can expand the get and set to include some validation or other code.
int age = 0;

public int Age
{
   get { return age; }
   set
   {
     if (value < 0) age = 0;
     else age = value;
   }
}
Once you expand the get and set, you have to keep track of the property’s value in a class variable, as shown in the first line of the code above.
The get returns the value of age, while the set does some validation to ensure that age can never be negative. The value variable is what is passed into the property. Let’s see this in action.
-
Create a new Windows Console Application (FILE > New > Project…> Windows Desktop > Console Application) and name it ClassesAndObjects.
-
In the Solution Explorer pane right-click ClassesAndObjects and select Add > Class.
-
Select the Class template from the list and set its name to Person.cs, then click Add.
-
Click on Person.cs in the Solution Explorer and change its code as follows:

Select Program.cs in the Solution Explorer pane and change it as follows:
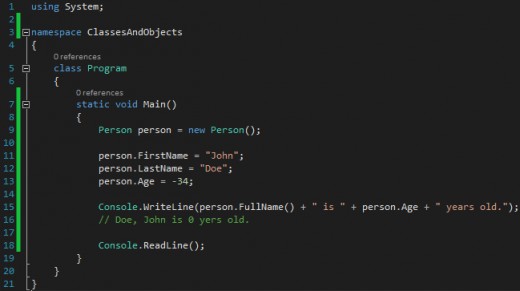
In line 9 we instantiate a Person object. Then we assign values to its properties. Notice when you type the dot after person, the IDE's intellisense automatically brings up a list of the class’ properties and methods.
In the WriteLine statement we used the Person object’s Fullname() method to retrieve the person’s fullname. When running this application you’ll see the age is displayed as zero because we checked for negative ages in the Age property’s set block.
You may also choose to either omit the get or set blocks in a property. A property with only a get block becomes read-only and a property with only a set block becomes write-only.
Other Class Methods
Private Methods
A class may contain private methods that are only visible to the class itself, so they cannot be accessed from anywhere else. You may think of these private methods as helper functions. These could be complex tasks or calculations that the class needs to perform for its own purposes. They need not be visible outside the class.
Constructor Methods
In the Person example above, we instantiated an instance of the class Person using the new keyword, the class name, followed by parentheses. This is the default constructor method of an object, and is assumed by the compiler even though you didn’t explicitly code a constructor method in your class. Suppose you need to do some initialization of your class when you instantiate and object, or even pass parameter values. To do this, you can define a custom constructor methods.
class Person
{
   int age;

   // Properties
   public string Name { get; set; }
   public int Age { get; set; }
   public string Gender { get; set; }

   // Constructors
   public Person()
   {
      Name = “Unknown”;
      Age = 0;
      Gender = “Unknown”;
   }

   public Person(string name, string age)
      : Person()
   {
      Name = name;
      Age = age;
   }

   public Person(string name, string age, string gender)
   {
      Name = name;
      Age = age;
      Gender = gender;
   }
}
NOTE Methods in the same class may have the same name as long as their parameters are different, called the method’s signature. In OOP this is known as polymorphisms.
After the properties, we defined three constructor methods. We know these are constructor methods because they have NO RETURN TYPE. Constructors always return an instance object of the class. The compiler knows which constructor you are calling based on the parameters you pass.
-
The first constructor method has no parameters. This is a default constructor and in this case it simply initializes the properties with some values.
-
The second constructor accepts two values, but it also invokes the first constructor. It does this by adding a colon and the first constructor. This means it will first run the first constructor and then the current constructor. In this case, the Name and Age property will be set to the parameter values, but Gender will still hold the value it was given by the first constructor method.
-
The third constructor simply defines all the properties.
The example below shows the different outcomes when using the different constructors.
var p1 = new Person();
var p2 = new Person(“Jane Doe”, 28);
var p3 = new Person(“John Doe”, 30, “Male”);

Console.WriteLine(p1.Name + “ “ + p1.Age + “ “ +
                  p1.Gender);
Console.WriteLine(p2.Name + “ “ + p2.Age + “ “ +
                  P2.Gender);
Console.WriteLine(p3.Name + “ “ + p3.Age + “ “ +
                  P3.Gender);

// Unknown 0 Unknown
// Jane Doe 28 Unknown
// John Doe 30 Male
NOTE The var keyword is a shortcut in C# that tells the compiler to infer the type of the variable from whatever type you assign to it on the right-hand of the equal sign.
The above example shows the different outcome when using the different constructor methods of the class.
Destructor Method
As the name implies, a destructor method is the opposite of a constructor method. It is used to clean-up and/or dispose the object. You might want to close any remaining open links or dispose of a very large object. For your average class however, this is rarely necessary. The .NET Framework will automatically remove unreferenced objects from memory as required.
Finally
This has been a brief introduction to C#. There are still plenty of constituents of the C# language to discuss that falls beyond an introductory. For further information check the web at MSDN, Microsoft Virtual Academy, or simply search C# tutorials (there are plenty of sites).
© 2016 James Lombard
Related

How to Do Nested IF Statements in Excel

Programming in Java Netbeans - A Step by Step Tutorial for Beginners: Lesson 33

How to Use Structures ("struct") in C Programming

Excel VBA - Guide To Creating A New Sheet Everyday Automatically

Gun Rights: Part 5: A Deeper Look: Can Reasonable Gun Control Save Lives?


