- HubPages»
- Technology»
- Computers & Software»
- Computer Software»
- Digital Photography & Video
Intro to Photoshop: the Tool Bar Basics


Photoshop Head-Scratchers
If you are like me, new technology is intimidating. But there are some things that are well worth the effort to decipher. Adobe Photoshop is one of those. The learning curve is rather high but not impossible. Like many things (music, art, dance), the more you practice, the better you get at it.
One of the things that I did to practice was to assign myself weekly tasks, mostly with text effects, but also with photographs and photo-manipulation. Years ago a person was stuck with a book and hours of head-scratching. Today there are thousands of YouTube video tutorials by lots of pioneers who have already done the head-scratching for you.
I have Photoshop CC as well as Adobe Photoshop CS5. There have been a few new advancements between the CS5 and the CS6 and the CC. Most of the tool are the same however and are used basically the same. There are a few differences that I will share along the way.
Basics Without The Textbook
To begin, you have to know some of the basics, such as where to find certain tools and how to work them. The first time I opened Photoshop, I saw there was a Paint Brush tool. As an artist, I figured that I didn’t need any help working a paintbrush so I clicked onto it and nothing happened. Very disappointing. In this introduction, I will try to cover the many tools listed on the toolbar and how to make each one work.
To Start
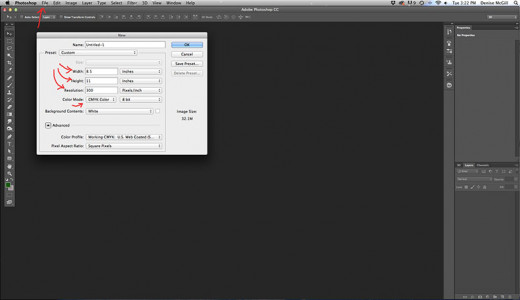
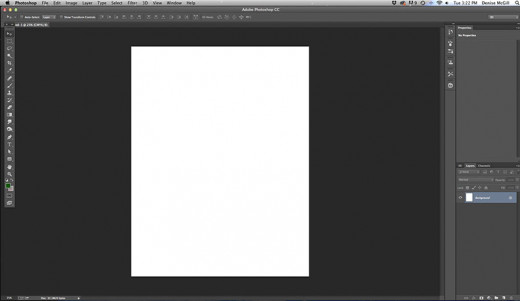
To Start anything in Photoshop, even if you are only going to play with the tools, you must open a new document. To do this you go to the upper menu bar, to File and New. When the dialog box opens, you can set the parameters to anything you like. I personally like to have the parameters set to inches, but that’s just me. When you change the Width to inches, the Height automatically changes too.
At the top of this dialog box is a space for the Name of your document. It will name the document Untitled, by default, which is fine with me. I usually leave the default name until I am done and then rename the document when I’m ready to save it. Many people like to name their document right upfront, but this is personal preference and you don’t have to if you don’t want to.
Rate Photoshop
RGB or CMYK:
Under Preset, I like to click onto the bar and set my document as U.S. Paper. This makes it automatically 8.5 inches by 11 inches and Resolution set to 300 pixels per inch and Background Contents are White. Color Mode is set to RGB, which means Red, Green, Blue. This is the perfect setting for anything digital. However, if you wanted to print your document, you may want to change the RGB to CMYK, which stands for Cyan, Magenta, Yellow, Black, or the colors used for printing. Between RGB and CMYK there is a slight discrepancy in the color tones and variations in lightness and darkness between the two. If you created a document in RGB and later decided to print it, you would have to change it to CMYK. The computer does an automatic “translation” but you should always check to see if the colors have remained the way you wanted them and make changes if needed. I like to leave it at RGB because most of what I’m working on is for digital art or Internet work and doesn’t need to be printed.
Shattered
Basics
Resolution
As for the Resolution in pixels per inch, I like to work with 300 PPI because it gives a nice large space to work on. However, it MUST be reduced for loading onto Facebook, Twitter or HubPages… or most Internet sites because 300 will take forever to load. Many artists don’t use it higher than 150 PPI, but even so, that should be reduced to 72 PPI for Internet use.
Rotate
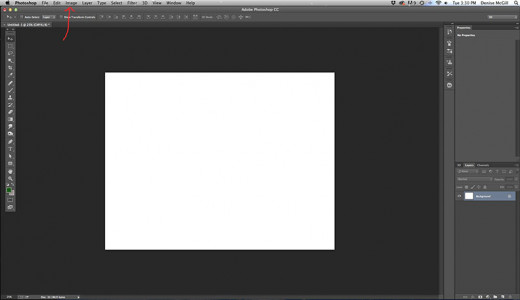
Once your parameters have been decided on, click okay and a new white page will open for you to work on. Because U.S. Paper loads in the Portrait position and not Landscape, I like to turn it the long way. To do this, Go to Image at the top menu bar, then choose Image Rotation, and 90 degrees CW (clockwise). CCW or counterclockwise will work just as well. The tab at the top of my artboard says Untitled-1, as if I’m going to open more than one, and I often do. There is an “x” next to it. If you should click the x it will close the new document but a window will open asking you if you would like to save it first. That’s a nice feature.

Do you think you would use Photoshop if it were a little easier to understand?
Move Tool
You are now ready to examine your tools. On the left should be a column of tools. The very top one is the Move Tool designated by a little arrow and a +. This allows you to move things within your document or dragging and dropping things from other documents into this one. You can click onto the icon to activate it or type the letter V. If you take the curser and let it hover on any of these tools, the name of the tool will pop up along with the shortcut in parentheses. This one says Move Tool (V).

Hiding Tools
Notice that almost all the other tools have a tiny white triangle in the lower corner of each icon. This means… wait for it… there are tools hiding under each of those. One of the ones I use most is the Paint Bucket tool, which will dump a color and fill the entire document in one click. However, the Paint Bucket is a cool tool hiding under the Gradient Tool. Since there are so many of these, I will cover all of them for you.
Select and Deselect
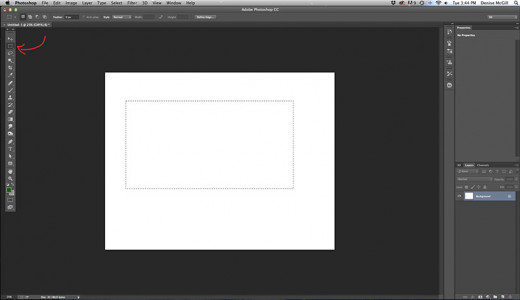
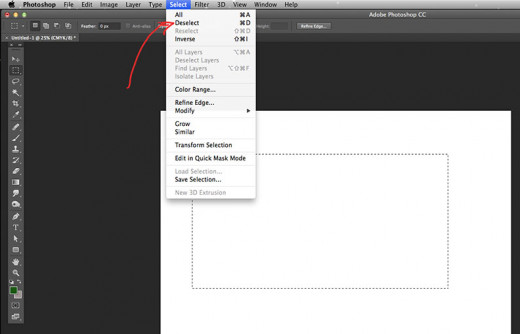
Under the Move Tool is the Rectangular Marquee Tool (M). If you click onto it and hold it down, a list of the other tools hiding under it will appear. They are the Elliptical Marquee Tool (also M), the Single Row Marquee Tool (no shortcut) and the Single Column Marquee Tool (also no shortcut). When you use these tools they will surround a selection with “marching ants” and allow you to make changes to just that portion of your document or photo, or copy and move that portion, and a number of other things. The important thing to remember is that once you have the marching ants activated, Photoshop will not allow you to do anything else until you Deselect the selected parts. For this, you type Control (for a PC) or Command (for a Mac) and the letter D. In future I will shorten this shortcut by just saying Control/Command+D. You can also turn off the marching ants by going to the top menu bar and choosing Select and then Deselect.
Undo
Keep in mind that you can always Undo whatever you have done by using the shortcut Control/Command+Z or go to Edit and selecting Undo. If you want to Undo several steps pressing Control/Command+Z more than once won’t work. In that case, you have to go to Edit>Stepback and stepback as many times as you need to.
Unfortunately, the Stepback command will only work about 20 times. The default settings can be changed to allow the Stepback to work more than that but I have never found that I need to step back more than 20 times.
Magic Forest

Finished With Part 1
This is only the first of the tools from the toolbar. I will be discussing the other tools later. I hope this introduction helps you get acquainted with your program. Like I said before the more you play with it and work on small projects, the more you will be able to remember shortcuts and tool functions. Have fun.


