How to Create and Build Your Website Customizing With Google Blogger Tools
How to Start Your Website
To start your website, you need some basic requirements as mentioned below.
- A blogging platform to post and share your ideas, articles, images, videos or any content that may not be legally or morally prohibited. You can create a blog on any blog hosting platform like WordPress, Google Blogspot, GoDaddy, iPage, etc. with the help of their tools.
- If you want an exclusive domain name for your blog, you need to purchase one from the providers of domain names by paying some annual charges. Some of the sellers for domain names include Big Rock, Znetlive, GoDaddy, Hover, Namecheap, iPage, etc. I purchased my domain (www.mvchari.in) from Bigrock, and they charged Rs.600 + in India annually. I linked the domain to my free blog on Google Blogger. So, whenever I post an article on my blog, it automatically gets published on my paid website.
- Other things like a computing device and internet connection are understood as prerequisites as you will not be looking at this article without them.
How to Create a Blog on Google Blogger Platform
- For creating a blog on the Google platform, you may need any one of the updated versions of Google Chrome, safari, firefox, Internet Explorer, etc.
- Turn on the javascript button.
- For creating the blog, first, create your Google Account, if you don't have one already.
- You may be required to create a Blogger Profile if you like to showcase your writing talents or use your Google profile which is automatically provided to you on creation of the Google Account.
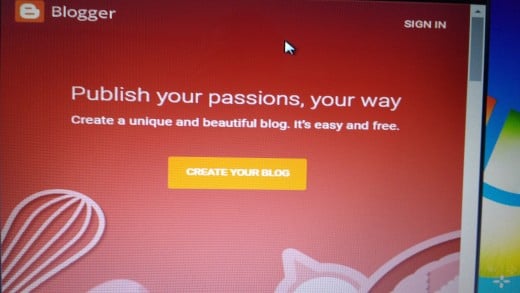
- After creating the account and profile, go to the blogger.com website, sign in with your email ID, and click on the Create a Blog button as shown in the first image below.
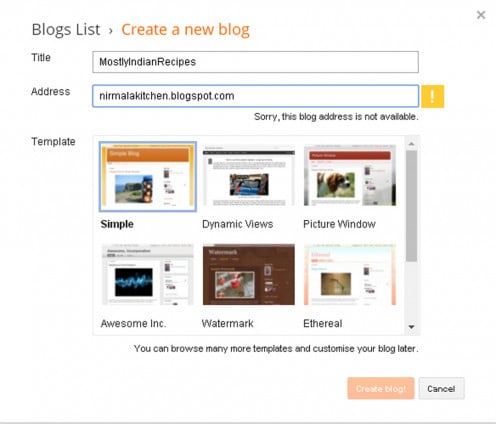
- A new page titled "Create a new blog" will open up as shown in the second image below for creating a title for your Blog and for selecting a template of your choice.
- See below for further instructions.
Step-By-Step Instructions for Creating Blog Title, URL, and the Blog Template
- Click over the "Create A Blog" button (as shown in the first image above). It leads you to a new page for typing the blog name, etc as shown in the above illustrated 2nd and 3rd images.
- In the blank space provided for mentioning the name of your blog, type the title of your choice which should be relevant to the content you wish to publish on the blog. You can select a general title or some specific title. For example "Vincent's Food Court" (general), or "Vincent's Delicious Desserts" (specific).
- Below the title, is another horizontal column asking for the address of the blog. You need to type a suitable URL address that matches your blog title. The address will be suffixed with blogspot.com which will be common for all addresses at the end of any URL (because blogspot.com is hosting your blog). You may use your name as a URL or prefix it with a title for the blog, or even use a simple blog title as the URL. For example - nirmalakitchen.blogspot.com or deliciousdesserts.blogspot.com and the like.
- If others have already used an URL address, you will not be allowed to use the same URL. In that case, type some other URL address by changing some of the letters or words. The dialogue box open on the page may sometimes suggest some of the options available.
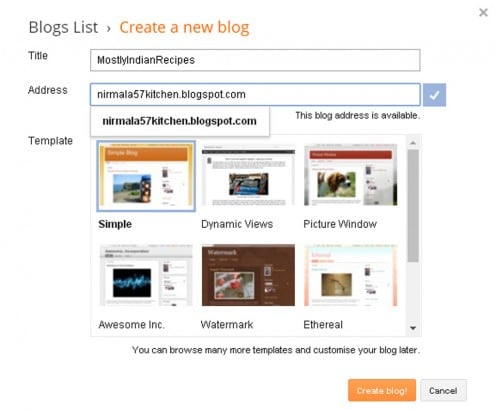
- For example, in the above images, the blog creator tried to create a new blog titled "Mostly Indian Recipes" with a URL address styled as nirmalakitchen.blogspot.com; but it was not available. A message flashed up as seen from the second image above with a yellow-colored exclamatory mark stating "sorry this blog address is not available". So, he had to insert a numerical number 57 after Nirmala. When 57 was inserted in the URL address, the blog address was available and allowed to him as evident from the third image above where it was marked with a blue tick and a message informing "this blog address is available" showed up below the tick.
- After the URL is selected and permitted by blogspot.com, you need to select a template design for your blog by clicking on any one of the template images provided there in the window. When you click on any template image, it will show more template options available under each set of templates. Some of them may be paid templates that display their prices. Select a free template design out of the many styles of templates provided there under each template if you are not going to pay.
- After selecting a template, click the "Create Blog" button at the bottom of that page as shown in the above image (3). Your blog gets created immediately and you can start publishing your articles or content. You can customize the appearance of your blog later on with the numerous tools available there, by logging into your blog as and when you find the time, and by using the tools available there. I am providing the full details of how to do it in the following paragraphs of this article.
Blogger Home Page (Old Version)
Blogger Home Page (New Version)
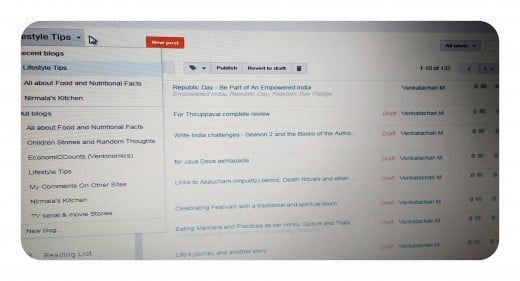
How to Manage Your Blogger Homepage or Dashboard
- When you create your blogger account with a fresh blog for the first time, you are assigned with a Home Page for managing your Blogger Account. This page shows a summary of your blog titles, the number of posts on each blog and also the total view counts for each blog.
- With one blogger account, you can create as many new blogs as you want. Total blogs allowed are 100 presently. And you can post unlimited articles on each blog.
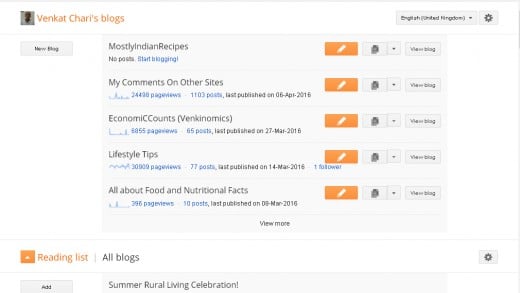
- The first image above is an example of a blogger dashboard (old version) which currently had 6 blogs (including the newly created one) on it. 5 were shown with their blog titles and below the titles were given total page views, the number of posts, and last published date. One blog was hidden which was shown when you clicked "view more".
- But, the older version has, since then, changed by Google Blogger Platform. So, I have included a fresh, recent version of the Home Page above this paragraph just below the old version one.
- The newly created blog "Mostly Indian Recipes" was shown at the top of this homepage in the older version. It indicated that there were 'No Posts' with a message to "start blogging".
- But, when they changed the older format, the new format of Homepage lands you directly to your currently updated Blog. You can notice the changes between the old version and the new version by comparing the above both images.
- The New Homepage shows you the picture of your recently updated blog by listing all your posts chronologically along with the view counts against each post of that blog. (Whereas the older version showed those figures only after you clicked your relevant blog title from the list of your blogs mentioned on Dashboard or Homepage).
- So, if you have to post an article on a different blog, you need to select that relevant blog first by clicking the drop-down menu (arrow) below the title of your current blog, that is visible before you in your left margin.
- In the above image of the Homepage (new Version), you can see that the current blog title "Lifestyle Tips" is there on your left side margin; and, there is a drop-down arrow which when clicked will appear as shown in that image showing you the full list of your blogs.
- I hope you are able to catch that list on your left margin side of above (new version) image. Below the Title of "Lifestyle Tips", you can find Recent blogs numbering to three and below that, after a line-break, you can notice a list of "All blogs" listing total seven blogs in it. And, again after a line-break, you can notice a "New Blog" clickable button. The whole lists are in black and white only and you can click them to land into the relevant blog whenever you want to publish posts in any one of those blogs.
- So, if you want to create another blog (not post) dealing with another different topic, you can click the "New blog" button and create the new blog. You can create as many as 100 blogs in this manner depending on your stamina.
- In the above (new version) image, you can see the red-colored button for creating a new post against the title of your recent blog "Lifestyle Tips". Whenever you want to post an article, you will have to click that page and, then, a new page will open for typing your title and content of the post.
- Below the list of the titles of the "All Blogs" in the above image, there is a "Reading List". Clicking on it leads you to a list of others' blogs subscribed by you for reading and enjoying. To add a blog for reading, you need to click it and then click the "pencil mark" button at the top right on the new page that comes in front of you.
- The other button below the Reading List in the above image is for Help.
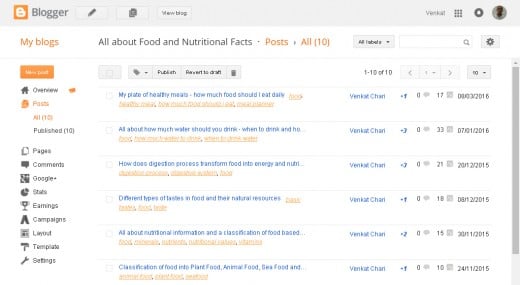
Blogger Tools for Customization of Your Website
The above image shows the various options and tools available for operating your blog and for customising its look.
- Concentrate on the left side of the above image which starts with "My blogs". When you click on my blogs, the page will go back to the list of blogs.
- Below My blogs, there is the "New post" button for posting your new article.
- Below "new post button", is overview button. It takes you to a summary of views during the week, no.of posts, comments, etc. It also shows the blogger news items etc.
- Below overview button, under posts heading is a summary of no.of all posts and published posts. In between, it will show drafts also if any.
- Below posts button is the pages button which takes you to a list of the pages that you have created on that particular blog. I have dealt with the details of "How to create pages/ categories on google blogger" in my another topic at HubPages.
- Below the pages button, there is Comments button which shows you published comments and spam comments, if any.
- Then there is the Google+ button for enabling your post to be shared on Google+.
- Below Google+ button there are the buttons of statistics, earnings, and campaigns which take you to those respective, related figures and analytics.
- Then, you will be having the layout button, template button, and settings button which I am going to deal in my below paragraphs.
Your opinion about webhosting platforms
Which blogging platform do you prefer most other than Hubpages?
Step-By-Step Instructions for Customizing Your Blog/Website With Template Designer
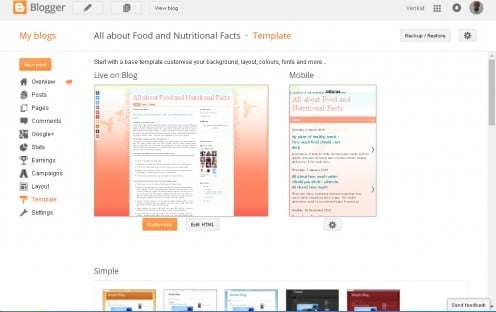
- For customizing your blog, you should click template button at the left side of your blog posts (list) page.
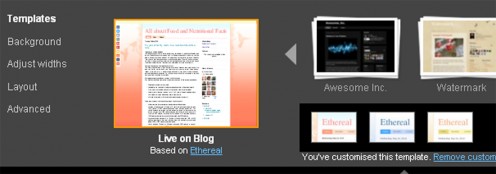
- Clicking the template button will lead you to the template page which shows the appearance of your blog on your computer and mobile apps (as shown in the first of above two images). Below the blog appearance, there are various options of template designs. Only 5 simple templates are visible in the above image. But there are many other types of designs available below in that page which did not come in the photo.
- If you want to change the template itself, then you should select a new one from those available template designs and then try to customize your blog.
- There is a small horizontal (customize) button (red/brick color) at the bottom of the computer preview format of your blog as appearing in the above first image. When you click on it, it will lead you to the customization page as per the 2nd image above. There is another white button next to 'customize' button which is for 'Edit HTML'.
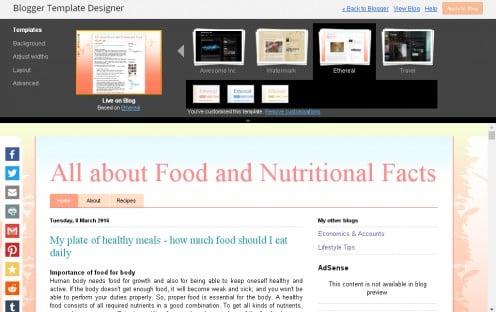
- So, when you click on the 'customize' button as mentioned in 4 above, you are landing on to the page showing the (customization) Blogger Template Designer page as in image 2 above. I have zoomed the upper part of that page in the 3rd image so that you can read the tools available on it.
- There are five tools available there as shown in the left margin. They are - Templates, Background, Adjust widths, Layout, and Advanced.
- For changing template design, you will click on the template designs that you like to apply from among many designs shown there.
- By clicking 'Background', you can change the background colors, tiles and alignment of your blog position on your page.
- By clicking on "Adjust widths', you can change the width of the main body of your blog that shows content and the width of sidebars on the blogs.
- By clicking 'Layout', you can change the layout design of your blog. There are options visible there and you can select one of those options. For example, Title bar with the main body and one sidebar; Title bar with the body and two horizontal bars on the same side; Title bar with the body and one sidebar each on both sides; Title bar with the body and one or two bottom bars; etc.
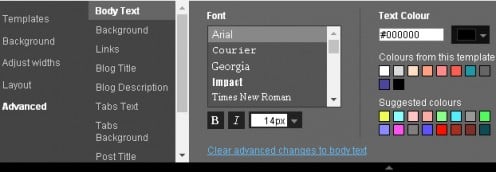
- The "Advanced" button is for customizing more advanced features of the blog like fonts, font size and color of titles, body text, links, and many other features as shown in the below-posted image of the advanced options page. You can customize anything and everything you want, by clicking buttons and create a wonderful blog appearance.
Advanced Features for Customizing Your Blog
Tips for Advanced Customization of Your Blog
- You can customize the fonts and color of body text by clicking on "Body Text" button as visible in the above image. Click on the fonts displayed and the color options available for your choice.
- By clicking on "Background" button, you can customize your blog's outer background color, your main body color on which content is displayed, and your main body border-line colors.
- The links color is customized by clicking on the "Links" button. There are three options for original color, visited color and cursor hovering color that should be customized by you.
- The button "Blog Title" allows you to customize the title fonts, font size and text color of title.
- Then there is the button for selecting the "Blog Description" color.
- The button "Tabs Text" is for customizing the buttons appearing on your blog like Home button, Pages buttons, Categories buttons, Date and Label display, etc. You can customize the fonts, font size, and text color.
- "Tabs Background" button is for customizing the background of tab buttons.
- Below 'tabs background', there are other tools for customizing "Post Title" just like blog title, then there is the Gadget Title customization and other CSS tools for HTML customization.
Simple Domain Prices and Hosting Charges
Domain / service provider
| .com
| .in
| .org
| hosting charges
|
|---|---|---|---|---|
Go Daddy
| Rs.329/month (includes hosting)
| Rs.199
| Rs.99/month
| |
Big Rock
| Rs. 909 for 1st year and 1319 for next year on
| Rs.199
| Rs.249
| Sells only Domains. No hosting done.
|
IPage
| $ 14.99 per year or $1.99/per month with free domain on iPage for 1st term of service.
| |||
ix web hosting
| $3.95/per month with free website
| |||
1and 1
| $0.99/per month hosting
|
The domain prices and hosting charges keep on changing. So consult the sellers or hosters. Amazon Web Services also offer services based on your needs.
Step-By-Step Instructions on How to Link Your Custom Domain With Google Blog
- Before linking your custom domain name with your Blogger Blog, you should purchase the custom domain from any domain sellers. There are hundreds of domain sellers in the world, out of which above mentioned names in the Table are only a few examples.
- After purchasing the domain, you need to set up your Domain with your blog by enabling any one of the two options provided for sharing your content with the audience (whether you want to share on world wide web or local web).
- Choose "where you would like to host your blog" by marking against any one of the options of 1) on a top-level domain (like www.com) or on a sub-domain (any local.com).
- After purchasing and enabling any one of the above options, you should go to your Blogger account and click on the settings button on that particular blog that needs to be linked to your custom domain. Your account id for blogger and custom domain need to be the same. So, purchase the domain with the same email id that you use for logging into your blog spot account.
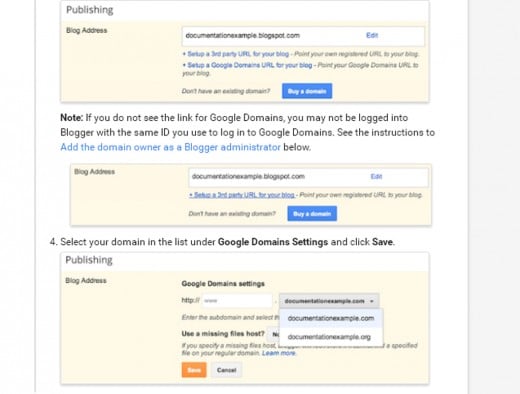
- When you click settings, a page opens up. Under publishing area for blog address, there are two options. Click "setup a google domain URL for your blog".
- Now, the "google domain settings" options will be visible to you. If you enabled "www" option while purchasing your domain, the blank space in the address bar column will show "www" and your custom domains will show up against it for choosing one of them as the address URL for your linked blog. Select your domain.com as the option for your choice as shown in the above images. For example, I have purchased www.mvchari.in and mvchari.com as my domains and linked the first one to my google blog (titled venkinomics.blogspot.com). So, when I search for venkinomics.blogspot.com, the website URL www.mvchari.in will show up in search results.
- After selecting your custom domain to be linked in the above address bar, click save at the bottom of the settings page. Now, your blog spot blog is linked to your custom domain and you or your viewers can visit your custom domain with your blog address, vice-versa.
This content is accurate and true to the best of the author’s knowledge and is not meant to substitute for formal and individualized advice from a qualified professional.

