Learn how to program using VBA in Excel
Microsoft Excel is one of the most popular computer applications being used today. People use Excel in business and at home for all sorts of reasons. Excel has evolved from simply being a spreadsheet to an extremely powerful tool with each new release. If you have experience in Excel on your resume then this can make all the difference when applying for a job since just about every business uses it.
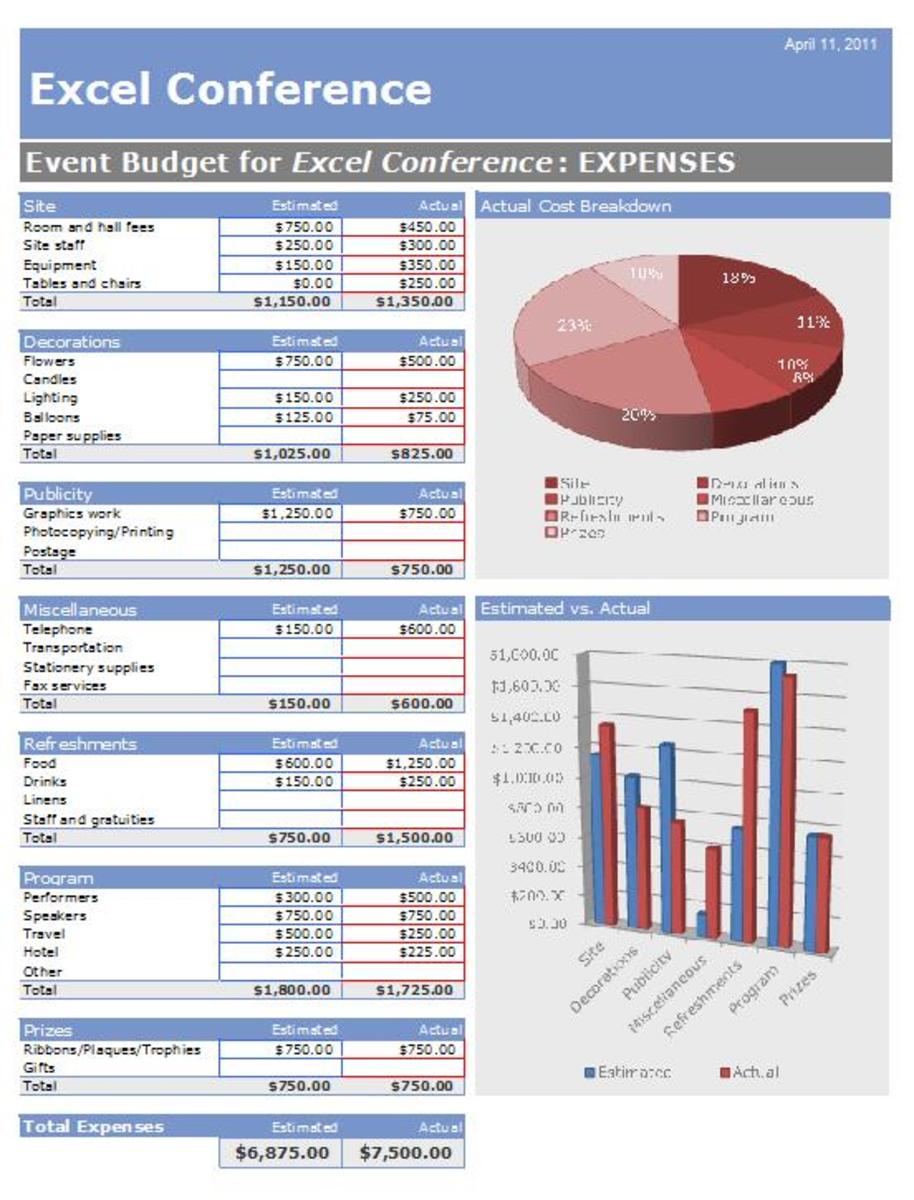
Excel is commonly used to quickly perform calculations such as sums, averages, minimum and maximum. It is used to store, organize, sort, search and filter data. People often use it for reporting, charting, and graphing. It is also often used for financial operations such as calculating profit and loss, or loan and mortgage values. It has the ability to automatically calculate and recalculate results whenever any values change within it. It can be used to manage finances, bills, stocks, contacts (address book), collections, checklists and calendars. Excel is dynamic, user friendly and has so many features built into it to suit just about any need.
I plan on writing a series of articles and tutorials on how to use many of the features in Excel. I would like to start with what I feel is one of the most powerful features in Excel, Visual Basic for Applications, commonly referred to as VBA. Briefly put, this is the ability to program within Excel using the language Visual Basic. Many people don't know that several of the latest releases of Excel contain VBA. VBA can add so much more horsepower to a spreadsheet application and it is not difficult at all to get started. In my experience, having programming skills with VBA has opened many doors when job hunting. It has improved my workplace skills and productivity in so many ways. As a way of paying it back, I would like to share what I have learned.
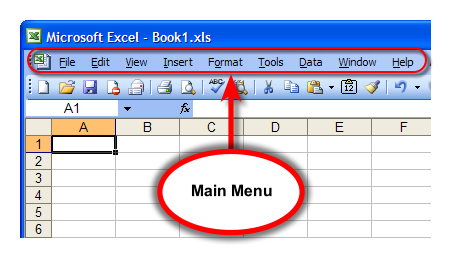
Start by opening a new Excel spreadsheet similar to the one shown in figure 1 above. Then from Excel's main menu, select Tools and then Macro as shown in figure 2.

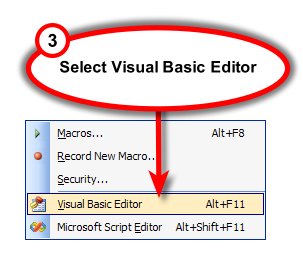
The Macro menu should present the sub menu shown in figure 3.
Select Visual Basic Editor.
Note, a quick way to get to this point is to use a shortcut, or combination of keys, using the Alt key and the F11 key (Alt+F11) together.
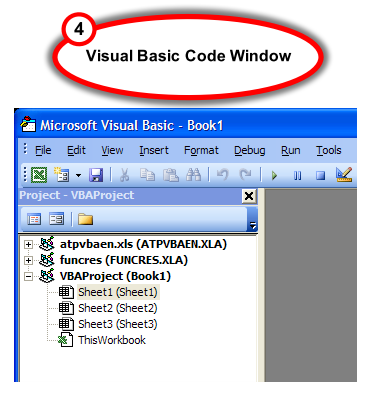
A new window should open, called the Microsoft Visual Basic editor window as shown in figure 4. This is the window where you can program, that is, type in visual basic code. It resides in the background whenever an Excel spreadsheet is opened, it is a part of the spreadsheet file.
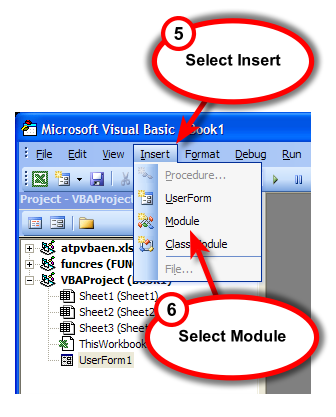
Next we want to create our first programming module. Modules are a way to organize your code. From the main menu select Insert and then Module (see figure 5).
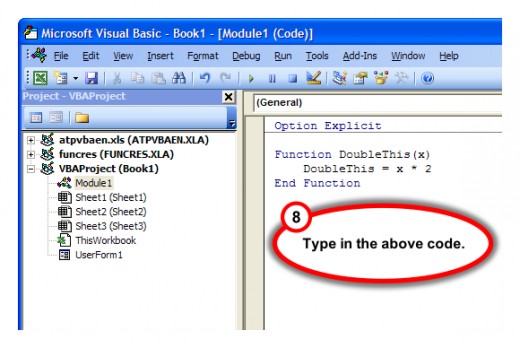
As you can see, its much like a blank sheet of paper where you can begin typing in code (see figure 6).

Our first program will be very simple, 3 lines of code, just to illustrate how easy it is to program and how code can be used within a spreadsheet. Simply type in the 3 lines of code as shown in figure 7 (or copy and paste the code directly below it). These 3 lines make up what is better known as a function. To be more precise, a user-defined function. The user-defined function which I have created here is one which requires an input value, called x, and produces an output value called "DoubleThis". The value of DoubleThis is basically two (2) times the value of x. For example, if we supply the function with the input value 5 it will then multiply 5 by 2 and produce an output value of 10. The input value x can be any numerical value we want, and the output value is called "DoubleThis" so that we can reference it from somewhere like the spreadsheet, which I will show you next.
Function doublethis(x)
    doublethis = 2 * x
End Function
Once we are done coding we can return back to the attached spreadsheet to test out our new code. One way that this can be done is by clicking the Excel icon as seen in figure 8.

To test out our new function, enter the new user-defined function name with an input value of 5. Choose any cell and type in =doublethis(5) and then press enter as shown in figure 9.

That's all there is to it! As you can see in figure 10 our user-defined function "DoubleThis" returned the correct value and our program worked correctly!
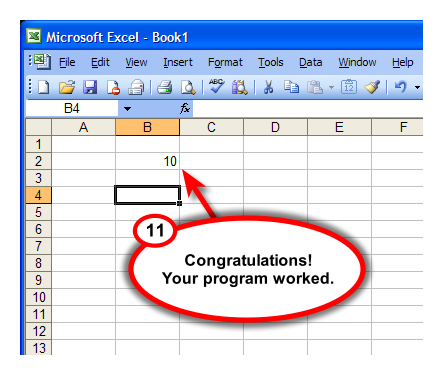
If you know a little more about Excel spreadsheets, you can easily replace the input value of 5 with a reference to any cell. For example, you can place the number 5 in cell A2 and then use the formula =doublethis(A2) in cell B2. This will produce the same result. Furthermore, you can use this newly created user-defined function in more than one place on the spreadsheet.
The code for doublethis does not really do very much justification for how much more you can do with VBA. For that reason, I have created another function (see figure 11) which is a little more interesting. It makes use of the "If-Then" code statements. Once again, it requires an input value called "quantity" and produces an output value called "PriceBreak". It will check if the quantity is greater than 100, in which case PriceBreak will be 8, otherwise it will set PriceBreak to 10. In other words, if quantity is not greater than 100 then PriceBreak will be 10.
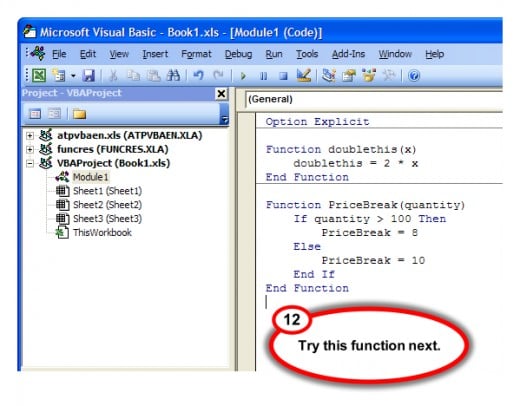
Function PriceBreak(quantity)
    If quantity > 100 Then
        PriceBreak = 8
    Else
        PriceBreak = 10
    End If
End Function
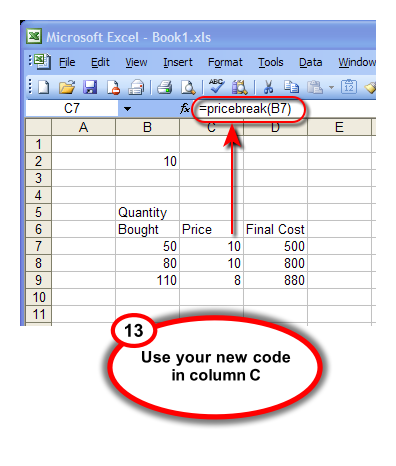
Once again, return to the Excel spreadsheet and this time create the small table I have created in figure 12. It consists of 3 columns and 3 rows. The first column, Quantity Bought, represents a sample of the number of items you might purchase. I have entered the values 50, 80 and 110 in cells B7, B8, and B9. The second column represents the price you would pay depending on how many items you purchased. It is sort of like getting a volume discount if you purchase more items. So for example, if you purchase 100 items or less then you would pay a price of $10 each. However, if you purchase more than 100 items then the price of each is $8. This is where we have want to use our new user-defined function called PriceBreak. Simple type in =pricebreak(B7) in cell C7 and then press enter. Copy and paste this formula into cells C8 and C9 and the underlying user-defined function will recalculate the correct pricebreak. Finally, the third column, Final Cost, represents the total amount you would pay for the number of items purchased. Type in cell D7 the formula =B7*C7 and then press Enter. Copy and paste this formula down in to cells D8 and D9. That's it you're done! You have just programmed two user-defined functions.
This is only a fraction of the power behind Microsoft Excel, it is amazing how much more can be done. The examples I have illustrated were intentionally simple so that you could make the connection between programming in Visual Basic and using that code in an Excel spreadsheet. I hope this motivates you to learn more and gives you the confidence to begin programming. Believe me, it will help with your productivity at home and work when using Excel to its fullest potential!


