- HubPages»
- Technology»
- Computers & Software»
- Computer Software»
- Office Software Suites»
- Microsoft Office
MS Word Time Saver Shortcuts


Using Tips & Tricks In Microsoft Word
I am not going to introduce MS Word as everyone knows it. There are alternatives to the Office suite such as Google Docs, Quick Office, OfficeLibre and more. Out of all these, ThinkOffice is a cloud based product that comes close when it is about competing with MS Word. It looks like Office 2003 and is easy to understand.
But this article is not about competitors. This is about Word shortcuts and tips. We'll talk about keyboard shortcuts in MS Word as well as setting up defaults so that you do not have to change the settings in the document editor each time you open it. Let's get started!
Create A Default Style For Writing
If you have a particular font that you use regularly other than the default Calibri" font of MS Word, you can make the word processor to use your font whenever you create a new document. You can also add certain additional settings such as font color and spacing.
To achieve this, you will have to change the settings for the Style named Normal. You can see the Normal style in the Ribbon. Type a paragraph using the font you use with the desired font color and style. That done, right click on the Normal Style Icon in the Ribbon. From the context menu, select "Update Normal To Match Selection".
The above step makes it normal for the current document. To change the Normal style for all documents on default template, open the File Menu, click Options and then Advanced. Look for Save subheading and under that, click "Prompt To Save Changes To Normal Template" (See image below).
Thus, when you exit the document, you will get a prompt if you wish to save changes to the template. Click YES so that the normal style is per own your settings when you create new documents.
This trick can be employed to MS Word 2007 and 2010. Of course, it can also be applied to the Word in MS Office 2013 but I don't use it yet so will stick to 2010 in this post.

Setting Default Paragraphs
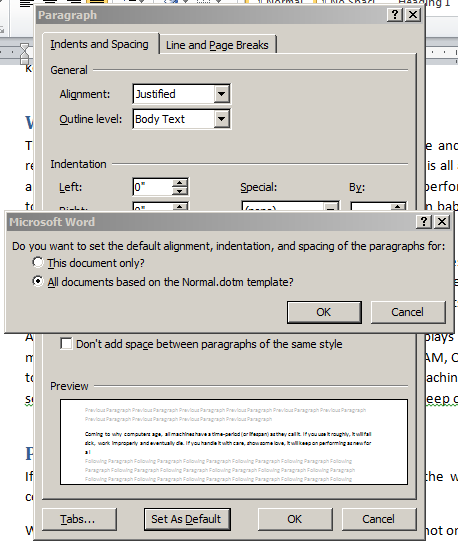
Likewise, you can also set up defaults for paragraph in the Normal template so that you do not have to change them each time you create a new document.
To change the paragraph settings, right click in the paragraph. From the context menu, select Paragraph. Make the changes there - such as line spacing, indents and hanging indent. Click on Set As Default. You will get a dialog box asking you if you wish to make it default for the current document or for every new document based on normal template. Select the latter (see image below).
Select Text Vertically As Show In Following Image

You can quickly select text vertically in MS Word, as shown above, by holding down the ALT key while dragging the mouse up or down to make a selection.
Let me know if you liked the above tricks. If you know any other tips that you want to share with the users, please use the comment boxes below.
Some Useful Keyboard Shortcuts For MS Word
CTRL+D -> Opens the Font Dialog Box
CTRL+G -> Opens The Goto Dialog Box
CTRL+J -> Justifies the Alignment of Selected text
CTRL+E -> Centers The Alignment Of Selected Text
CTRL+1 -> Changes The Line Spacing To 1
CTRL+2 -> Changes The Line Spacing To 2
CTRL+5 -> Changes The Line Spacing To 1.5
CTRL+T -> Increases the Indentation of Paragraph
CTRL+SHIFT+T -> Decreases The Indentation
Related
")
How to Use Word Processing Software (NVQ Diploma in Business and Administration & IT)

How to Use the Microsoft Office Word 2007 Page Layout Ribbon Tab

Microsoft Word 2003 Tools Menu
")
How to Convert Word Documents Into Images (jpg, png, gif, tiff)

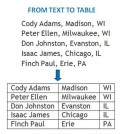
How To Convert Texts To Table | Microsoft Word 2007, 2010 Tutorial