- HubPages»
- Technology»
- Computers & Software»
- Operating Systems
Make Windows run faster

Ensure that all the drives are formatted with the NTFS partition; if your drives are formatted to a FAT32 file system you may convert it to NTFS by the CONVERT command. Scan all drives to check that the disks are free from any errors (chkdsk). Check your IDE data cable connecting to HDD. If RAID is configured consult an expert.
It is suggested that the size of the system partition is small to limit fragmentation; however this can only to be taken care of before the OS installation. If the windows system partition is more than 10 GB then consider re-installing the operating system. It is possible to take the ‘Program Files’, ‘Documents and Settings’ folder to a different drive (partition). There are some third-party-software that can change the size of a partition without affecting the current installation; however those utility is to be handled by an expert user only.
Transfer the memory paging file allocation to a drive other than the system partition, if possible check the access time of the drives and select to move to the fastest partition.
To move the paging file allocation, please perform the following steps.
1. Open Windows Control Panel. [Open on Performance and Maintenance icon].
Double-click the System icon.
Alternate Method: Open My Computer, right-click on an empty area, Click properties
on the pop-up menu.
2. On the System Properties dialog select the Advanced tab.
3. within the Performance frame click Settings. The figure looks like

4. Select the Option Adjust for best performance for Visual Effects, Click Apply. Next click on the Advanced tab.
5. In the Virtual Memory frame click Change, the Virtual Memory dialog opens.
6. Note that the drive where you want the paging file to be should have sufficient free space for the paging file. The recommended size of the paging file is 1.5 times of the physical RAM installed. If you are unsure of the size leave it to the system managed size.
Be aware that if the virtual memory paging file is made too small the system performance may degrade. Too large size is however not recommended.
7. Select the Drive [Volume Label] and click on the option custom size. Input the values Initial size [MB] and Maximum size [MB].
Assuming that you have 256MB of physical RAM installed, the initial size is 256x1.5=384MB and the Maximum size is 256x2=512 MB.
If you have 1GB or more physical RAM installed then limit the size of the paging file.
8. Next, click on the Set button. The value appears on the paging file size for that drive.
9. Select the Windows System drive (typically C:) and select the option No paging file, and then click Set.
10. Finally click on the OK button. Click OK on the Performance Options dialog. Click OK on the System properties dialog. You will be prompted to restart your computer; you may do so or do it later; however the new settings will be applied after the next restart.
Eliminate unnecessary start-up items. Perform the following steps.
Click on the Windows Start button and select Run (Win Key + R). Type in msconfig to Open and click OK. On the System Configuration Utility dialog, Click on the StartUp tab. Unselect all the entries that are not needed, keep only checked the important ones that are required to run on every Windows start-up. Finally click on the OK button. You may be prompted to restart the computer.
Similar to the StartUp programs, there are certain services which are not used but take up system resources; disabling the ones that are not used, can free up some amount of valuable system resources. Perform the steps described below.
Open the Services console by; Go to Start Run type in services.msc. Click OK.
Alternately Open, Windows Control Panel →[Performance and Maintenance] →Administrative Tools →Services.
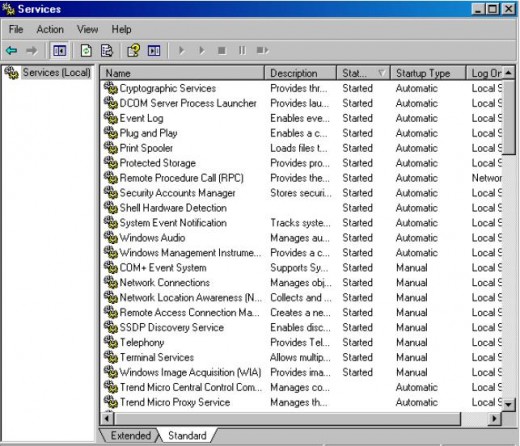
Select by clicking on the Service Name on the right-pane, Click on the Action menu
(alternately right-click) and select Properties menu option.
Extended tab provides service information, Look at the StartUp Type for the Services. Services can be set to Manual from the default setting Automatic. If a service is disabled by Windows, leave it to the default setting Disabled, unless you have a specific reason.
Set the startup type for the services to Manual for the following services below:
Distributed Link Tracking Client
Indexing Service
Help and Support
Logical Disk Management
Network Location Awareness
Network Provisioning service
Automatic Updates
Office Source Engine
Security Centre
Task Scheduler not using Windows Task Scheduler to run a scheduled task.
Themes
Windows Time
Computer Browser If not connected to a network
Error Reporting Service
Application Management
NetMeeting Remote Desktop Sharing Remote Registry
Portable Media Serial Number Service
QoS RSVP
Remote Registry
Remote Desktop Help Session Manager
Secondary Logon
TCP/IP NetBIOS Helper Service
Web Client
Wireless zero configurations
Many more services can be set to Manual/Disabled, Please consult a local system expert for further information and configuring your computer system.
Data keeps getting scattered due to constant copying/deletion of files in the hard-drive disks. This is called data fragmentation. Use the Windows Defragmenter or any other third-party-software to perform the defragmentation of the drive. Periodic defragmentation accumulates the data in one place thus reducing the seek time of the disk. Before performing disk defragmentation please perform the disk clean up to delete temporary backup old files. It is recommended to perform disk clean-up prior to disk defragmentation. You can perform the tasks following the menu Start →All Programs →Accessories →System Tools →Disk Cleanup ¦ Disk Defragmenter. Alternately on the Drive Properties dialog click on the Tools tab, and perform the appropriate task.
Disable THUMBNAIL Caching, Open, My Computer →Tools menu →Folder Options Select the View tab Check the option Do not cache thumbnails; uncheck Automatically Search for network folders and printers. Finally Click OK.
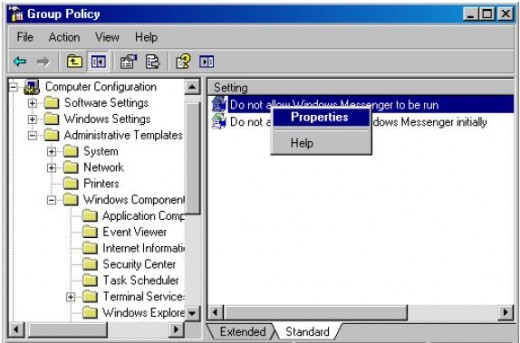
Windows Messenger takes up a couple of memory during start-up. To get rid of this for good go to Start Run, type gpedit.msc Click OK. The Group Policy Window Opens. On the left pane, Click Computer Configuration → Administrative Templates → Windows Components → Windows Messenger. In the right-hand pane Select the entry Do not allow Windows Messenger to run, choose its properties and select the option enable, and click OK.
In the Group Policy Editor Window left tree pane expand Computer Configuration → Administrative Templates → Network → QoS Packet Scheduler, on the right pane Enable Limit Reserve Bandwidth with 0%, This will help increase your internet bandwidth. Browse the Internet faster using Google Public DNS, A DNS Server can also help protecting your network.
Apply Windows Service Pack patch updates if not installed, update the Virus-definition database for your anti-virus scanner, and perform a through scan for any malware.
Happy Computing
No warranty of any kind: All opinions are of my own based on my personal experience, and does not provide any warranty of fitness or accuracy said in the document. This generalized document may be unsuitable for special cases of installations. If you are not sure consult a local system expert before making any changes on to your computer system.
© 2012 Dipankar Basu