- HubPages»
- Technology»
- Computers & Software»
- Computer Software
Mind Mapping Tools

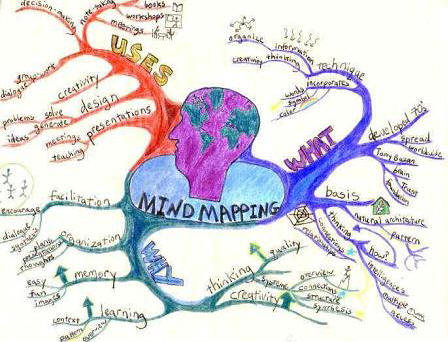
Our minds are full of thoughts. And unless we organise them, it is difficult to focus on important matters. This also becomes a challenge when collective intelligence has to be gathered or exercises, such as when brainstorming sessions are to be conducted.
Though the current office applications like Word processors and presentation tools provide a way to demonstrate already processed ideas (that is, meaningful thoughts), they do not provide ways to effectively gather ideas. This is where a new and rapidly growing genre of software called Mind Mapping tools enters.As the name suggests, these tools are specifically designed for the purpose of jotting down thoughts in form of a map with hierarchical links to create order out of apparently unstructured thoughts and ideas hovering in our minds.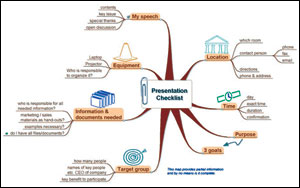
Free Mind
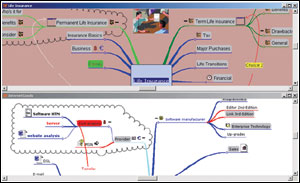
Let us explore one such tool called Free Mind for Windows. A one-time Project of the Month over Source Forge, this is a site offering a huge collection of open-source software. This tool can look a little intimidating at first as it presents a left side bar with a list of icons - which are just for info marking, not for functionality.
Start with pressing the New button on toolbar or File > New. An oval shape appears in the middle of the screen with a caption New Mindmap. Click it to covert the shape to editable text field. This is the root node, that is, the focal thought point. Call it Year 2008 for example, and assume we want to try a new operating system Ubuntu this year.
Press Insert or use r-click to select New Child Node. Name this child node as Ubuntu. Press Insert again to add a note with caption "Search the internet for installation guide." Save the map before other operations could be formed. Making use of icons to visually guide this very primitive map, r-click the Ubuntu node and select Icon > Linux. Similarly, place the icon of Flag on its sub-node to show an outstanding item.
Along with icons, other visual aids to make the map more meaningful is Physical Style. Press Enter on our last node to add a sibling node captioned ‘Ask a friend for Live CD' and select Needs Action by pressing r-click and selecting Physical Format. Note that now this node has red colour to make it physically distinct.
Mind mapping is not just a one-off activity. It can be used to track progress on a continuous basis.
For example, you find time this weekend and download a few Ubuntu installation tutorials from the internet which you know you will have to refer to come next weekend. Simply, go to the relevant node in the map, r-click and select Insert > Hyperlink. Shortcut keys for all such menus appear next to their captions for quick access. Select a file and note that the node now shows a red arrow. Moving the pointer over this node reveals the attached file name and location at the status bar. Since it is a hyperlink, it provides an easy access to follow-up on a cluttered mind's organised thoughts.
For further emphasis, node appearance can be modified to one's wishes with the options of colours, background and edges. Continue to transfer all the outstanding tasks from your mind onto the visual map this way, making use of indicative icons for quick reference. If at any time you feel overwhelmed by the size of the structure, use the plus and minus buttons at the top to fold or unfold levels, so that focus can be retained at higher levels or at minute details as and when required.
At times, there could be some relationship among the nodes other than parent-child or sibling. For example, searching for an online reference resource and asking your colleague for a report on the same subject can be two distinct sibling nodes under Project Report node. However, assume that you have to verify the contents of colleague's report from your own internet reference material. Such links can be captured by selecting both the nodes and selecting Insert > Graphical Link which draws an arrow from first to the second selected node.
When the mind map expands and requires scrolling, graphical links can be very useful. There is also an option to create hyperlinks between the nodes themselves using the Insert menu. This comes in handy to jump instantly from one node to another when two nodes share some common information under different parent nodes.
Obviously, this map mechanism is of little use if all we could capture in our nodes is its name and links. Thankfully, there is an option of notes. Select a node, go to menu Insert and select Note. From now on, selecting this particular node will result in notes area at the bottom of the screen. Make sure to move your mouse to this area without hovering over any other node otherwise notes area will disappear.
Now we discuss a mind mapping tool for Ubuntu, called View Your Mind. It also starts with a root node in the middle. Adding an icon is fairly easy as all it takes is a click at the toolbar at the top, and multiple icons can be added as well. Addition of notes is simple using View > Show Notes Editor that opens a separate window and adds a clickable icon inside the node. The export option is something to be noted here as it allows XML as well as TXT or image.
A question may arise here though: how is mind mapping different from note taking which has grown in popularity as a new kind of software. The foremost difference is orientation. Notes do not display a cohesive picture with graphical layout. Furthermore, in mind mapping, different maps can be created for different projects or assignments.
Tools such as mind mappers are only as good as the users use and implement them.