Move and back-up My Documents in Windows 7: Move and save all of your documents in Windows 7

Microsoft's Windows 7 operating system is becoming popular day by day. In fact, Windows 7 is the future hope of various Windows users. I bought Windows 7 DVD just few days ago and installed it. After installing, I amazed and I decide to use it. Like me to many people it becomes the popular operating system. But guys, do you know the process of back-up your documents (I mean My Documents on your Windows 7 machine). Remember, it's not save to keep all of your documents in your installed operating system folder. Because if your Windows 7 operating system crashes then you may loose all of your documents. So, it's better to change My Documents default save location and put the location other drives rather than the Windows 7 installed drive. In this page you will learn the ways to change the location or moving My Document default location to other location of your computer. Before moving to the ways to moving My Documents location, I want to tell you the advantages of moving My Documents folder in Windows. The advantages are:
- It saves your documents easily.
- If your computer operating system crashes, you don't have to worry. You can easily recover them from that location.
- Moreover, if your computer is heavily affected by virus, then you may need to reinstall your Windows 7. But you can still find all of your documents easily.
Steps to move My Documents to other location in Windows 7
Follow the following steps to to move My Documents to other location in Windows 7:
Step 1: Opening My Documents folder
Click on Start menu and select Documents. You will see the documents folder is opened to a new window.

Step 2: Accessing My Documents properties
- From the opened window, double click on Libraries .
- Now, again double click on Documents folder.
- You will see My Documents folder.
- Right click on My Documents folder and click on Properties.

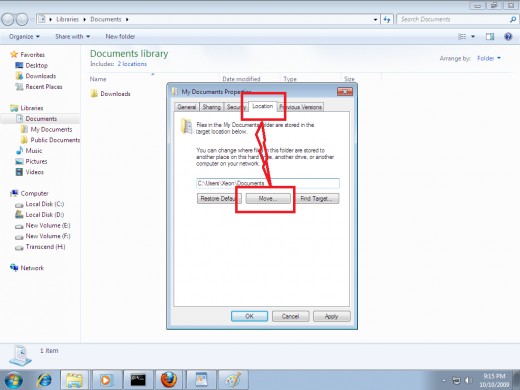
Step 3: Preparation to move "My Documents"
- From My Documents Properties click on Location tab.
- Click on Find Target and click on Move button.
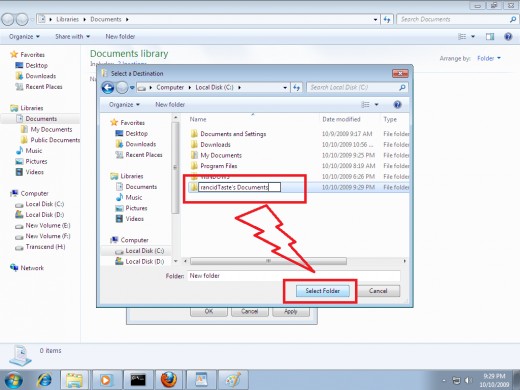
Step 4: Creating folder for your documents
- Navigate the drive location(other than the installed drive) where you want to keep your documents.
- Create a new folder by clicking right button of your mouse and name it as your wish. For example, I give it a name as rancidTaste's Documents.
- Click on Select Folder button.
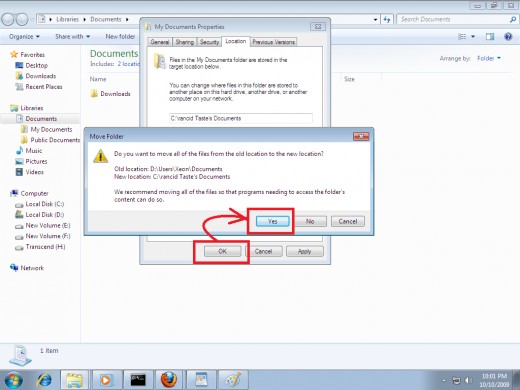
Step 5: Finalizing My Documents folder location
- After selecting the folders (in this case, rancidTaste's Documents), click on OK button.
- A warning message will be popped-up which will ask you to confirm your desired change for my documents folder.
- Click on Yes button and then click on OK button.
And in this way, you can easily change the location of My Documents folder in Windows 7 in all (i.e. Windows 7 Ultimate, Business, Home, Basic etc.) edition.
Hope, you success. If you face any difficulties or problems then tell me in the comment section. I will try to solve your problem.
@Written by rancidTaste


