- HubPages»
- Technology»
- Computers & Software»
- Computer Science & Programming
Programming The Kinect for Windows: Getting Started

What Is A Kinect?
Remember in the Minority Report film when Tom Cruise waved his arms in the air and controlled a computer display that hovered in mid-air without touching it? The Kinect can help you do that. Well, at least part of it. The Kinect is a powerful sensor array that connects to a computer (or and XBox 360) and allows the computer to interact with a user who stands in front of it, without the user having to touch anything. Inside the Kinect is a web cam, an infrared sensor, an array of microphones, and a motor to adjust the viewing angle of the Kinect. When properly programmed, the Kinect can interpret the movement and gestures of people, track human faces and other objects, listen to voices and recognize words, and many other things, too. It is truly a Star Wars era device. And the best part is that you can buy one off the shelf from Microsoft to program yourself.
I have been fortunate lately to have written several pieces of software for my company using the Kinect for Windows. It was a great experience that really stretched my pre-conceived notions about how humans can interact with computers. My favorite application to date is one I wrote that lets the user stand in front of a large display and control a slide show of animations (like a PowerPoint show) by gesturing in the air as they talk. It looks like magic to the audience and is really fun to use. In this tutorial, I am going to walk you through how I got started programming the Kinect and what I learned along the way. I hope you enjoy this article.
What You Will Need
The first thing you will need to get started is a Kinect device to plug into your Microsoft Windows 7 based computer. You cannot use a Kinect that is meant for the XBox, you need to buy the "Kinect for Windows". This unit is available from Microsoft for about $250, but you can find it cheaper on Amazon and some other places.
Next, you are going to need some sort of Visual Studio compiler for Windows. I use C# (C-Sharp) for programming, and this tutorial is using C# syntax, but you can use other languages to program the Kinect. There are on-line tutorials for several other languages around the web. If you don't already own Visual Studio, there is a free version called Visual Studio Express available here.
Finally you will need the Kinect SDK (Software Development Kit), which you can get here. I would suggest downloading and installing both the SDK and the Toolkit, because the toolkit contains lots of great code examples for the SDK, and also contains the KinectExplorer, which is a great application to use to calibrate your Kinect for the room you plan to work in.
Once you have gathered up everything you need, follow these steps:
1) Install Visual Studio onto your Windows 7 computer.
2) Install the Kinect SDK and Toolkit onto the computer.
3) Install the Kinect device onto the computer.
One tip about installing the Kinect. Plug it into a different USB hub than your mouse and keyboard if possible. For instance, if they are plugged into the back of your computer, try plugging the Kinect into the front of the computer, which is usually on a diferent hub. The Kinect is a USB bandwidth hog, and will work better on its own hub.
When you have the Kinect installed, go to the toolkit on your Windows Start menu, which should be located at Start/All Programs/Kinect For Windows SDK vx,x, and open up the Developer Toolkit Browser. Inside this browser, scroll down to the KinectExplorer and Run that application. It should bring up a window like this:
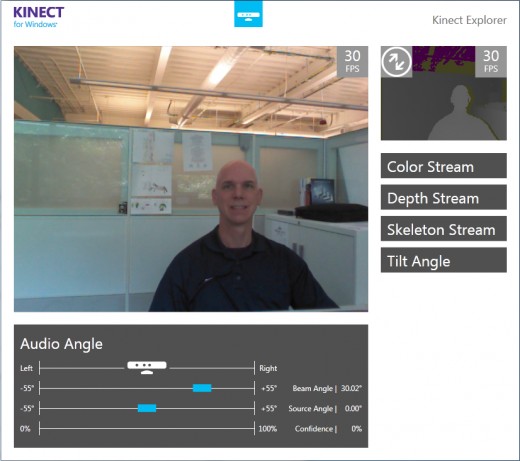
If your screen looks like this (albeit with a less scary face), then you are ready to write some Kinect applications. If it does not, then your Kinect is not working properly or it is aimed in the wrong direction. If you see the floor or ceiling, try using the TiltAngle function in the KinectExplorer application to re-aim your Kinect. DON'T manually tilt your Kinect up and down. You will break it. If you don't see any image at all, you will want to troubleshoot your installation and search on the Kinect forums on Microsoft for some help.
So assuming that you see a good picture on your Kinect, let's get started with our first bit of Kinect code.
Starting a Kinect Application
For this tutorial, we are going to be writing a simple Windows forms application that does pretty much the same things as parts of the KinectExplorer application. If I get enough positive feedback on this tutorial, I will post one later showing you how to make your own gesture recognition software for the Kinect. For now, though, let's just focus on some basic Kinect features.
The Kinect will work in conjunction with several Windows programming models. It will work with the XNA game framework, the WPF framework, and the Winform framework, and possibly others. These are the three that I have worked with myself. For this tutorial, I am going to use the Winform framework, but the techniques I am going to show you will work the same in the other frameworks, thanks to the ubiquity of the .NET framework. (Go Microsoft!!) I am going to assume that you are familiar with .NET programming. If not, you probably should get a book on basic .NET programming and learn that before you try to tackle this application.
So to get started, open up Visual Studio and create a new project of the type "Windows Forms Application". You can name your project whatever you like. Mine is called "WindowsFormsKinectTest".
Once the project is loaded, the first order of business is to bring in the Kinect SDK DLL so that we can use it in our program. In the solution explorer for the project, add the Kinect SDK to your references. It should be in the .NET tab of the Add References dialog and it is called simply, "Microsoft.Kinect". If it is not there, you probably have an issue with your SDK installation.
Now, if you look at the code-behind for the default form that was created with our project (usually called Form1), you will see something like this:
using System;
using System.Collections.Generic;
using System.ComponentModel;
using System.Data;
using System.Drawing;
using System.Linq;
using System.Text;
using System.Windows.Forms;
namespace WindowsFormsKinectTest
{
public partial class Form1 : Form
{
public Form1()
{
InitializeComponent();
}
}
}
If you compile this code and run it, you will get a blank Windows form. That is a good thing. It means that everything is working properly. This point is where we will start our Kinect Application code.
Initializing the Kinect
Believe it or not, the hardest part of programming a Kinect is getting it to properly initialize. The Kinect is pretty sophisticated inside, and there are lots of prerequisites that the hardware has to recognize before it will start up. For instance, you can only have one application at a time using a Kinect.
To set the Kinect up so that your application can use it, you need to call an initialization routine. Several of the example applications in the SDK Toolkit feature an initialization class called "KinectSensorChooser". However, this class did not exist for a Windows Forms application, so I borrowed the WPF version of the class. To add it to your project, simply right click your project in the Solution Explorer, and add an existing item to your solution. In the add dialog, rummage around in the WPF examples until you find "KinectSensorChooser.cs", then add it to your solution. I found it in "C:\Program Files\Microsoft SDKs\Kinect\Developer Toolkit v1.5.0\Samples\C#\Microsoft.Kinect.Toolkit", but your mileage may vary.
We are going to use the KinectSensorChooser in the Load event of our Form. So go to the design view of your Form1 and double-click the Load event in the properties of the Form. This will create a Load event method in the code-behind that should look like this:
private void Form1_Load(object sender, EventArgs e)
{
}
Now in your Form1 class declaration, add an instance variable for the KinectSensorChooser, like this:
private KinectSensorChooser _chooser;
And in the Form1_Load method, initialize that variable, like this:
_chooser = new KinectSensorChooser();
If you compile this now, you will get some errors. For one thing, you need to put a "using" clause in the top of your Form1 class for the Microsoft.Kinect.Toolkit. Another issue is that the KinectSensorChooser class has some dependencies on other classes from the toolkit. So you need to go and add the source code for those classes into your project just like you added the KinectSensorChooser.cs class. Here are the source code files that you need:
ContextEventWrapper.cs
ThreadSafeCollection.cs
KinectChangedEventArgs.cs
CallBackLock.cs
Once you have added these source code files to your project, it should compile and run, and do nothing really exciting. But we are about to fix that!
Start It Up!
Now that the software can talk to the Kinect, let's start the Kinect up so that we can use it in our application. To do that, first we are going to add one of the events that the KinectSensorChooser delegates to our form1 class. So in the Form1_Load event, add this line of code below the chooser initialization:
_chooser.KinectChanged += ChooserSensorChanged;
If you compile this, the compiler will complain that the ChooserSensorChanged method does not exist. We can remedy that by adding that method to our Form1 class, like this:
void ChooserSensorChanged(object sender, KinectChangedEventArgs e)
{
var old = e.OldSensor;
StopKinect(old);
var newsensor = e.NewSensor;
if (newsensor == null)
{
return;
}
newsensor.SkeletonStream.Enable();
newsensor.ColorStream.Enable(ColorImageFormat.RgbResolution640x480Fps30);
newsensor.DepthStream.Enable(DepthImageFormat.Resolution640x480Fps30);
newsensor.AllFramesReady += SensorAllFramesReady;
try
{
newsensor.Start();
rtbMessages.Text = "Kinect Started" + "\r";
}
catch (System.IO.IOException)
{
rtbMessages.Text = "Kinect Not Started" + "\r";
//maybe another app is using Kinect
_chooser.TryResolveConflict();
}
}
As you can see, this method has a lot going on inside. When it is called, it is going to see if there is already a Kinect sensor running. If it is, it is going to stop the sensor. Then it will try to start the sensor, and if successful it will enable data streams that come from the Kinect on a continual basis. These data streams include a)color web cam video, b)a model of the skeleton of anyone that is in the camera range of the Kinect, and c) a depth image of the 3-d space in front of the Kinect. Cool stuff, huh? But this method won't run because it is asking to call other methods that we have not written yet. So let's do that.
Add these methods to your Form1 class.
private void StopKinect(KinectSensor sensor)
{
if (sensor != null)
{
if (sensor.IsRunning)
{
sensor.Stop();
sensor.AudioSource.Stop();
}
}
}
        void SensorAllFramesReady(object sender, AllFramesReadyEventArgs e)
        {

        }
We also need to add a messagebox to our Form, so switch to the Form design view and drop a RichTextBox onto the form somewhere. Name it rtbMessages. Finally, in the Form1_Load event, add this line of code:
_chooser.Start();
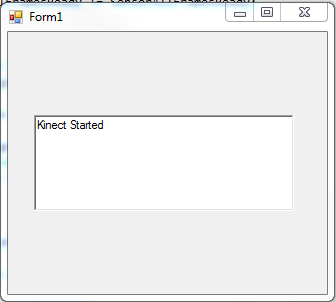
Now compile the code and run it. You should see something like this:
I Am Not Impressed
So as exciting as it is to start up the Kinect and have it work, our application doesn't really do anything, other than show a message. Let's remedy that by showing the video feed coming out of the depth sensor in real-time. To do that, we need to know when the depth sensor has a frame ready to show. So add this code to your application. (Note that in the case of the SensorAllFramesReady method, we are replacing the existing empty method with one that contains code)
void SensorAllFramesReady(object sender, AllFramesReadyEventArgs e)
{
SensorDepthFrameReady(e);
video.Image = _bitmap;
}
void SensorDepthFrameReady(AllFramesReadyEventArgs e)
{
// if the window is displayed, show the depth buffer image
if (WindowState != FormWindowState.Minimized)
{
using (var frame = e.OpenDepthImageFrame())
{
_bitmap = CreateBitMapFromDepthFrame(frame);
}
}
}
        private Bitmap CreateBitMapFromDepthFrame(DepthImageFrame frame)
        {
            if (frame != null)
            {
                var bitmapImage = new Bitmap(frame.Width, frame.Height, PixelFormat.Format16bppRgb565);
                var g = Graphics.FromImage(bitmapImage);
                g.Clear(Color.FromArgb(0, 34, 68));
                //Copy the depth frame data onto the bitmap
                var _pixelData = new short[frame.PixelDataLength];
                frame.CopyPixelDataTo(_pixelData);
                BitmapData bmapdata = bitmapImage.LockBits(new Rectangle(0, 0, frame.Width,
                 frame.Height), ImageLockMode.WriteOnly, bitmapImage.PixelFormat);
                IntPtr ptr = bmapdata.Scan0;
                Marshal.Copy(_pixelData, 0, ptr, frame.Width * frame.Height);
                bitmapImage.UnlockBits(bmapdata);

                return bitmapImage;
            }
            return null;
        }
When you compile these changes, you will see that you are missing something called _bitmap. That is a type Bitmap that you should add to your Form1 class declaration. You should also add a PictureBox called video to your Form design. This will show the depth frame video feed in real time. You will probably want to play around with the properties of the video PictureBox so that you can see the whole image from the depth frame. The depth sensor is sending a 640x480 picture, so your PictureBox needs to either stretch that image, or be at least that size.
Anyway, if you have done everything right, you should see something like this picture:
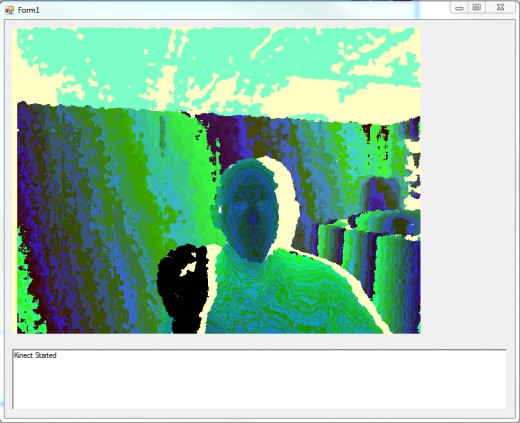
Now That Is Cool
There now, that is much better. You can now see a live video feed of the depth sensor from the Kinect. You are on your way to creating some really cool applications with the Kinect. If you had trouble getting your application to compile, you are probably missing "using" clauses in the top of the application or some other minor thing. The full code list looks like this:
using System;
using System.Drawing;
using System.Drawing.Imaging;
using System.Runtime.InteropServices;
using System.Windows.Forms;
using Microsoft.Kinect;
using Microsoft.Kinect.Toolkit;

namespace WindowsFormsKinectTest
{
    public partial class Form1 : Form
    {
        private KinectSensorChooser _chooser;
        private Bitmap _bitmap;

        public Form1()
        {
            InitializeComponent();
        }

        private void Form1_Load(object sender, EventArgs e)
        {
            _chooser = new KinectSensorChooser();
            _chooser.KinectChanged += ChooserSensorChanged;
            _chooser.Start();
        }

        void ChooserSensorChanged(object sender, KinectChangedEventArgs e)
        {
            var old = e.OldSensor;
            StopKinect(old);

            var newsensor = e.NewSensor;
            if (newsensor == null)
            {
                return;
            }

            newsensor.SkeletonStream.Enable();
            newsensor.ColorStream.Enable(ColorImageFormat.RgbResolution640x480Fps30);
            newsensor.DepthStream.Enable(DepthImageFormat.Resolution640x480Fps30);
            newsensor.AllFramesReady += SensorAllFramesReady;

            try
            {
                newsensor.Start();
                rtbMessages.Text = "Kinect Started" + "\r";
            }
            catch (System.IO.IOException)
            {
                rtbMessages.Text = "Kinect Not Started" + "\r";
                //maybe another app is using Kinect
                _chooser.TryResolveConflict();
            }
        }

        private void StopKinect(KinectSensor sensor)
        {
            if (sensor != null)
            {
                if (sensor.IsRunning)
                {
                    sensor.Stop();
                    sensor.AudioSource.Stop();
                }
            }
        }

        void SensorAllFramesReady(object sender, AllFramesReadyEventArgs e)
        {
            SensorDepthFrameReady(e);
            video.Image = _bitmap;
        }


        void SensorDepthFrameReady(AllFramesReadyEventArgs e)
        {
            // if the window is displayed, show the depth buffer image
            if (WindowState != FormWindowState.Minimized)
            {
                using (var frame = e.OpenDepthImageFrame())
                {
                    _bitmap = CreateBitMapFromDepthFrame(frame);
                }
            }
        }


        private Bitmap CreateBitMapFromDepthFrame(DepthImageFrame frame)
        {
            if (frame != null)
            {
                var bitmapImage = new Bitmap(frame.Width, frame.Height, PixelFormat.Format16bppRgb565);
                var g = Graphics.FromImage(bitmapImage);
                g.Clear(Color.FromArgb(0, 34, 68));

                //Copy the depth frame data onto the bitmap
                var _pixelData = new short[frame.PixelDataLength];
                frame.CopyPixelDataTo(_pixelData);
                BitmapData bmapdata = bitmapImage.LockBits(new Rectangle(0, 0, frame.Width,
                 frame.Height), ImageLockMode.WriteOnly, bitmapImage.PixelFormat);
                IntPtr ptr = bmapdata.Scan0;
                Marshal.Copy(_pixelData, 0, ptr, frame.Width * frame.Height);
                bitmapImage.UnlockBits(bmapdata);

                return bitmapImage;
            }
            return null;
        }
    }
}
Everything else should be a snap. Give it a try to let me know if you have issues. If you want to see more, leave some comments and I might write another tutorial about the skeleton buffer or using gestures to control an application. Have fun and enjoy doing it yourself.
Related

2D Game Programming In C++ Under Windows: Doing Cool Things With Allegro

How to Build a Timber Frame Conservatory

Ghost Hunters Explain How Xbox Kinect Sees Spirits Inside Haunted Houses

Computer Based Antivirus Strategies That Secure Your Computer Online

How to use Scratch to create games, art and to teach children to code


