A Tutorial: Sales Tax Calculator Program (code) done in Visual Basic (VB)

This hub will show us how to build a total cost calculator in Visual Basic for Applications (VBA). VBA is included in Excel, so all you will need is Excel 2010. It may also work in previous versions of Excel, not sure about that.
In order to use VBA, you will need the Developer tab found within Excel. Here is how to display it. Open up Excel and do as follows:
1. File --> Options (click)
2. Customize Ribbon (click)
3. Check the “Developer” box and click “OK” at bottom.
4. You will now see “Developer” tab. Click it.
5. Section dealing with macros and VBA (Visual Basic) is now visible.
Now we will save the open workbook as an “.xlsm” file, which allows us to work in VB. File --> Save As, and a window will open up. Make file name = “tax” and Save As Type = “Excel Macro Enabled Workbook”.
Now we can write the program which gives us quick and easy cost calculator including sales tax.
Click on “Developer” Tab. Over on far left, see “Visual Basic” tab. The Visual Basic workspace comes up. Two workspaces are open, the VB space and the spreadsheet. We will not do anything with the spreadsheet; it only serves as a place where our GUI, or graphical user interface, will show up. The GUI will be part of our program, and will allow us to enter price and tax rate, then display total cost.
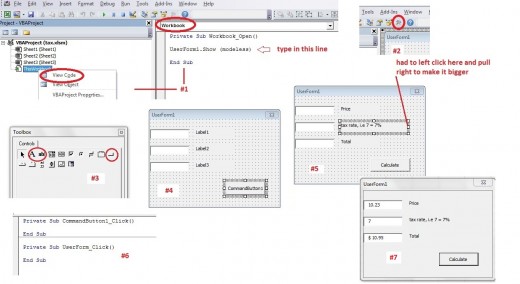
Refer to the diagram/ picture, area #1. In the VB workspace, you will see on left three spreadsheets listed, along with “ThisWorkbook”. Right mouse click on ThisWorkBook and select (left click) on “view code”. Then, in the drop down menu at right, select “workbook” (see picture). This code will be visible:
Private Sub Workbook_Open()
End Sub
All that means is the workbook opens. In the diagram, I show one line of code you need to type in. Put that one line in. What that line does is activate a visual user form, which will be our interface. We will build that form next.
Do as follows. Still working with VB interface, at top of page, Insert --> UserForm. Your form will show up, most likely with a toolbox. If the toolbox does not show we will fix that in a minute. In the VBA Project window, see we now have UserForm1 under ThisWorkbook. Right click on Useform1 and see you can toggle between View Code and View Object. Try that and get a feel for it. When you toggle back to View Object, the toolbox may now be there. If not, there will be a toolbox icon available, see picture area #2. If your toolbox did not come up, click on the toolbox icon and it will appear. See that the icon will toggle the toolbox on and off. Keep it on and drag it to the right of or below the form.
Now we will build the form, our interface. In the picture, area #3, see I have three toolbox icons circled, from left to right: Label, TextBox and Command Button. Hover over them with the mouse in your workspace and you will see the names. In area #4 of the picture, see that I have left clicked (with hold down click) and dragged all three from the toolbox onto the form: three text boxes, three labels, and one command button. If you make a mistake you can left click on any of them, then right click and delete it. Then try again. Now you can slow double click on each and change the text as I show in area #5. If you fast double click, the code view will come up. No problem, just go back to VBA project window, left click on UserForm1 to select it, right click and choose View Object. So we now have our form built as shown in area #5.
Now try this. Close the VB window and the workbook will remain. Save the workbook and close it. Re-open and your form will show up. We have not placed our final code, so it will not work further. Close the form by clicking on the “x” at upper right corner. Let’s get back into the VB interface. Hit the Developer Tab, then Visual basic tab. In VBA project window, left click select UserForm1, right click and select View Code. You will see picture area #6, which is blank code for the form and command button you placed in it. Copy and paste this one line of code between the two lines in the UserForm code:
CommandButton1
In the CommandButton code, paste these lines in between:
Dim bpstr As String, trstr As String, tstr As String
Dim bp As Single, tr As Single, t As Single
bpstr = TextBox1.Text
bp = C(bpstr)
trstr = TextBox2.Text
tr = Val(trstr) / 100
t = bp + tr * bp
t = Math.Round(t, 2)
tstr = Str(t)
tstr = Trim(tstr)
tstr = "$ " & tstr
tstr = Trim(tstr)
TextBox3.Text = tstr
What does the code do? The first one line code we put into the Workbook at the beginning just brings up our form when the Workbook is opened. The other one liner we put into the Userform code simply passes us on to the command button on our form. The big block in the CommandButton code will, once you type in the price and tax, calculate the total price including tax.
Close the VB interface. Save the workbook. Open it up, the form will show. I have an example in picture area #7, where I type in price and tax rate, then hit “calculate” (the command button, remember?). The calculated cost then appears in the third window. We are done. Good job.
Related

How to Find the Missing Toolbox in Gimp

How to write Visual Basic code to configure a User Interface created using a UserForm in Excel 2007 and Excel 2010

Techie Corner: Easy Steps to PowerPoint- It Only Looks Scary!

Emulate A TI-83 Plus On Your Windows PC

Excel VBA - Guide To Creating A New Sheet Everyday Automatically