Secure Browsing with SSH

You are at your local Panera enjoying your smoked turkey breast sandwich and chicken noodle soup. The sandwich is just epic today... the staff just really did a good job on making this meal. The only thing that can make your combo meal even more enjoyable is letting everyone on Facebook know just how good it is right? So you pull out your laptop, connect to the free Wi-Fi hotspot, and your off. Good to go right? Don’t be so sure. One of the caveats when connecting up to an unsecured open wireless connection is just that; there is no security.
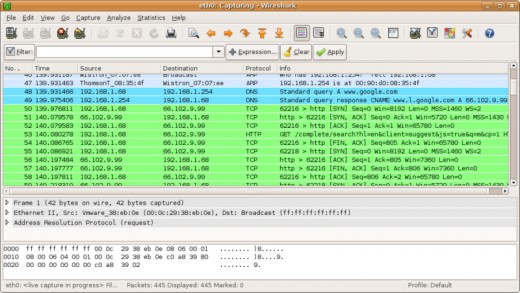
If there were a user with malicious intent also connected up to the same hotspot, they could utilize a packet sniffer like Wireshark to literally read all plain text packets being transmitted from your laptop. Well what can you do though? You want to continue to browse the Internet, but you don’t want people to see what you’re doing.
A positive note is sites like Facebook do allow for a secure browsing (https) option when available. Most banking and email sites are secure browsing by default also. What about casual browsing though? What can you do to protect yourself when secure browsing is not an option?
One of the easiest options out there for secure browsing is to surf the Internet over a secure shell (SSH) tunnel. When performed correctly, your browser will use your established SSH connection to provide a secure browsing session, and help protect you from anyone trying to get a peak at what you are doing.
What do you need:
- SSH Client on your laptop (I recommend PuTTY)
- Access to a Linux box running SSH
- Web Browser
1. On your laptop, Setup a new PuTTY Connection
For this step, we will be using the SSH client program PuTTY which can be downloaded here. Set the Host Name or IP Address to your accessible Linux box that is running SSH*. Set the port to the secure shell default 22, and verify that the protocol selected is SSH. Name your session, and click Save.

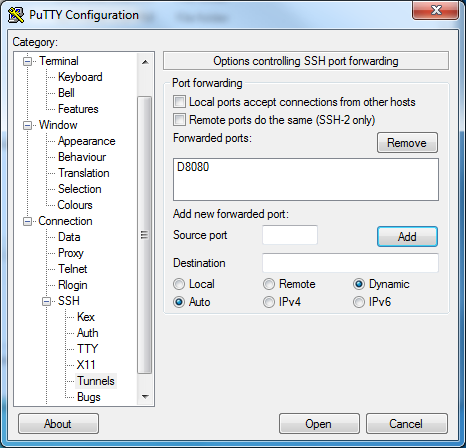
2. Now we configure our tunnel
With our new session still open, select the “Tunnels” option under Connections > SSH. Here is where we will add our new dynamic port configuration. Under “Add new forwarded port”, type in 8080 for the Source port. Leave the Destination empty, and be sure to select the “Auto” and “Dynamic” radio buttons. Press “Add”, and you should now see “D8080” listed within the Forwarded Ports window. Hit “Save” again to ensure that your settings are remembered!
3. Tunnel is good to go. Next, let’s setup our Web Browser.
For Google Chrome, click the Wrench and choose Options. Select the “Under the Hood” tab, and under Network click “Change Proxy Settings”.
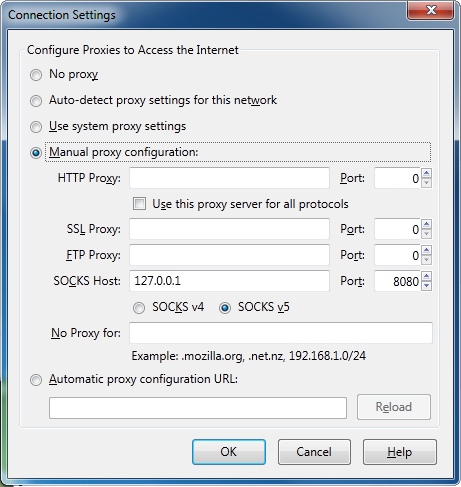
With the Internet Properties window now open, click “LAN Settings”. Check the box for “Use a Proxy server for your LAN” and use the following settings:

Ensure that Socks is set to use 127.0.0.1, with the port set to “8080”.
Mozilla Firefox is configured in almost the same fashion. Click Tools > Options. Select the Advanced tab, and choose “Network”. Click “Settings”, an use the same proxy settings as depicted for Chrome.
4. Connect to our new tunnel
Choose your newly named session, and press “Open”. Input your login credentials, and if all goes well you should now be connected successfully.
5. But... I don’t want to use PuTTY.
Not a fan of PuTTY? Not a problem. You can still get this going using only the command line (assuming that you do have an SSH client like OpenSSH running on your laptop). If that is the case, simply run the following command:
ssh -d 8080 username"@"myremotelinuxbox.com
This should also allow you to establish your secure tunnel.
6. Enjoy
You now have the ability to surf securely when you are connected to a non-secure network. Keep in mind though that this method will secure your connection at the hotspot to your SSH host. Security between your SSH host and the Internet is another nugget.
More on CT Web Design and other articles.
Related

How to Build a Large Citywide Wi-Fi Hotspot/Zone
, What to Use")
6 Reasons Why You Should Secure Your Unsecured Wi-Fi Wireless Network, What Can Happen (Such as Porn), What to Use

How to Speed Up Internet Connection with Google DNS

How to Start a Wi-Fi Hotspot Business

Dual SIM Nokia C2 – No More Fuss in Configuring GPRS Internet and MMS Settings on China Phones


