Set Up Connection in Ubunto: how to setup Internet Connection on Ubuntu

After completing the Installation of Ubuntu operating system, every body tries the Internet connectivity to his / computer or notebook or laptop. Me too, follow the same step. After completing the installment, I am much interested to setup internet connection on Ubuntu and searched lots of tutorial. The thing I found that most of the tutorials are not easy to understand and configure the Internet. By the way, it took me more than one hour to configure the Internet connection to my Ubuntu installed laptop by reading the tutorials from the way. After this, I decided to write a tutorial page which will easily explain the details step by step to setup internet connection on Ubuntu computer or laptop or notebook. In this page, you will find the step by step instructions to setup internet connection on Ubuntu.
Steps to Setup Internet Connection on Ubuntu
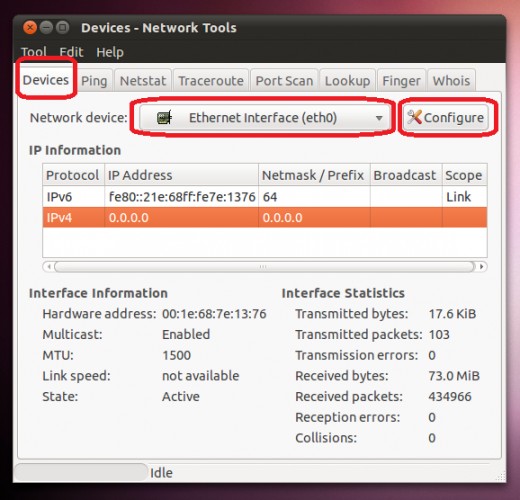
Step 1: Click on System and Administration and then choose Network Tools from the drop down menu. After clicking on Network Tools, you will find Devices -Network Tools window. All the Manual configuration of LAN can be done through this option.
Step 2: From the Network Tools window, choose the Network device to configure network. Remember, we are learning to configure the IP address manually. So, we must have to choose the network card which we would like to configure. So, from the Network Device choose the LAN card. In this example, we choose Ethernet Interface (eth0) and click on Configure button.
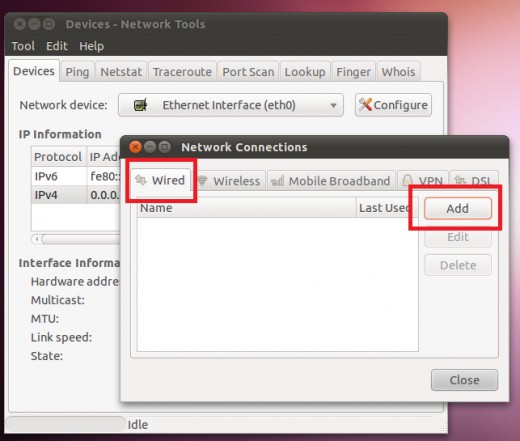
Step 3: After the above steps, you will find the window of Network Connections and choose Wired tab. If you find any ip address or something into there, then Delete all of them. Now click on Add button which enables you to add network ip address as you like from the Editing Wired Connection
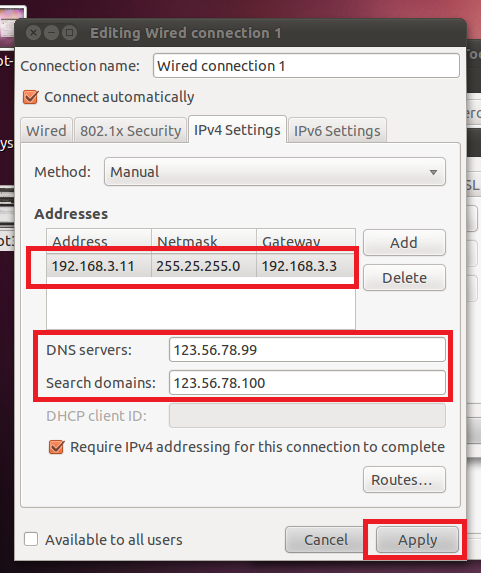
Step 4: From Editing Wired Connection window choose IPv4 Settings tab and choose Manual from the Method option. Now, click on Add button and start adding the network address that you would like to configure. Remember, you must have to know the IP address, Netmask and Gateway that you would like to configure. If you do not know the IP address then talk to your ISP for IP address, Netmask and Gateway. After configuring the IP address, Netmask and Gateway. After doing this click on Apply button.

Step 5: After completing all the above steps, it's time to finalise the network set-up for Internet. Put the DNS address and click on Apply button to finish the configuration.
Following the above steps you can easily setup internet connection on ubuntu. But remember, the steps here explain for the case of manual setup internet connection on ubuntu. This tutorial is not suitable for the wireless network connection on Ubuntu. Hope, you successfully configure the internet connection of your Ubuntu installed computer. Moreover, if you face any problem or any difficulties then please tell me in the comment section and I will try my best to explain the solution.


