Setting Up a Password Database Using KeePass

KeePass sample screen
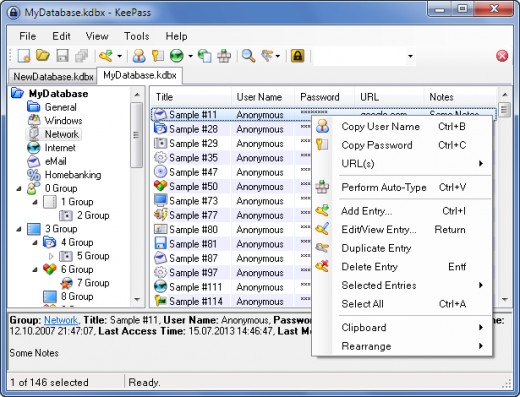
Working with KeePass
Nowadays there is more demand than ever when it comes to computer security. Passwords seem to be a key aspect of it, one that affects everyone to some extent. However, having a super strong password may not be enough, since you often need to create passwords with different requirements across the various sites and applications you are working with, plus it is a security risk to use the same password across different sites. To make matters worse, it is often the case that you need to change these passwords periodically, making the task of remembering all of them quite challenging. To remedy this several options have been developed. One of them is the KeePass freeware application, an easy-to-use database for all your passwords. Here is how you can use it to make your digital security better and hassle-free:
- Download and install KeePass on your computer. First of all you need to get the application from here and install it on your machine. There are several versions of it, each with its own pros and cons. We recommend the 2.x one as it packs more features, though the basic 1.x one is quite good as well. Also, for each version of KeePass there are two options, the installer and the portable one. The installer makes KeePass a part of your operating system, while the portable one is for using the application on USB devices, such as thumb drives. Upon running the installation file (KeePass-x.xx-Setup.exe for the installer), follow the instructions in the windows that appear. For the the portable version (KeePass-x.xx.zip), just extract the contents of the archive to your USB device using any archive management software.
- Create a new KeePass database file. Once you have installed the KeePass program, open it by double-clicking on the KeePass icon (blue padlock) and click on the first icon on the toolbar, or press Ctrl-N, to set up a new password database. This will open a new window that will allow you to select the name of the password database file (.kdb or .kdbx file, depending on the version of the program), along with its location. Pick a name for it (e.g. my passwords.kdbx) and note down all this information for future reference. Upon doing this, you’ll need to create a password for it (take your time on this one as it is the most important password you’ll be using from now on, and make sure you create it to be as strong as possible). Alternatively, you can use a key file, whose contents will be used as your password (make sure you have at least one copy of this file, on a different storage medium, just in case). If you are a more advanced user, you can use the Windows user account as a password making the database accessible only from you particular account, on your computer. Moreover, you can use any combination of the above three options as the way to access the database, for additional security. Afterwards, you need to set up some settings for your password database, though even the default ones are fine. You can always come back to this window and edit your settings later on, using the Database Settings option in the File menu (hammer icon).
- (Optional) Create a password folder. In order to organize your passwords more efficiently, you can create a password folder using the Add Group command in the Edit menu. You can also create nested folders by clicking on the parent folder and then selecting the Add Group command.
- Set up a password entry. Now it’s time to utilize the safe storage that this application provides. To do that, just click on the folder you wish to store the password in and then click on the Add Entry icon on the toolbar (the one with the key), or press Ctrl-I. In the window that opens, fill in all the fields you wish, particularly the title and username ones. If you wish to use the randomly generated password, leave the password field as it is. Alternatively, you can input your own password by typing it in the Password and Repeat fields. As you type in your password it will be automatically evaluated in the field below. Any password having a quality bar that turns green is sufficiently strong. If you are an advanced user, you can customize how the password is generated by clicking on the button with the key icon on the right.
- Repeat steps 3 and 4 for all the passwords you wish to store in the KeePass database. Once you are done, be sure to hit Save (Ctrl-S), so that all the passwords are stored in the database file.
- (Optional) Make a copy of your .kdb / .kdbx file. Although not mandatory, it is a good idea to create a backup of your password database (the .kdb or .kdbx file you have created in step 2), preferably on a completely different location, such as a thumb drive. The file is usually quite small (especially if you have used the GZip setting, making it a compressed archive) so this process should be quite fast.
- Use KeePass to retrieve a password. Now you are ready to make use of your password database. Just open the .kdb / .kdbx file by double-clicking on it, insert your master password / key file / etc., and find the password entry you are interested in (use the search bar on the right-most part of the toolbar, if necessary). You can access all the entry’s data by pressing Enter, or just the username and password information by pressing Ctrl-B and Ctrl-C respectively). Then paste this information on the site / application that requires it. Make sure you close the password database once you are done, to ensure that no-one else accesses it.
For any additional information on the software, you can consult the online Help, or the FAQ section of the site. Also, feel free to donate to the developers, if you find this application useful.
Disclaimer
I am not in any way affiliated with the company that produced this software, nor do I receive any benefits from it, directly or indirectly, by publishing this article. The sole reason for writing about KeePass is because I believe in this product and want to show my appreciation to its makers by sharing the word.

![How to Remove Kaspersky Password Protection? [Easily Recover]](https://images.saymedia-content.com/.image/t_share/MTc2Mjk3NDcwOTAzNTkyMTI2/how-to-remove-kaspersky-password-protected-easily-recover.png "How to Remove Kaspersky Password Protection? [Easily Recover]")


