Setting up DJ Turntables


Setting up your turntables
Its always good to review exactly what you will need to do when you setup your DJ equipment. You might think that you just pull out your turntables and slap a record on, and the party is started. If you only do that, your crowd will probably think they hired a toy DJ.
Deckplatter
You should be using direct-drive turntables, and you will have to make sure that you have removed the rubber mat that you still might have on the turntable. If you haven't removed this already, you should very quickly leave at the nearest exit. You will need to place the slipmat directly on the deckplatter, and then the record will have to sit on top of that.
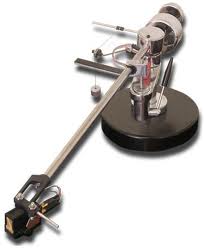
Tonearm
The tonearm is what holds the needle. You have to make sure that the tonearm is setup correct, so the needle stays accurate, and in place. If your tonearm is not adjusted carefully, you can easily damage your needles, and also your records. The tonearm height should be enough to firmly sit the needle on the records, and enough so that it doesn't jump if there is vibrations on the table.
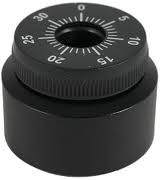
Counterweight
The counterweight on your turntable is a weight that is located on the back of the tonearm. This controls how much down-force the tonearm applies through to the the needle to keep it in the record groove. The recommended setting for the counter weight is usually given by the manufacturer guidelines. The best setting involves you doing what is called floating the arm. First you should remove any records on the platter. Then lift the tonearm towards the middle of the deck platter, and hold it carefully to ensure you don't drop the needle down. Start to turn the counterweight clockwise at the same time, so that it moves towards the back end of the tone arm.
As you are doing this, watch how the tonearm either lifts or dips. You have to find the sweet spot of balance, where the arms just hovers magically between up and down. Once you've found the floating point, then you can return the tonearm to its original position. Now take a hold of the silver section of the counterweight, and hold the black ring tightly. This ring has numbers on it, and it is independent of the counterweight. Make sure you turn the black ring until you position up the line so that it is pointing down from the number zero, with the line on the tonearm matching up with it. A needle manufacturer will sometimes suggest that you add 3 grams of counterweight onto the tonearm, and you can do this by turning the entire counterweight, along with the the black ring anticlockwise until the number 3 on the black ring lines up with the tonearm mark.
Height
To adjust the height on your turntable, use the ring at the bottom of the tonearm. This ring raises and lowers the tonearm as you turn it clockwise or anticlockwise. There is a small mark on the assembly which shows you how much height you have added. If you are a hip hop scratch DJ then you will need a raised tonearm height to add down force to your needle. There is always a recommended height from the needle manufacturers, which you should follow.
Peripherals
After you have those turntables setup, you will need to remove the lids, which have held the protective cover in place. These can easily get in the way. You will need to adjust the feet also, since the table that you have placed your table on is unlikely to be even. This is important, as there are four leg screws, and there is a very good chance that they will be uneven as soon as you place your turntables down.


")


 Resolutions - What Does Resolution, Aspect Ratio, ppi Mean For Your Smartphone, Tablet, TV, or Monitor")