- HubPages»
- Technology»
- Computers & Software»
- Computer Software
Step by step guide to using Track Changes in Word 2007
Introduction
Welcome to my first Word 2007 hub. In my job, I do a lot of work with documentation, particularly working collaboratively on documents with other members of my team who are situated in other geographical regions. I often proofread and approve completed documentation and I use Track Changes to share the changes I have made to a document with my team mates. This hub was born through my discoveries of exactly how to get the best out of the Track Changes button and also through me teaching colleagues how it all worked.
Track changes, in a nutshell, allows you to mark changes that you or a colleague make to a document so that these changes can be easily seen. These typically include additions, deletions and changes to formatting. The original author can then accept or reject those changes. The reviewer can leave notes for the original author to further explain some changes they made, or to just bring something to their attention.
Getting started with Track Changes
Before beginning to make changes to a document, it is important to check a few settings in Word. All settings to do with tracking changes are on the Review tab in Word 2007. You can largely run with the default settings, but it doesn’t hurt to ensure that the options available are set to best suit your preferences.

-
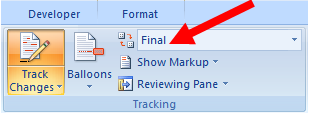
Firstly and most importantly, if you are working on a document and making changes it is much less confusing to select Final in Display for Review as shown by the red arrow in the picture below. The default is Final Showing Markup and I find it confusing when making edits so I change it to Final.
- I would recommend that you check that the name that Word 2007 will use to mark your changes as yours is correct. This is especially important if a number of people are going to be suggesting changes to the document at once, so that those changes can be tracked to the correct person. In large firms, Word 2007 and / or Office 2007 are often installed with a generic user name that is identical across all installations which can lead to confusion over who made which edits. To do this click on the Review tab / Tracking group then Track Changes / Change User Name.
- Finally, check the use of balloons. Click on the Balloons button and determine which of the three options you prefer. It is a matter of personal preference. If you have a small number of changes, Show Revisions in Balloons is a good choice. If you have a large number of revisions, this could get messy, so I would go with the default Show only Comments and Formatting in Balloons.
Balloons can be turned off completely by clicking Track Changes / Change Tracking Options and setting Balloons / Use Balloons to never.
Now that we have set Track Changes up, the last thing we need to do is to turn it on. This is done by clicking Track Changes and then selecting Track Changes.
Below is a picture showing how all the tracked changes will appear in Word 2007. I have changed the balloon settings to make the changes easier to see.

Using Track Changes to Review a document
Ensuring first that you have turned on Track Changes as outlined above, as a reviewer, you just go ahead and makes all the changes to the document that you wish. As Word 2007 also keeps the document available in its original state, you should work off the original document rather than making a new version. This also has the advantage of reducing the number of document copies floating around. The original author should create another version based on the changes proposed once the reviews are completed and use appropriate versioning to reflect the changes that have been made.
Accepting the proposed document changes
When the author receives the reviewed document, the first step is to change the setting in Display for Review to Final Showing Markup. You can also add a review pane if that suits your working style from Review tab / Tracking group.
To begin to accept the changes (or reject them if you disagree with the reviewers changes), use the Accept or Reject buttons in the Changes group on the Review tab. You can either accept or reject the changes one at a time or accept or reject all the changes in one fell swoop. You can use the previous and next buttons in the Changes group to move from one tracked change to the next.
Comparing two documents
As part of the review process, you may wish to compare the original document with the updated document the reviewer has made changes to. There are two approaches to this based on whether there are two documents, or if the changes were all made to the same document.
Comparing changes within a document.
To switch between the original version of a document and the final version (with or without the markup (tracked changes) visible) use the Display for Review option in the Tracking group as shown above.
Comparing two versions of the same document
To compare version one to version two of a document for example, click on the Compare button in the Compare group on the Review tab. It will ask you for the location of the two versions you wish to compare. Word will then open the document called Compare Result <Number> for you to compare the versions of the document.
Important things to remember when using Track Changes
- When reviewing a document, remember to turn track changes on first
- Work in Final rather than Final Showing Markup when reviewing a document to make it easier to see
- When working through the changes made on your document, accept or reject changes to incorporate them into your document (if you accept them) to make them disappear from the view
Conclusion
Using Track Changes in Word allows a number of people to work collaboratively on a document, marking suggested changes directly into the document. Changes that are approved are incorporated directly into the document; changes that have been rejected are dispensed with. Word even keeps an original version of the document within the document so that you can easily see the scope of the changes once you are finished with the click of a button. As long as you keep in mind the points raised above, using Tracked Changes is not as daunting as it looks and will enable you and your team mates to work collaboratively together to ensure your documents are of a consistently high standard.
Many thanks for reading my hub, I do hope you enjoyed it and found it useful. Please feel free to leave any comments you wish below.


