Steps I Took to Set My Kids Up with their Own Websites
Why did I get my kids their own websites?
My sons are just-turned-14 and nearly-13. My boyfriend and I started working from home a little over 4 years ago because my boyfriend couldn't find a job. We live in South Africa and good jobs are scarce. What if my sons also have problems finding work after their last year of school, or after further studies - and even if they do find a good job, what's wrong with an attempt at ensuring they are in a position to earn a little extra income?
We registered their domains in their own names, sebastianschultz.co.za and isaiahschultz.co.za so that while their websites now may be used for writing about anything, later my children could possibly use these same websites for their businesses, or even to offer freelance services or to sell a product. The websites will have aged beautifully by the time they leave school, and should have a fair amount of content on them, and will already be receiving a decent amount of visitors - I think the reasons mentioned above are all good reasons to get a website.
Having their very own site is also considered more professional than having for eg a free Blogger site - and who knows what my kids might do for a living one day - so I'm starting them with a professional site right away - the look can be changed later, if needed, to reflect more professionalism or business representation, and the navigation bar can be changed too, making their earlier posts accessible only by natural search results or by navigating through the archives of their sites.
Note: A free Blogger blog can be a great way to start getting used to managing "your own" site and I am not against people starting with a free Blogger blog - my kids have already gotten used to using free Blogger blogs, so now we've moved on to what I think should be the next step in getting used to making the best of the Internet.
The websites were an early Christmas gift from Tony and I, on the 1st of December 2011, and all we had to pay was one year domain registration and one year hosting. It's not quite the middle of December 2011 right now, and they already have 7 articles each on their sites.
So how did we get my kids their own FREE websites?
Paying for only domain registration and hosting means there were no web design costs involved. How did we do it?
We got my children free wordpress.org themes - there are over 1 000 free WordPress themes to choose from!
Most free Wordpress themes can be further modified or customized to make your site look even more unique. Luckily Tony and I know html, so we can customize the sites even further. Tony also knows how to work with both html (source coding) and the php coding (programming coding) that the WordPress themes come with, so even more customization is possible However, even if we couldn't do this extra coding, the basic modifying options the free themes come with are sufficient to get your site looking pretty unique.
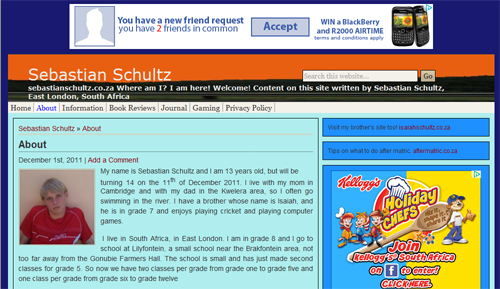
Sebastian's site
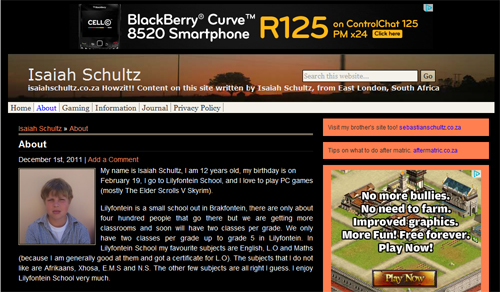
Isaiah's site
The 20 steps we took
- We registered their domains
- The hosting you get must support PHP/MySQL
- We logged into the control panel using the log in details we got after ordering hosting
- We looked for the area that lets us install scripts - usually called "fantastico" or "install scripts" and then selected "WordPress"
- We clicked "install"
- We followed the few basic steps of creating a username and password and we selected to install the WordPress script "at top level"
- We logged into the WordPress dashboard
- We didn't want the default free theme WordPress comes with, so we installed another free WordPress theme by scrolling down the dashboard on the left and going to "appearance" then "themes" - we searched for and chose another free theme, and installed it in just a few seconds - it replaced the default theme
- We opened up another tab on our computerto actually view the site inbetween our working in the dashboard, and we refreshed the website page from time to time to see if we were happy with what we were doing or had done in the dashboard
- Next, we scrolled down to the "settings" tab in the dashboard, and did the different settings according to our preferences, including that comments must first be moderatedbefore being allowed to appear
- For the permalinks structure setting, we don't like the ugly default permalink structure which is not really search engine friendly and we rather set it like this /%postname%/ in the custom permalink structure setting area
- We're not yet really going to allow the kids to receive comments on their sites yet, but for particular pages that we might allow some comments we wanted to help protect against spam, so we activated the Akismet spam comment filter plugin - in the "plugins installed" area of the dashboard
- Next, we showed the kids how to install some pluginson their own - by going to "plugins" and then "add new" and typing in a search phrase for eg FB Like Button, and then choosing one to install, activate, and then go to the "plugins installed" page (still all in the dashboard - everything is done in the WordPress dashboard) to do any settings of individual plugins - sometimes these plugins are also just listed near the bottom of the dashboard on the left side, and can be clicked there to do any settings - maybe in the future they may even want to add a shopping cart plugin to their sites, and sell products or crafts they've maybe made - yeah, even having a basic shopping cart on a WordPress site can be free - just add it from the plugins area, and do the settings in it
- Next, we showed the kids how to put widgetsin their widget areas, and any settings that any of the individual widgets needed - for this we went to the "appearance" section of the WordPress dashboard, then "widgets" and showed them the page of their widgets and widget areas - the widgets are listed down the main part of the page, and the widget areas (into which the widgets go) are on the right - they just open up a widget area by clicking on it, then they click on a widget and drag it over to the open widget area they selected, and drop it into the dotted rectangle area that appears, do any settings of the widget and then click "save"
- The main widgets the kids have on their sites are "recent posts," "archives," and "text" widgets into which I've placed Adsense ads coding for them, using my own Adsense publisher ID and my own Adsense publisher account, because they are too young to get their own Adsense accounts - any Adsense earnings their writing efforts generate, I will give to them - I can check on what they are earning because I added their sites' URLs to the URL channels list in my Adsense account - when they turn 18 they can get their own Adsense publisher accounts and can replace my Adsense ads on their sites with their own Adsense ads - Tony also did some modifications in the coding to add a text widget area right at the top of their sites (into which we could put an Adsense banner.)
- Next, we had the boys add their own website header banner- to replace the boring one the free WordPress theme came with - we went to "appearance" in the dashboard, and to the "header" area - in this area, sometimes a plain colour change can be made to the existing header banner, or you can at least see the header banner image measurement sizes there, if you wish to upload your own header banner - the boys made their own header banners in PhotoShop using photos they'd taken themselves, and then uploaded their correctly-sized new header banners - if we didn't have PhotoShop we could have downloaded a free photo editing program from the Internet - IrfanView - to resize their photos - the boys also chose their own background colour for their sites, and the other colours that they wanted Tony modified in the stylesheets of the sites - remember though that because there are over 1 000 free WordPress themes to choose from, you may very well find a theme that already has all the colours you want, so no further modification may be necessary
- We had the boys write an "about" page on their computer and then showed them how to add a page to their sites - going to "add a new page" in their dashboard, and being faced with a page where you can write a title, and paste copied words you have already written into the big space where the page content goes - they can click "save draft" whenever they want to, and also "preview" before hitting the "publish" button
- We also showed the boys how to add their own photos into a page (or into a post, as it's the same method used) - they resized and then uploaded an image to the "media" section of their WordPress dashboard, and then went to "edit" of their one page, and in the toolbar above the main text body, selected the little square that has "insert image" appearing when you hover your mouse cursor over it, clicked it, selected "from media" and then found the image they wanted to appear in their page or post, clicked "show" to get it appearing in their page, then clicked "save changes/updates" in the top right area of their page, went to look at their sites, refreshed, and there their photo was
- Next, we had the boys write their first article which would be their first "post" - not a "page" - and that would also automatically appear in their "recent posts" widget - posts are created in the same way as pages, but you can also add tags to them, and place them in a category - the tags and category area is on the right of the area you are writing your post in
- We also showed the boys how to set a custom menu for the tabs in the navigation bar of their sites - by going to "menus" in the dashboard, not checking off the "automatically add new pages to the navigation bar," creating a menu simply by naming it whatever you want and clicking "create" then selecting it as the one to use, checking off pages or categories you want to be in your navigation bar, then sliding them around in the menu area so that they appear in the order you want them to appear in, in your navigation bar - individual posts could also be directly linked to in your site's navigation bar by choosing to add a custom link to your menu, within the menu area of your WordPress dashboard
All done! - No, not quite!
These are kids, currently on school holiday, and they need to be reminded to write articles for their sites from time to time - which may not be what they want to do during their school holidays, and especially when we insist that their articles should be at least 300 words each - so we give them some tips on what to write about to make it easier for them:
- their old school projects have been written in their own words, so they can use those
- they can add short stories they've already written for school
- they can write about what they "did" recently - like in a journal
- we've suggested tabs for their navigation bars of their "menu" - categories: journal, gaming (they enjoy playing computer games), information (their old school projects), short stories, poetry, book reviews, movie reviews
We also hope that they themselves will be more keen to write more often when they see that their efforts pay off in the form of earning from Adsense
We also sometimes go through their articles they've written just as they are about to publish them, and point out where they could repeat a word for Search Engine Optimization purposes, and they're already learning to do this on their own too - for eg instead of saying "he" they can repeat the words "Terry Pratchett" again, if doing a review of one of Terry Pratchett's books
In time, we will also show them how to start linking to their sites from other sites, how to comment on other sites that have content that relate to their own content, and more
Conclusion
I'm really pleased that Tony and I have given my kids something now already that may assist them well into their future, whether they use their sites as their own business website one day, or to earn income from as bloggers, or even as just a place they can call their own and let their thoughts be known.

