Steps to Install Joomla 1.6 beta 7 (Local Installation)

As a best CMS (Content Management Systes), Joomla is always popular from the beginning. In the previous article Easy Steps to Install Joomla 1.5 Quickly (Local Installation), you learn the ways to install Joomla 1.5. Now Joomla 1.6 Beta 7 is available and ready to install. Joomla is actually is used to manage your web easily and simply and fastly. Anyway, in this page Joomla 1.6 Beta 7 will be discussed in details.
Local Installation Requirements to Install Joomla 1.6 beta 7
The popular open source CMS Joomla 1.6 beta 7 can be installed locally to your computer and then can easily uploaded to your hosting space. Installation Joomla to your computer is very simple and easy. Before begin to install Joomla 1.6 beta 7, just download XAMPP and Joomla 1.6 beta 7 from the following two links
Note: Before going to the next paragraphs, just download XAMPP and Joomla 1.6 beta 7 from the above two mentioned links. Because we need them to install Joomla 1.6 beta 7.
Steps to Install Joomla 1.6 beta 7
Installation of Joomla 1.6 beta 7 is very simple and easy. Just follow the following steps to learn and install Joomla 1.6 beta 7 locally on your computer.
Step 1: Complete XAMPP Installation
Actually we are learning quick and easiest way to install Joomla 1.6 beta 7. For running Joomla, you must have to install PHP, MySQL, Apache. All these software installation needs some time and effort. You need to download and install them one by one which is really a time consuming task. But using XAMPP you can easily do all thing by simply finished installation of XAMPP.
So, we need to install XAMPP. To install it, just download XAMPP and then install it simply. Just download it from the download link and then install it step by step. After finished XAMPP installation, you have to install Joomla 1.6 beta 7.
Step 2: Unzipping Joomla 1.6 beta 7 to XAMPP 's htdocs
- Extract the Joomla 1.6 beta 7 installaion file which you download previously and rename it as Joomla after extraction is completed..
- The default installation location of XAMPP on your computer is on C drive. Go to the location C:\xampp\htdocs
- Now, copy the extract folder (in step 1) and paste that folder into htdocs
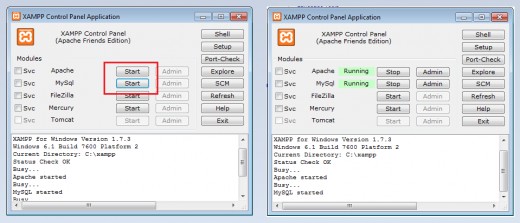
Step 3: Running Apache and MySQL through XAMPP
- Double click on the shortcut of XAMPP Control Panel that
and it will popped up to the right-bottom side of your monitor. (When
you finished XAMPP installation, you will find a shortcut on your
desktop XAMPP Control Panel. )
- Click on Start button of Apache to start and run Apache
- Click on Start button of Mysql to start and run Mysql
Note: You will see a Running when Apache and Mysql starts running
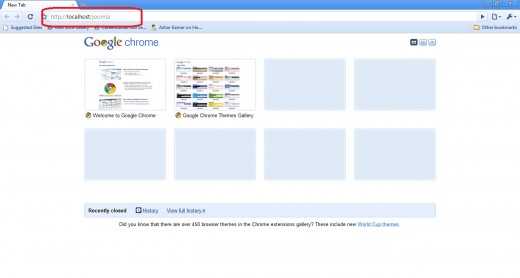
Step 3: Opening Joomla 1.6 beta 7 to Your Browser
Open any browser and write http://localhost/joomla to the address bar of the browser and hit Enter key of your computer keyboard. Throughout this tutorial, everything is done using Google Chrome Browser.
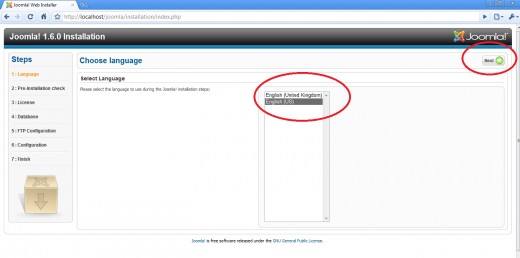
Step 4: Selecting Language for Joomla 1.6 beta 7
After step 3, you will see a prompt to select language to install Joomla 1.6 beta 7. Joomla 1.6 beta 7 offers only English (US) and English (UK) languages currently. Just choose the language and click on Next button. We select English (US) and click on Next button.
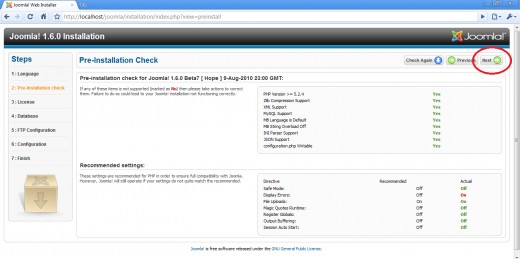
Step 5: Pre-installation Checking of Joomla 1.6 beta 7
At this step, you will find the pre-installation check. If everything is properly working, there will be green Yes marked. Now, you have to click on Next button to proceed Joomla 1.6 beta 7 installation.
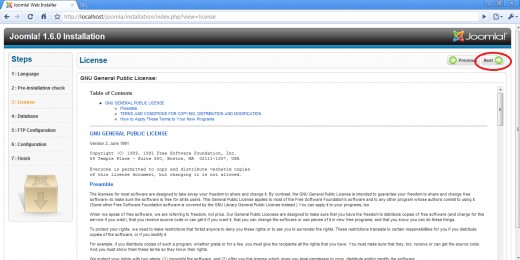
Step 6: Agreeing Joomla 1.6 beta 7 License Agreement
After step 5, you will find the Joomla 1.6 beta 7 license agreement. You could find the details of 1.6 beta 7 license agreement here. Again, click on Next button to continue your Joomla 1.6 beta 7 installation. Actually clicking Next button means that you are agree Joomla terms and conditions.
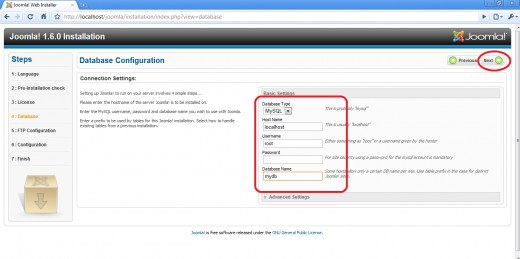
Step 7: Configuration of Database for Joomla 1.6 beta 7
You need to configure the database for completing Joomla installation. You have to put the information of hostname, username, password and database name. Generally, if you install Joomla through XAMPP then you just need to put hostname, username and database name. In this step, you have to do the following configuration:
- Database Type: The type of Database. We are using mysql so select mysql form the drop down menu.
- Host Name: Put the hostname. This is usually localhost or a host name provided by the hosting provider.
- User Name: Just put the user name. This can be the default MySQL username root, a username provided by your hosting provider, or one that you created in setting up your database server.
- Password:
Using a password for the MySQL account is mandatory for site security.
This is the same password used to access your database. This may be
predefined by your hosting provider. Leave this field blank as we don't
put any password during XAMPP installation. If you put any password, you
have to give that password in this field. We dont put any information
as there is no password.
- Database Name: At last put a Database name as you like. You may put any name. For example, we put mydb for our installation.
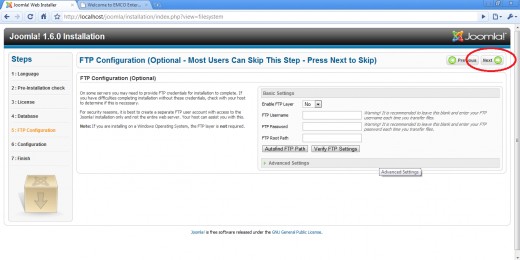
Step 8: FTP Configuration for Joomla 1.6 beta 7
You can also configure FTP for your Joomla 1.6 beta 7. If you like to configure it, just put the infomation. For our Joomla 1.6 beta 7 installation, we do not configure any FTP account. Just go to Next button to proceed Joomal 1.6 beta 7 installation
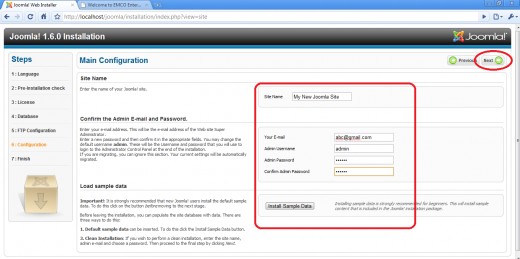
Step 9: Finishing Main Configuration of Your Joomla 1.6 beta 7 Installation
Here, you have to put several information to complete installation. The things which you need to configure are mentioned below:
- Site Name: Put a name of yoru site. For example, we give the site name as My Joomla New Site as the site name of our site.
- Your Email: You have to put your email address. We put abc@gmail.com for our Joomla 1.5 installation.
- Admin Password: Put the admin password.
- Confirm admin password: Just re-typ the admin password.
- Install Default Sample Data:This option creates several default Joomla data. If you are a beginner, it is recommended to enable this feature. Because you can learn easily see the effect when you learn several thing. Just click on that button and it will automatically install all the default sample data.
After doing all the above steps, click on Next button to complete Joomla 1.5 installation
Step 10: Deleting the Installation Folder
You
have to be careful after finishing the above step. Please do not go
further from this screen. Just go to the Joomla 1.6 beta 7 installation
directory. If you install XAMPP in your C drive of your harddisk, then
just go to C:\xampp\htdocs\Joomla and there you will find a folder named as installation.
Select that folder and delete that folder permanently. You must have
delete that folder otherwise you can not complete the installation of
Joomla 1.6 beta 7.
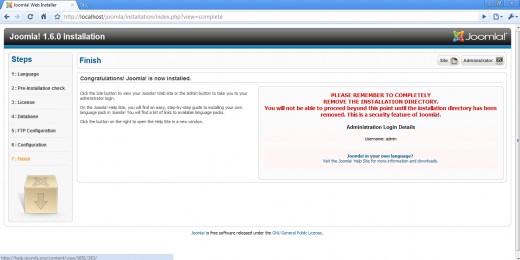
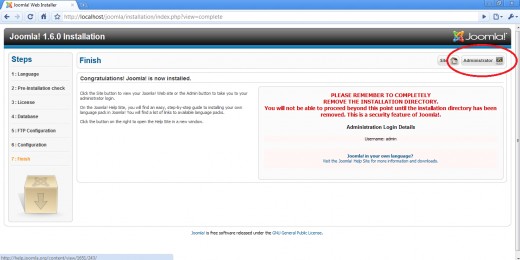
Step 11: Accessing to Admin Panel of Joomla 1.6 beta 7
After deleting the installation folder from your Joomla installed location, you are ready to go your Joomal control panel i.e. Joomla admin panel. Just click on the Admin button
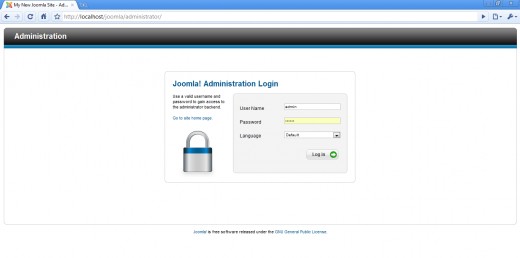
If you successfully completed all the above steps, a log in prompt
will be appeared. From here you can access the admin panel of your
Joomla site. Just put the Username and Password and click on Login button to access the control panel of admin.
Remember, for Joomla 1.6 beta 7 the log in Username is always admin

![VirtueMart 2.x - Der Grundkurs[NON-US FORMAT, PAL]](https://m.media-amazon.com/images/I/5111FXibvOL._SL160_.jpg)
And that's all. By following the above steps, you can easily install Joomla 1.6 beta 7. Hope, follwoing the above mentined steps, you are able to complete installation Joomla 1.6 beta 7 locally to your computer. In the next tutorial, I will explain the details about installing Joomla 1.6 beta 7 to your hosting space i.e. the real web server installation.
Furthermore, if you face any difficulties to install Joomla 1.6 beta 7 then please mention that in the comment section. I will try to resolve the problem.
© Written by rancidTaste
 computer")


