- HubPages»
- Technology»
- Internet & the Web»
- Web Page & Web Site Development
Streaming Video with Amazon S3/Cloudfront on a Joomla site

If you already know why you would want to use Amazon Cloudfront and S3 to deliver your video in your Joomla site, you can skip right down to the tutorial.
Streaming versus Downloading
What happens when you offer a video file for download on your web server? The web server pushes the file to the users browser as fast as it can. When enough data has been downloaded, the player that is inside the users browser will start playing the file. You cannot fast forward to the end of the file, because the download starts at the beginning. Especially when you have a large file, it can take quite some time before the user can view your video. Not good.
Enter the idea of streaming. “Streaming” is done with a streaming media server that is specialized for the task. A streaming media server knows about the format, bandwidth and structure of the files it is serving up. It also pays attention to the player that receives the video and how well it performs. It delivers just the right amount of data needed to play the video, at exactly the rate that is needed to play it. That means that people with a low speed connection will still be reasonably able to view the video, just in a lower quality.
You can view the difference between downloading and streaming like this: Downloading is a one way interaction between the web server and the users browser (the client), a monologue, while streaming opens up a converstation. Streaming is a dialogue between the server and the client. It is what online video services like YouTube use. Until a short while ago it was the exclusive province of professional streaming companies, or people who own their own media streaming server. The costs were simply to high for us normal folk to use it. But that has changed...
Some Advantages of Streaming
- You can monitor excactly what people are watching and how long they are watching it.
- It makes more efficient use of bandwidth.
- People can skip ahead in the video
- The video will start playing sooner
- You maintain more control over your content, because it is not stored on the clients computer, thus it is more difficult for a user to hijack the video stream
Protocols HTTP versus RTMP: What Gives?
If you have only a short video, it may be worthwile to offer it for download rather than stream it. It is much more simple to do, and if you are interested in delivering your videos in the highest rate of encoding possible, it’s actually the best way to do it. This downloading is always done in HTTP protocol, which is the standard.
Streaming uses a variety of different formats. For the purposes of this article we will use Real Time Messaging Protocol (rtmp) that is the protocol of choice to stream Flash video, it works for mp4 too. This is the protocol that is used by Amazon Web Services to stream video content. It is a specialized protocol that is owned by Adobe.
Why Amazon Web Services to Stream Video
After a terrible hosting experience with GoDaddy, which offer ‘unlimited bandwidth’, but in murky reality, delivers content so slow that your website will not be able to load at all, let alone play videos, I had decided to go back to my old host, who offer fantastic hosting. The only drawback is that they offer only limited space to store content, and bandwidth is prohibitively expensive, like 50 cents per transferred GB. I am sure many people are in a similar situation.
Amazon S3 is a solution to store your media files for very little money. It is very good. The first few GB’s are even free. And then Cloudfront will allow you to stream that content to your users. It performs well, all over the world, because their servers are set up on different locations, and it’s cheap. So that is what we have decided to go with. An additional boon is that when you back up your site, you will not need to back up the large video files (even though you can exclude them, it is still less work.) The implementation can be a little tricky, though, when you run a Joomla site. Which is why I have decided to write up this little tutorial. I have scraped resources from around the web to give you a step-by-step walkthrough of the process.
Tutorial - What You’ll Need
- A Joomla site
- 5 files contained in this zip.
- the fabulous avreloaded plugin installed on your joomla site
- a subscription with Amazon S3 and Cloudfront (Sign up separately for bot
How We Will Do It
- Install the avreloaded plugin on your site like you would any other plugin
- Upload the four playback files in your joomla site
- Upload your video file to amazon S3
- Create a ‘streamer’ on Cloudfront
- Create a custom player in the avreloaded plugin, and create tags in it
- Put the video into your website
The Steps
1. Download and install avreloaded plugin, it is enabled by default, just install like you would any other plugin, and you are set.
2. Download this zip file and unzip (this is the same file as the one under "What you'll Need", no need to download twice). In it you will find 5 files, FOUR of which you will need to upload to your Joomla installation. The other file contains the code to create the player. These files:
- jwplayer-4.3.132.swf
- five.swf
- swfobject-uncompressed.js
- swfobject
you should upload to the following folder in your Joomla installation:
joomla_root/plugins/content/avreloaded/
It will ask you to overwrite two javascript files and you should allow this.
The fifth file (a .txt file) contains the code you can use to create the player with. We will come to this, so keep this document available.
3. Create a bucket and upload your video file to Amazon S3. Do not create a folder to put your video file in, that just complicates things (a little). When done, select your file, choose ‘actions’ then ‘make public’, if you have not previously ticked “make everything public”. If you click on properties for your file it will give you a link at which the file can be reached. You WILL NOT need this link for streaming. But your file does need to be publicly available for Cloudfront to access it.
IMPORTANT: By this time you should also know the dimensions of your video. To learn these you can open your file in Quicktime for example, then under ‘Window’ click ‘show movie inspector’. You will find the dimensions in ‘format’, in our example we will use 720x576 pixels. Do not use ‘current size’. Make sure your video does not exceed 800 pixels width, as it will not go nicely on your page. Also look at the bitrate, it should not be too high, as this will not playback nicely.
4. Go over to Cloudfront in the AWS manager, and click ‘Create Distribution.’ Choose ’Streaming’ as the delivery method. Select your Amazon S3 bucket you just created. Keep logging to ‘Off’. Ignore the CNAME field and the Comments field. Set Distribution status to ‘Enabled’.
Click ‘Create’. Then go make yourself a cup of tea or something. It can take about 15 minutes for your stream to be made available. The ‘State’ tab will change from ‘InProgress’ to ‘Deployed’. The Status should be green and at ‘Enabled’.
All the information you will need from this page is the identifier given under Domain Name. That is the location of your stream. It will look something like this: s0em4218ibwjp.cloudfront.net
Copy this, as we will need this stream identifier in the next step to build our player.
5. Now comes the fun stuff. All the professional sites like Youtube and so on offer their own player that is submitted to the users browser, and that is used to playback the video file. In this step we will create our very own custom player to play back yours.
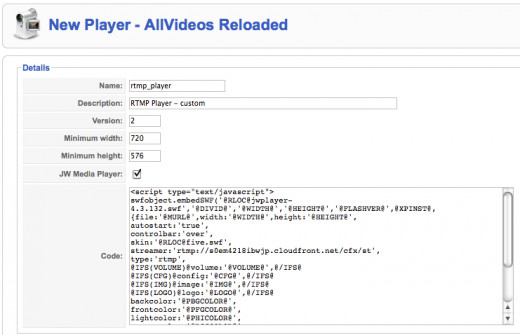
Go into the Admin Panel of your Joomla site, and go to ‘Components’ > Allvideos Reloaded > Manage Players. Click ‘New’.
Then fill in the following information into the fields.
Name: rtmp_player
Description: RTMP Player - custom
Version: 2
Minimum width: 720
Minimum height: 576
(Set these according to your video dimensions noted earlier, they must be the same.)
Check JW Media Player
Then for the code field, look at the code below, which can be found in usable form in the fifth file contained in the .zip., and replace the red identifier string with the one you created in step 4.
DO NOT COPYPASTE THE CODE FROM THIS PAGE, but rather use the similar code from the text file that was included in the .zip you downloaded earlier.
Note that the identifier MUST BE FOLLOWED BY this: /cfx/st (without a trailing slash). As it is not added to the streaming identifier by default.
code
<script type="text/javascript">
swfobject.embedSWF('@RLOC@jwplayer-4.3.132.swf','@DIVID@','@WIDTH@',
'@HEIGHT@','@FLASHVER@',@XPINST@,
{file:'@MURL@',width:'@WIDTH@',height:'@HEIGHT@',
autostart:'true',
controlbar:'over',
skin:'@RLOC@five.swf',
streamer:'rtmp://s0em4218ibwjp.cloudfront.net/cfx/st',
type:'rtmp',
@IFS(VOLUME)@volume:'@VOLUME@',@/IFS@
@IFS(CFG)@config:'@CFG@',@/IFS@
@IFS(IMG)@image:'@IMG@',@/IFS@
@IFS(LOGO)@logo:'@LOGO@',@/IFS@
backcolor:'@PBGCOLOR@',
frontcolor:'@PFGCOLOR@',
lightcolor:'@PHICOLOR@',
screencolor:'@PSCCOLOR@',
stretching:'uniform'}
,{allowscriptaccess:'always',seamlesstabbing:'true',allowfullscreen:'true'
,wmode:'@WMODE@',bgcolor:'@BGCOLOR@',menu:'@MENU@'},
{id:'p_@DIVID@',styleclass:'@AVCSS@'});
</script>
Take note of where it says: streamer:'rtmp://s0em4218ibwjp.cloudfront.net/cfx/st'. The underline designates the streamer id

Then save it. You have just created the custom player for playback of your videos, and it should show up in the list of players that you find under ‘Manage Players’.
Create Tags
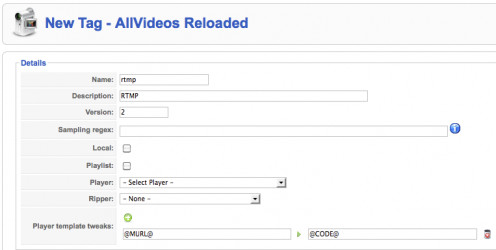
Now it is time to create custom tags that you can use to put the video into your Joomla articles. Tab over to Manage Tags / Presets and choose ‘New’.
Fill it out with:
Name: rtmp
Description: RTMP
Player: RTMP Player - custom (select the player you just created above)
Player template tweaks: add the @MURL@ and @CODE@ like you see below
It should look something like this:

Last step
6. Now you are ready to insert your video into the article.
This is simple. Just open your article and type in the following:
{rtmp width="720" height="576"}testvideo.mp4{/rtmp}
Where you replace testvideo.mp4 with your file name as it is hosted on Amazon S3.
You could also use the AVR media button to insert it, but I find this is much simpler.
And that is it. Your video is now streaming to your web page. I hope it helps you. Let me know if we can in any way improve this tutorial
My website
- The Road to Financial Freedom and Independence
I write about improving life and technology on this site, and also about home businesses and making money ideas


