- HubPages»
- Technology»
- Computers & Software»
- Computer Science & Programming»
- Programming Languages
Visual Basic for Applications (VBA) Tutorial: working with cells (rev 1)

This hub will show us, in very fundamental terms, how to work with spreadsheet cells in VBA (Visual Basic for Applications); a starting point primer. We will use Excel 2010. Let's begin by opening a new/blank spreadsheet.
A necessary preliminary step is making the “developer” tab accessible. Refer to the following hub for instruction on how to do that:
http://lucabrasi.hubpages.com/hub/How-To-Display-Developer-Tab-in-Excel-2010
Once that is done we need to construct a blank macro, which we will later paste some code into which works with/processes/manipulates spreadsheet cells. The objective will be to become familiar with some commands for working with data within cells.
Some background and explanation on the blank macro: Macros are traditionally used to implement sequences of keystrokes which we would otherwise do over and over again. Instead of repetitively doing, say, 10 keystrokes again and again, we would record the keystrokes in a macro, then simply hit a key or combination of keys to execute all 10 keystrokes (“ctrl a” for example).
What we will do here next is create our blank macro and assign the key or keys to execute it. Then, paste in some code which will be provided. When done, hitting the key(s) will execute all the code.
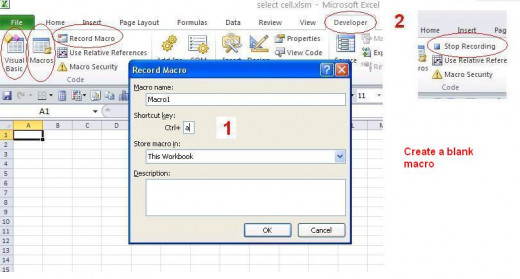
We have the developer tab visible. Refer to the 1st diagram. Click the developer tab to display all the Visual Basic and Macro tabs shown to the left. Click on “Record Macro” and the window will pop up. We can keep the default name “Macro1”. In the shortcut key window, place an “a”. Thus, when we later hit “ctrl a” from within the workbook/spreadsheet, our code (not yet put in) will run. Hit “OK”, and immediately hit “stop recording”. Immediately, or any keys we might hit would get placed in the macro, which we want to be blank.
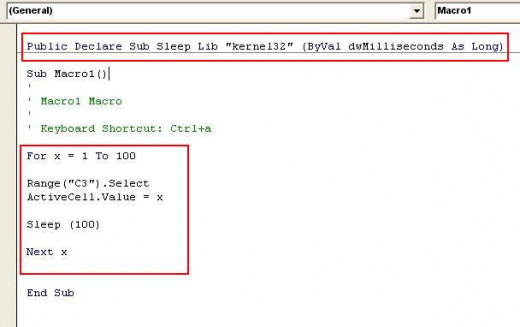
Now, select “Macros” and “edit”. Our blank macro will show up. Copy this code and paste in at the top (refer to 2nd diagram):
Public Declare Sub Sleep Lib "kernel32" (ByVal dwMilliseconds As Long)
It will allow us to use a “sleep” or time delay within our code. We need the time delay to view the cell of interest for 1/10th second before it changes.
Now take this block of code and place it (copy/paste) as shown in diagram:
For x = 1 To 100
Range("C3").Select
ActiveCell.Value = x
Sleep (100)
Next x
What does it do? Goes through a loop 100 times, placing the loop index (number or counter) in spreadsheet cell C3. “Range("C3").Select” selects cell C3. “ActiveCell.Value = x” places the loop counter in. The delay is seen as “Sleep(100)”, and is required to allow us a bit of time before moving to the next loop iteration.
Once done pasting in code, close the code window and save the spreadsheet in “.xlsm” format. This ensures code will run properly. Give it any name you want. Go to one of the sheets within, hit “ctrl a” and watch it run.