Credit Images & Create Links with HTML


How to credit images and create links using HTML
All images any reputable website have to be credited. Even if you have used your own photographs, it's still a good idea and sound common sense to let the world know that you own the copyright.
This can be done quickly and easily using the codes below. We'll start with the basics and gradually get a little more fancy, but it's easy. Really.
All you have to do is copy these codes into a text document (something like Notepad is ideal), save it to your computer and you'll have the details ready whenever you need them.
Let's get started.
..........................
Note: These codes will work on any site where you have access to the HTML. A Wordpress blog is a good example. Different blogging softwares and content writing sites all have different criteria, but if you have access to the code, these will work perfectly.
Instructions:
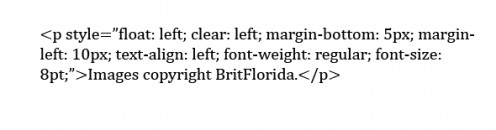
1. Below, you'll see what I think is the perfect credit. The text is small and it isn't obtrusive.
It uses the copyright symbol which saves space. In this instance, the photographer doesn't require a link.
I prefer to use images that don't need linking because search engines can frown upon pages that have too many.

2. In the image below, you see the code for a simple link. Of course, you'd replace the URL and the wording itself.
Take away britflorida.com and replace with the required web address, do the same with the credit name; the text you want to appear on the site.

3. In the example above, the entire phrase is a link. Below, you'll see a refinement.
In this case, just the word 'BritFlorida' is the link. This is handy if your copyright phrase is lengthy.
You might have spotted another change too.In this example, I have set the link to open in new window. Adjust this if you wish. Some people like links to open in new window. I don't as many web users are irritated by this. It's personal preference.

4. Now we're getting little fancier! This code below chooses the size of the text. I do prefer smaller so I tend to use 8.
This code doesn't create a link but read on for the full code.
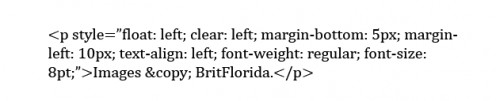
5. There's only one thing that I now want to change. I do prefer to use the copyright symbol rather than the word.
As you can see in the image below this is easily done by replacing the word with an ampersand (&), the word copy and a semi-colon (;)
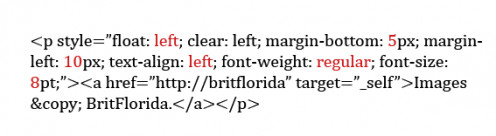
6. Below you'll see the complete code you need if you want to credit images and include a link. As you can see, I've highlighted certain sections of the code in red. That's because you can change these if you wish.
For example, if you'd like the text to be bolder, simply replace 'regular' with 'bold'. Would you like the font to be a little larger? Change 8 to 9.
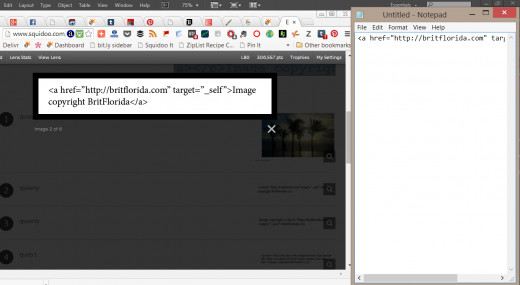
7. Below, see how to get these codes on your computer. You'll only have to type them once, then you'll have them permanently on your computer.
The best way to do this is to minimise your browser window so it covers roughly half the screen. Then enlarge the image showing the code.
Open Notepad, or a similar program and minimise that and type the code that you see. Then save the document.
...............................
If that sounds confusing, just see the image on the below to see what I mean.
...............................
Want to learn more? I know this sounds terribly geeky, but code is fascinating. You've seen above how a seemingly random selection of symbols and punctuation marks can create wondrous things.
Learn more using the book below. Scroll down to below the image to see the book.