- HubPages»
- Technology»
- Consumer Electronics & Personal Gadgets»
- Portable Electronics
Does an Underwater Camera Bag Work?

Yes, An Underwater Camera Bag Works, and It's Great for the Pool, Lake or Ocean
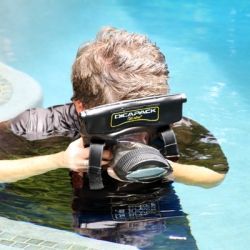
Underwater photography has become quite popular in the past few years as affordable waterproof cameras have made it possible for just about anyone to take photos while swimming, snorkeling, kayaking, or hanging out at the local water park. But what if you can't afford another camera? Then an underwater camera bag is the answer. These affordable and reliable waterproof bags can help you take great photos in and around water. And they work great! I recently purchased a DiCAPac waterproof case to take my Canon DSLR into the pool, and I love it. Here's why a flexible waterproof case is a great purchase.
(Photo of the author by Cayne Howard)
Why Buy An Underwater Camera Bag?
It's the cheapest option for shallow underwater photography
I already owned a few waterproof cameras before I splurged for an underwater camera bag. My waterproof collection includes two rugged compacts, a POV sports cam and a scuba mask with a built-in camera. So why get a bag, too? Simple - I wanted to take my DSLR into the water. Although today's compact cameras are pretty impressive, they still can't match the quality and speed of a good DSLR.
Unfortunately, I can't afford a pricey hard case housing to take my digital SLR underwater. Hard cases are made for scuba divers who want to take their camera to depths far beyond the reaches of your average swimmer or snorkeler, and each housing is designed for one specific type of camera. As a result, these cases can cost well over $1000.
Underwater camera bags, on the other hand, are designed to be used in much shallower depths and to work with a variety of cameras. That means that they're much more affordable than the scuba housings. In fact, you can get a waterproof bag for a small compact camera for less than $20. This makes underwater camera cases even cheaper than the cost of a couple of disposable film cameras plus developing and printing. Larger bags for larger cameras cost more (the bag for my DSLR, for instance, was about $80), but they're still cheaper than buying a good rugged camera or a hard waterproof case.
With my new bag, I've got all the advantages of a DSLR at less than the price of a good waterproof compact camera. Of course, the bag does present some challenges of its own. For instance, looking through the viewfinder under the water can be difficult once you don a pair of goggles or mask, and pressing any of the buttons is definitely more awkward underwater than on land. But if you need an affordable way to take photos in the water, a waterproof bag is the way to go.
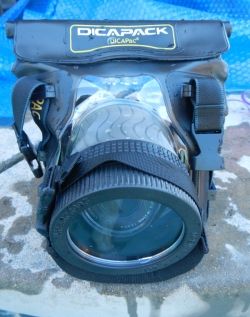
The Waterproof Camera Bag I Own - DiCAPac WP-S5 for Small DSLR Cameras
The DiCAPac WP-S5 is the case I own. I use it with my Canon EOS Rebel T1i, an older entry-level Canon DSLR that I use as a backup to my Canon 7D. (I admit that I'm still nervous about putting the more-expensive 7D underwater!) This underwater housing has worked great with my Rebel. I simply make sure to check all the seams and seals before I put my camera in the water.
Tips for Using an Underwater Camera Bag - Follow this advice before jumping in the water
- Test your bag before using it
It should go without saying that you shouldn't put an expensive piece of electronic equipment in any type of underwater case without testing it. But I'll say it anyway - don't put your expensive electronic equipment in ANY waterproof case without testing it first. Visually check all the seals and seams, place a dry piece of paper inside, follow the manufacturer's directions for sealing, and then put the bag under water. If the paper stays dry, you're good to go.
- Practice with the case before you need it
If you're going on a big vacation, plan to take photos at your child's birthday pool party or simply want to be sure to get the best results from your photos the very first time you use the case, PRACTICE beforehand. I can't stress this enough.
Because I've taken underwater photos and was going to be using a camera I'm very familiar with, I thought I'd just jump in the pool and start taking amazing photos as soon as I got my case. Wrong! It took me awhile to figure out how to use the bag for the best results.
For instance, looking through the viewfinder can be a challenge while wearing goggles or a mask, and seeing the LCD screen underwater can also be tough. I discovered that I can hold the bag underwater and look through the viewfinder without goggles for very shallow shots, and then put on goggles or a mask when I want to get shots farther under the water. For quick action shots, I prefer to use the viewfinder rather than Live View on the LCD screen because the focusing is faster. However, the LCD screen is easier to use when shooting still objects.
Practice to see what works best for you and your camera, or you might be very disappointed with your first attempts to take photos underwater.
- Choose your settings before sealing
Although you can change your camera's settings once it's inside the case, it's much easier to do it before you seal the bag. Then you won't have to struggle with adjusting the buttons and wheels through the case.
- Add weight to keep the bag underwater
Because your camera bag is filled with air, it will float. Adding weight to the bag solves this problem and makes it easier to keep the camera below the surface. I use a soft 2-lb. scuba diver's weight bag on the bottom of my bag. If you don't have a scuba store near you, you can purchase soft lead weight bags online or look for bean bags (which typically aren't as heavy, so you might need several).
- Position your camera properly to avoid vignetting
Unlike hard case housings that are specifically designed for a single type of camera, underwater camera bags are designed to fit a variety of cameras. So the fit for each camera is not going to be exact. This means you may need to adjust your camera inside the bag to avoid vignetting, those dark areas around the edges of the photo. These dark areas can be caused when the lens sees the inside of the housing.
To avoid vignetting, make sure your camera is fitted properly inside the housing and the lens is pressed as close as possible to the inside of the housing.
- Don't exceed the product limits
No housing is going to keep your electronic devices waterproof forever under every condition. So read the manufacturer's product specs and make sure you're well within your bag's time and depth limits. For instance, my bag is rated waterproof for 30 minutes at 5 meters.
If you need to use the bag for longer than the allowed limit, be sure to come up, check the bag, and reseal everything before submerging it again.
- Get a weight belt if you want to remain underwater
Depending on the type of photography you plan to do, you may want to get under your subject while shooting. But unless you plan to dive under and shoot while your body naturally rises back to the surface, you're going to need a way to stay down. A scuba diver's weight belt is the solution. You can buy or rent one from any dive shop, and they'll help you get just the right amount of weight so you don't need to fight to stay below the surface.
If you follow these tips, you'll get the most from your waterproof camera bag and have a great time taking photos under the water!
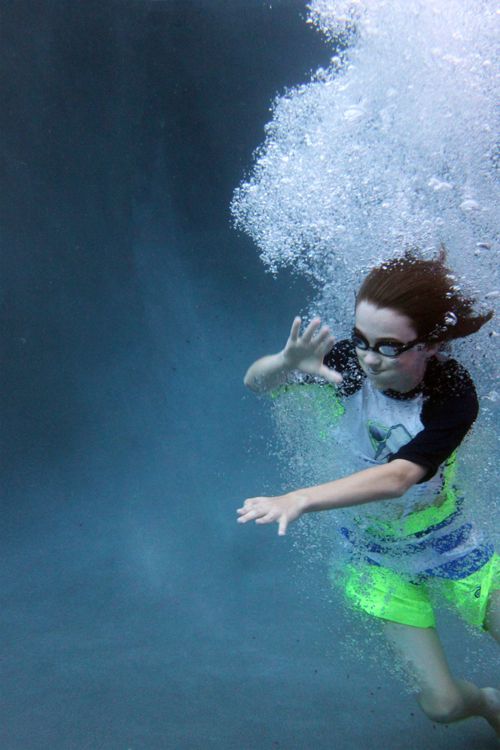
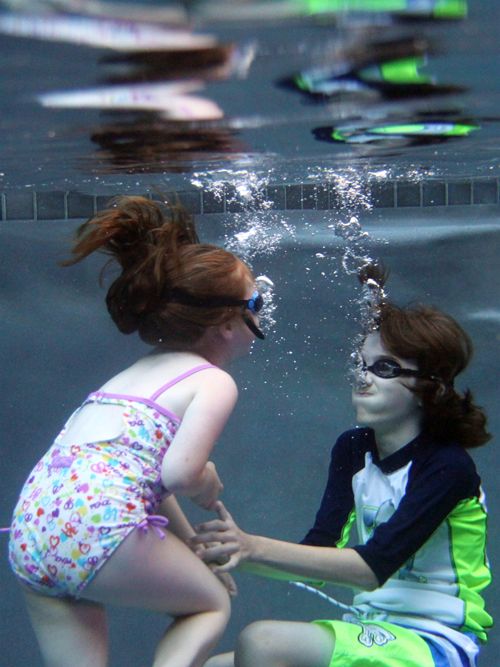
(Photos by Lisa Howard)
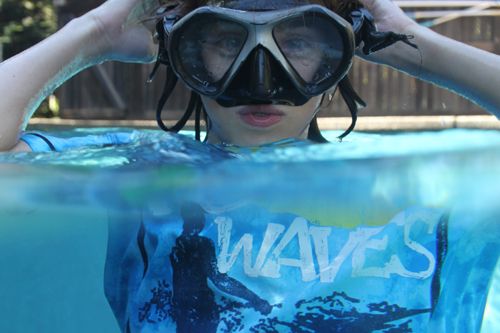
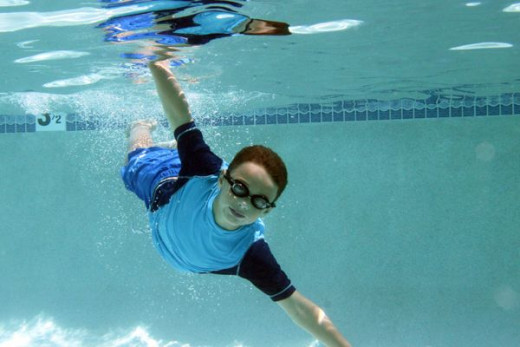
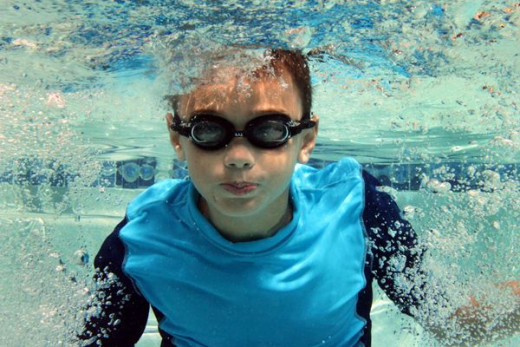
Sample Photos from the DiCaPac Underwater Camera Case - Shots from above and below the water using the DiCaPac bag
Click thumbnail to view full-size


More DiCAPac Underwater Bags - Designed for all types of cameras (and phones and tablets, too!)
DiCAPac is a South Korean company that makes flexible waterproof cases for cameras and other electronics. The list below shows some of the underwater camera bags you can purchase online from Amazon, but for a complete list and to find the one that works best for you, check out the DiCAPac fitting guide.
Be Sure to Check Your Bag's Seals Before Every Use
Learn More About the DiCAPac Underwater Camera Bag - Overview from the Consumer Electronics Show
Thanks for visiting!


