How to Transfer Music from iPhone to Computer?
Transfer Music from iPhone to Computer
Transferring music from iPhone to Computer
Do you want to manage your iPhone music files without iTunes limitations? Then read this 'how to transfer music from iPhone to computer' guide.
One of iTunes’ biggest shortcomings is it’s limited music management abilities (One way transfer only from iTunes to a device but not the other way round). It is also not as spontaneous or as flexible to use as it could be. Here I am going to introduce you with an excellent software namely, ‘KiwiG Phone Tunes’, which is one of a number of programs that intend to fill in the gaps in iTunes' functionality. But what sets 'KiwiG Phone Tunes' apart from others, is that it is completely free to use and it has no hidden spyware or missing functionality. Most of the known software that promise to transfer music files between devices are not free programs.
As its name suggests, KiwiG PhoneTunes is optimized for iPhone/iPad/iPod touch, and it is also compatible with Android devices. It has an intuitive and well-organized interface. This is by far one of the best free music management tools available for migrating music between multiple platforms safely and without any hassle. If you're a Windows PC user then with this tool you can manage, transfer and backup your music files between iOS devices, iTunes, PC and Android device, with ease. Before you proceed to read this guide on how to transfer music from iPhone to computer let me first describe the extraordinary features of this freeware.
How to transfer music from iPhone to computer - Main features of the free software
Basically this program supports 3 kinds of music transfers, which are given below:-
- Transferring music files between multiple devices (iOS, Android, PC and external storage devices);
- Transferring music from iTunes to other devices;
- Transferring music from other devices to iTunes;
The main features of the software are,
- It can manage and transfer music files and playlists between multiple devices like your PC, iOS devices (iPod, iPhone, iPad), iTunes, Android and other external storage devices without losing quality or corrupting the files;
- It can directly transfer music between other devices to Android device without iTunes assistance;
- It offers a drag-and-drop way of transferring songs between iTunes, iOS device, Computer and Android;
- It automatically detects the duplicate files, if any, across the devices and marks them for users to keep or remove;
- It enables users to manage playlists and music libraries as they want. The software allows music lovers to edit the music details and album information including renaming, adding a photo cover, or creating new playlists;
- It Supports all versions of iPod (iPod touch, iPod Nano, iPod Classic and iPod Shuffle);
- The software enables one click access to music library stored in PC, iOS devices, iTunes, Android and other devices;
How to transfer music from iPhone to computer- Step by step guide
Step 1: Go to the official site of ‘KiwiG Phon Tunes’ and download the latest version of the software. After you download the program install the latest version of iTunes on your PC as well;
Step 2: After installation of the software connect your iPhone to the PC and launch ‘KiwiG PhonTunes’ to begin transferring music from iPhone to the Computer;
Step 3: On the screen interface of the program (shown below) you will find all your current music resources organized in the left-panel i.e. files stored in iTunes, other devices (iPhone, iPod, Android, etc) and the local library. The music file lists are displayed in the middle pane and the options for transferring the music files to different destinations/devices are provided at the top of the middle pane (marked in red).
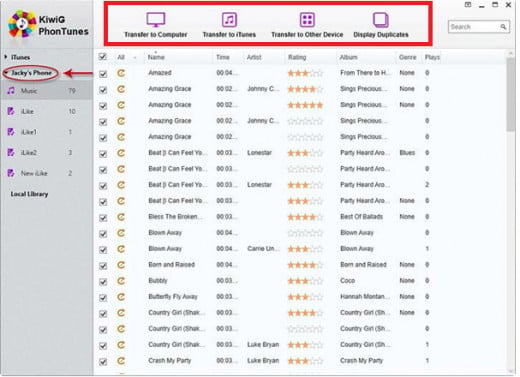
Step 4: Select your Phone tab in the left panel and the program will scan your iPhone and list the existing music files in the centre. Select the music files you'd like to transfer from your iPhone. You can select a few songs, a playlist, or the whole library for transfer. Now choose the destination from the options given on the top. Click ‘Transfer to Computer’ option in this case. A window will appear detailing the number of music files and play lists selected for transfer;
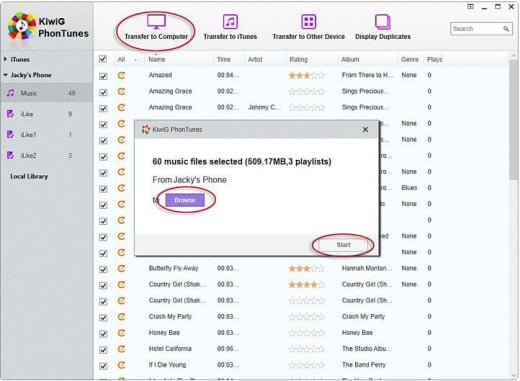
Step 5: Click the ‘Browse’ tab to choose the location on your computer where you would like to save the music files and then press ‘Start’ to complete the music transfer process. (You can also save the music files by selecting the network path after clicking the ‘Browse’ tab);
Step 6: A window will appear informing you that your transfer of music from iPhone to Computer has been completed successfully;
You can follow the same procedure to transfer music from your iPod, iPad or other devices to a directory in your computer without any hassle.
Conclusion
After going through this guide on ‘how to transfer music from iPhone to computer’ you must have realized that ‘KiwiG PhonTunes’ is arguably the most comprehensive music management tool for iPhone/iPad/iTouch, Android and PC. I can say one thing for certain that if you have this freeware in your music management toolkit, you will not require any separate software for each device to manage and share your music files between them.
The only shortcoming of 'KiwiG PhonTunes' is that it is not ready to transfer music from iPhone to computer for Mac OS. However, good news is that I can suggest another good software namely, ‘DeTune for Mac’ which can meet the demand of Mac users. 'DeTune' is also a free software for non-commercial use and supports all your iOS device (iPhone/iPad/iPod touch). With this utility you can copy back your music files from your iPhone by dragging them to your Mac’s desktop or to a folder of your choice, quickly and easily. What's more, you can also transfer files from your Mac to your iOS device just as quickly and easily.
If there are other good free programs that you have tried and you are not affiliated with the company then please feel free to share the same with our readers.


