- HubPages»
- Technology»
- Communications»
- Smartphones»
- iPhone
iOS - About Xcode and its UI Interface - Part 2


The Info tab
In my previous article, I had explored some of the tabs and menus of Xcode starting from the top-left corner of its window. I will continue from where I left off so from the Info tab in the central panel.
This tab shows the Info.plist file data stored in the Project navigation panel on the left side, with some additional options like Document Types, Exported UTIs, Imported UTIs and URL Types.

- Document Types: If your app is capable of opening specific types of files, you should register that support with the system, and you can do that in this section by expanding it clicking on the + sign.
- Exported and Imported UTIs: These 2 sections are for Mac apps, you can add new Uniform Type Identifiers for proprietary data formats by expanding this section and clicking on the + sign.
- URL Types: Here's where you can declare the types of URL needed for your app in case you're using some third-party framework like Facebook SDK, GPUImage framework, etc.
For all other data, you can either edit the Custom iOS Target Properties section or click on the Info.plist file in the left panel. I actually recommend you to do so since It will offer you a wider area and you'll also be able to adjust the cells' width.
The Build Setting tab

This tab is mostly for experienced developers and it hosts all the necessary keys and paths about your project, such as the framework path, the signing team, the Swift compiler version, etc.
You usually edit some sections of this tab when you embed some third-party frameworks in your project, such as adding some flags and keys needed to make those frameworks work with your application.
The Build Phases tab

This tab is to manage the compile source files and bundles relative to your project, Xcode usually handles this automatically when you add files to your project, and again, in case you're using third-party frameworks, you may need to manually add some of their dependencies in this tab.
- Target Dependencies: click on the + sign to add dependencies from your third-party framework (if any).
- Compile Source: here's where your project's swift files get shown as a list, Xcode adds them automatically.
- Link Binary With Libraries: In this section, you can manually add iOS .framework files by hitting the + button and selecting the ones you need. Please note that you can do the same thing in the General tab as well.
- Copy Bundle Resources: This section hosts the Image Sets and .bundle files relative to your app, in fact, you can see the Assets.xcassets folder and the Main and LaunchScreen storyboard files.
The Build Rules tab

Most Xcode project types support Build Rules, which allow developers to modify how existing file types are built, and to define how new file types are built. This tab is for very experienced developers and may be edited just in case you use plugins like J2ObjC and need to add its proper code to be decoded by Xcode and translated into Objective-C.
The Inspector toolbar
Now let's get into the toolbar that is located on the top-right corner of the Xcode window, right below the Layout toolbar.
Select Main.storyboard from the Project navigator panel to get the full set of options in the Inspector toolbar.

- File inspector: this tool shows the identity and type info of your Storyboard file, along with the Interface Builder number, Deployment target, Localization files list for translations and Target Membership (the target name of your project).
- Quick Help: here's where you can find quick help for Views and instances by searching in the official iOS documentation, most of the times you just have to select a View or a line of code and Xcode will automatically display their descriptions and declarations in the left side panel, while sometimes you have to click the Search Documentation button to open it and manually search for your desired topic.
- Identity inspector: this section is where you set a Custom Class name, its Module and its Storyboard ID. This is important in case you perform a Segue or just need to switch from a ViewController to another by code, where you have to instantiate a second screen and type its Storyboard identifier in order to Xcode to open such controller.
- Attributes inspector: One of the most used options of this toolbar is this one because here you can edit several attributes of your Views such as text and colors for Labels, TextViews, Buttons etc, layout types for Controllers and much more. When Xcode was first released you had to mostly edit Views' attributes by code, no you can skip this painful job and speed up your app development.
- Size inspector: This is another tool you frequently use in order to set auto resizing, size, position and margins of your Views in the Storyboard.
- Connections inspector: here's where you can check all the connections you've made between your Views and the swift files relative to your ViewControllers, such as IBOutlets and IBActions.
The Objects panel
On the bottom-right corner of the Xcode window, you can find the Objects panel which let you select and use files, snippet codes, Views and Media objects for your project.


- File template: this library contains all the files you can drag in the Project navigator panel and add to your project in order to build your app.
- Code Snippet: this is a very useful tool where you can save and use code snippets, just select the piece of code you want to save in a swift file and drag it onto this panel, give it a name and shortcut key so you'll be able to recall it while coding by simply typing the shortcut key and hit Enter. This will help you save time on development.
- Object library: here's where you can select and drag UIViews, Controllers, UILabels etc. onto your Storyboard and build the design of your application.
- Media library: if you've added some media file into the Project navigator panel you'll find them in this panel.
The Views panel

This panel is where you can set the size of your ViewControllers in the Storyboard based on a chosen device, zoom the storyboard window and adjust constraints for Views. You can hide and show it by clicking on the button that starts with "View as: ".
The Document Outline panel
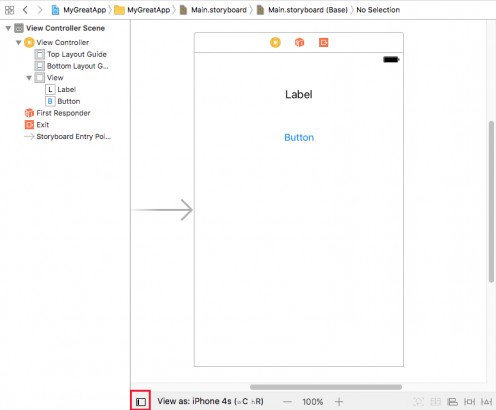
By clicking on the small square icon highlighted in the picture above you can hide and show the Document Outline panel which is the list of Views and Constraints included in your View Controllers.
This panel is useful to manage Views z position - move them in front or back, select objects quickly and make connections to the swift files.
Conclusion
Thanks for reading, hope you've enjoyed this article. In case you missed the Part 1 of it just click here to read it.
Don't forget to check out my other articles and my portfolio of app templates on CodeCanyon!


