How to Move cPanel Accounts to Another Server


If it's time to find a better web host and move all of your active websites over, you might have a feeling of dread. Don't worry - you won't need to know Linux commands to get it done, because cPanel has a great feature that will do it for you.
In this short tutorial, we'll look at moving server accounts from an old server to a new one. In order to do this, I'm assuming that you currently have 2 webhosting accounts: your old one, and a new one that you just subscribed to.
Step 1: Copy Multiple Accounts from the New Server
- Log into your newly registered web hosting account by visiting the unique cPanel WHM address supplied to you by the webhost. It is a hyperlink that is in numerical format, and its username is always "root."
- Now, you should be in cPanel. On the upper left, there is a search box. Search for "copy multiple," at which point, the option for "Copy multiple accounts/packages from another server" should pop up as an option in the auto-complete under the search box. Click it. [Note: cPanel will be merging this with the "Transfer Tool" feature in the near future]. See below for a screenshot:

Step 2: Input Your Old Server's Login Info
- You should be seeing a screen for "Remote Server Information," as seen above. This is very cut-and-dry -- simply include your Remote Server Address in the field. This address should be nothing more than an IP address: do not include "http(s)://" before it, and do not include a trailing colon with numerals after it. So, if your server address is https://123.45.67.89:1234, you'll have to input it in this field as simply 123.45.67.89
- The "Remote SSH Port" should be defaulted to "22" -- leave this as-is.
- For the "Login" radio button, choose "Root (default)." If your old server's login is not "root" (which is rare), then edit this by choosing "User" and inputting the correct one.
- For "Authentication Method," choose "Password (default)." Below, you'll enter the Root Password for your old server. Make sure you type it in correctly.
- At the bottom of the page, you should see a big button for "Fetch Account List." Click it, and it will begin processing with a series of load bars. Afterward, you should see this as your next screen:
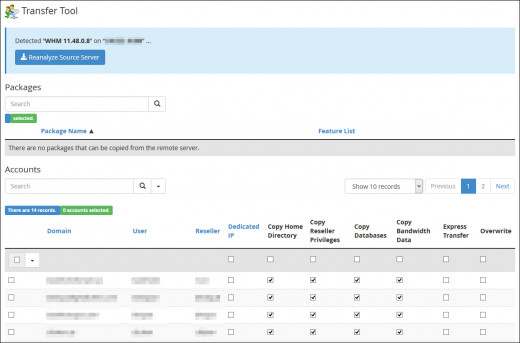
Step 3: Select Accounts to Copy Over to the New Server
- Using the checkboxes on the account matrix, select the accounts you want to move over to the new server. In most cases, you won't have to modify any of the checkboxes that are pre-selected, since you'll want to copy all of the data over, including each accounts' privileges & database.
- Once you've made your selections, click the "Copy" button at the bottom of the screen. In the next screen, you'll watch all of the data migrate over from the old server to the new one, with progress bars. This is what you should see, next:

You're Done!
That's all there is to it. Once this complete, you'll be able to see all of your old website accounts on your new server through Account Information > List Accounts in cPanel. Everything has been migrated: the account names, admin username/passwords, databases, etc.
Now, your final step is to change the nameservers of your domain names through your domain registrar, so that they will point visitors over to the new server. It's always best to do this as midnight, or whenever you're sure there aren't many people visiting your websites.
Once the nameservers have resolved and you've tested every single domain to make sure it points over to the new server properly, you can safely cancel your old web hosting account.


