How to Convert LPs to CDs

How to Digitize Your Vinyl and Turn It Into MP3s and CDs
Do you have a closet full of old records? Do you want to bring them into the computer age, drop them into iTunes, make playlists, use the Genius feature, see what others are saying about your tracks, find them instantly, shuffle them in any order, play them without fear of deterioration, burn them onto CDs and put them on your iPod and free up all that closet space?
In other words, do you want to rediscover your old music? Then you need to digitize those puppies and give them a new life! You can digitize a huge collection of old records and save a small fortune over the cost of re-buying all those tunes. Plus, some of your old music may no longer be available. You can even buy old LPs for a fraction of the cost of what the music would cost new, and greatly expand your music collection!
Or maybe you want to digitize some of those old cassette tapes. Maybe you have some old family recordings, or some audio of you speaking into your first tape recorder as a kid. Maybe you want to bring back some old memories.
Unfortunately, those old cassette tapes can deteriorate with time. What's more, that aging cassette player or boombox in the closet that you thought would serve you in good stead whenever you wanted to listen to those old tapes may no longer work! Internal rubber drive belts can decay and snap and other parts can wear out with time, even when lying around unused. So digitize those old tapes while you can, get rid of shoe boxes full of cassettes and closets full of records, and pack every song you own onto a single compact iPod.

Digital Music vs. Vinyl - Which is Better?
Is vinyl really superior?
But should you even digitize your old records? Aside from the economic aspects, some people say that vinyl has a better sound than any other audio format. They use terms like "warmth" and "richness" in describing the sound of vinyl. Well let's think about this for a minute.
Even if this is true (and it's debatable) you have to consider how the average person listens to music. They don't have expensive audiophile-quality equipment. They have an inexpensive phonograph and speakers.
Plus, each time they play a piece of vinyl, it deteriorates slightly. The difference is tiny, but it is there. In fact, you may have had the experience of carefully cleaning a record with a soft, damp cloth, and then finding dust on the surface or sticking to the needle after playing it. This is vinyl that has been scraped off the surface!
So what did most people do in the past? They made a cassette recording of their vinyl so that they could listen to it anywhere and preserve the quality of the original record. So they were listening to a tape anyway, rather than the original recording. There goes any sound advantage of vinyl!
Now that we have the "vinyl is superior" myth out of the way, let's get on with the digitization process.
What you need to begin
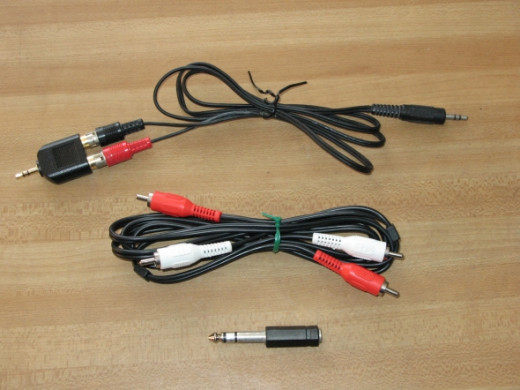
Shown in picture:
Top: Stereo RCA cable with built-in miniplug at one end and miniplug adapter at other end (for connecting to computer).
Middle: Stereo RCA cable without miniplug to be connected to turntable's "out to tape" jacks
Bottom: Adapter for using miniplug with standard headphones jack
To digitize your music, you will need to have a little know-how, and that's what this lens is all about. But it's not that hard; in fact, it's similar to making a tape recording. Here I will cover purchasing a turntable, if you don't have one already, using the free, open-source digital audio recording software Audacity, and finally transferring and organizing your songs in the free iTunes.
Here's what you will need to get started:
* A turntable, phonograph, record player - whatever you want to call it - with a built-in preamp or a standalone preamp or receiver, if one isn't built-in (more on this later)
* A tape player (if you want to digitize tapes)
* Some LPs and 45s (or cassettes) to digitize
* Stereo RCA to 1/8 inch stereo mini plug cable (about 10 bucks at electronics stores)
* A computer with a sound input port, or a USB audio input device if your computer lacks one
* Audio recording software such as the open-source Audacity (free!)
* iTunes on your computer to play your music (also free!) or some other music playing software
Got what you need? Okay, let's get started.

The turntable - Where it all starts
Make sure it works properly first
To digitize your 45s and LPs, of course, you'll need a turntable. Perhaps you have an old one in a closet, attic or basement. The next option is to buy one new or used. We'll cover all three options.
Whether you're going to use an old turntable you have lying around the house or purchase one used, you want to make sure it is in proper working order first. I had an old stereo phonograph that I thought worked decently, but I couldn't get a good recording off of it. I tried different cables, different hookups, posting to troubleshooting boards, and so on.
Finally, I actually tested the thing and found out that it was not giving a proper output through both speakers. Twiddling the balance knob did no good, nor did switching speakers or wires. The thing was just shot. So the moral of the story here is, even though a phonograph, stereo or turntable may seem good at first glance, it can turn out to be a dud. You should test it carefully before you get started.
Whether you test a phonograph you find in a closet or one you find at the second-hand store, the process is pretty much the same. If you're going shopping for a used phonograph or turntable, you might want to bring a record and speaker (or headphones) with you for testing purposes.
The first thing you want to test is whether the thing actually has a needle (stylus)! It will be difficult to test the phonograph in a secondhand store if it lacks one! If the phonograph in your closet lacks a needle, you'll have to find out what type it takes and order one online (they're no longer carried in RadioShack stores).
The second thing to test is a turntable speed. Put the record on the turntable, start the thing running and place the needle on a steady, even passage. Does the pitch vary? In other words, is the turntable's motor speeding up and slowing down? If so, the thing is shot and you should avoid it.
WARNING: This step is tricky! You do not want to buy a used turntable and spend a lot of time trying to digitize albums on it, only to discover that your time is wasted because the turntable suffers from subtle speed fluctuations. A turntable can fool you, especially if the problem is intermittent, so perform this test carefully!
Next, plug the speaker into either output jack (or use a pair of headphones) and twiddle with the balance knob while the record is playing. Make sure you get a smooth, strong signal through each stereo track at approximately the same volume and with no static.
Finally, make sure to test the device on both LPs and 45s (even 78s if you have some really old ones you want to digitize).
If the unit has passed this battery of tests, you should be ready to go. The unit doesn't need to have any speakers, since you will be plugging it directly into your computer and using the PC's built-in speakers for monitoring.
If you want to save the hassle and make sure you get a quality unit right from the beginning, you might want to just buy a new turntable. There are a number of good ones that are designed specifically for digitizing old vinyl.
Naturally, the quality of the turntable or phonograph you buy will in large part determine the quality of your digitized files. The unit will simply have a better sound, even when no speakers are involved. It will have a richer base and sharper treble. The quality of your digitized files, of course, will only be as good as the quality of the equipment you use to digitize them.
However, you can get pretty decent results even from a budget phonograph. Plus, you will have the satisfaction of knowing that your music will never deteriorate any further from this point onwards.
OK, what about a preamp?
The technical details
There are basically two types of turntables -- amplified and unamplified.
Some turntables are not stand-alone devices, and are part of a larger entertainment system. These types often lack a preamp.
What is a preamp? A little background first.
In order to fit long-playing music onto an LP record, vinyl is typically recorded with reduced lower frequencies and boosted higher frequencies. This is called the RIAA curve. To capture audio from your vinyl, you need to make sure this curve is corrected. A USB turntable, (one specifically made for digitizing vinyl, in other words) will take care of all this for you. Some USB audio input devices, designed for computers that lack a sound input port, will also correct this.
Another problem with turntables is boosting these frequencies back to normal levels when you play a record. You can rebalance the frequencies by altering the equalizer settings in your audio software.
A third problem with turntables is the low frequency hum. If you hear this when you're trying to preview a record, you are hearing ground, caused when the turntable from which your preamp amplifies sound is ungrounded. You can correct this by wrapping your turntable's grounding wire around the bottom prong of a three-pronged plug like the one on your power strip, and plugging it into a grounded outlet.
Again, none of these things are issues for you when you buy a USB turntable, one specifically made for digitizing vinyl, or when you use a turntable that has a built-in stereo receiver. How do you know if your turntable has a stereo receiver? If your unit has a built-in AM-FM radio or cassette deck, then you can be assured that it also has a built-in receiver.
Great USB turntables on Amazon - All specifically designed for digitizing music


You need some Audacity
Audacious!
To digitize your music, you will also need audio recording software for your computer. Although there are some more sophisticated options, the free Audacity is a good all-around choice, and it is the software bundled with many USB turntables. If you do not already have it, you can get it from http://audacity.sourceforge.net/download. Decompress and install it as you would any other software package.

Setting up your own recording studio
Just a corner of a room will do...
Next you will need to position your stereo unit within close proximity of your computer so that the patch cord will reach. The type of cord you use will depend on the type of jacks on the stereo unit. If there are jacks on the back that read "out to tape" those are the ones you should use. (As far as the phonograph is concerned, your computer is nothing more than an overpriced tape recorder.)
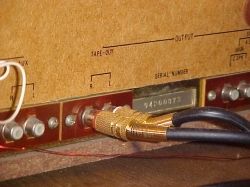
Plug it in
If there are no out-to tape jacks, you can plug the cord directly into the unit's speaker jacks; you'll be monitoring your recordings through your computer's built-in speakers anyway. Or you could plug the cord into your stereo's headphones jack; you get the same signal out of the front or the back anyway, and the front is easier to reach.
However, on an aging turntable of mine a hum was audible when using the headphones jack unless the plug was wiggled just so. This was just the unit's way of telling me it was getting old, and not to be confused with the low frequency hum discussed above.
Stereo RCA to 1/8 inch stereo mini plug cable on Amazon - The cable(s) you need

Next, plug in the computer
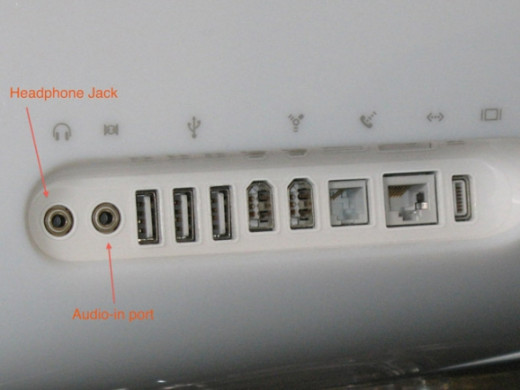
The other end of the cable goes into your computer's audio-in port. Note the icon associated with this port: it looks like a circle intersected by two triangles (older computers may show a microphone icon next to this port). If there is no audio-in port, you will need a USB adapter (or a USB turntable).
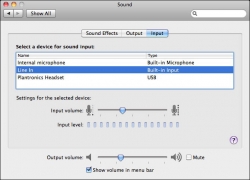
Set your sound input
You may need to set your computer's sound input control panel to "line in." On the Mac, choose System Preferences from the Apple menu, then click the sound icon. Click the input tab and choose "line in" as the input source. Windows computers use a similar setup. Check your system help for details.
The Audacity Main Interface
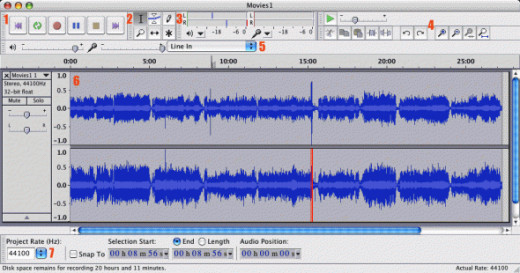
Now you are ready to fire up Audacity. Above is the Audacity interface.
When launched, you will notice the row of playback and record buttons on the default tool panel, similar to those on a tape recorder (#1 in the image above). Those, the input meters, and the project rate pop-up at the bottom of the Audacity window, are the most important interface elements.
The major parts of the interface, and the ones that you will be primarily using in digitizing LPs are numbered in the illustration. They are as follows:
1. The recording and playback buttons. These are similar to those found on a tape recorder. The first and sixth button send the playback hand cursor to the beginning or the end of the recording, respectively. The button with the red circle starts recording. The two blue lines pause the recording and the yellow squares stops recording.
2. The editing tools. The most important is the first button with the I-beam cursor. After you have stopped recording, you can click this button to select the I-beam cursor and drag it over a portion of the recording (waveform) to select it. This is useful for selecting dead space at the beginning or end of the recording so that you can delete it.
3. The output and input meters. These are labeled R and L. There are two sets of meters. The two on the left are for playback and show green bars when your recorded file is playing in Audacity. The length of the bars indicate the strength of the recording. The two bars on the right are for input, and fill with red when you're actually recording something. When recording, the bars should not go all the way to the end, as this indicates that the playback volume on your turntable is too high. It is also that both the (L) and (R) bars display red indicators, indicating that both left and right stereo tracks are getting a signal. If not, adjust the balance knob on your turntable.
4. Four magnification tools. Click one of these and click on the wave form below to zoom in or out. The last of the four buttons zooms all the way back out so that the entire recording fits in the Audacity window.
5. The Line-In pop up. This may or may not show in your version of Audacity, depending on the version you are using.
6. The waveform, or a visual representation of the recorded music.
7. The Project Rate pop up. This is important. For music, you want it to be 44100. Fortunately, this is the audacity default.

Starting your recording
To begin recording, click the "record" button in Audacity (that's the one with the round red circle on it -- see the area labeled 1 in the image above).
You should always click the record button and start recording in Audacity before you place the needle on the record. If you place the needle on the record first and then rush to set Audacity to start recording before the music starts playing, you will be hurried and you will probably miss the first part of the music anyway. Remember that any extraneous noise, such as the needle being placed onto the record or other false starts, can easily be edited out of Audacity afterwards.
After recording one whole side of the record, I always stop Audacity. Some people may prefer to just click the pause button in Audacity, flip the record over, and start recording again into one long file. However, since the various songs on the record are going to be split into separate tracks on the digitized file anyway, it is just as easy to do one side at a time.
When recording, an important interface element of Audacity to pay attention to is the left and right input meters. They will "dance" or fill-in according to the loudness of the music. They should both be showing an equally strong signal. If they don't, there is something either wrong with your record player, your cord, your sound input settings on your computer, or the setting of the balance knob on the record player.
Avoid recording at too loud a level, or "clipping"
The left and right input meters show up as green when they are getting a good, strong signal. They should be filling up almost all the way during loud passages to ensure a good strong signal. However, they should not be veering into the "red zone." This means that your record player is set too loud, causing "clipping," or loud notes exceeding the range of the recorder, and it could cause distortion in the finished recording. It is better to make the recording slightly too soft than too loud; you can always set the song's default playback level in iTunes later anyway.
When the song is recording, you will see the "wavy line" in Audacity dancing in time to the music. When the song is over and you press Audacity's stop button, Audacity will generate the waveform, or the visual representation of the music. The waveform is where you make edits.
Selecting and deleting unwanted sound
You can use the magnifying glass in Audacity to zoom in onto one portion of the waveform to make precise selections, such as to delete empty space at the beginning or end of the album.
To select part of the waveform, drag the I-beam tool over the part of the waveform you want to work with, much as you would drag the cursor over a line of text to delete some words. Release the mouse button after you have dragged to the desired spot and that part of the waveform will be highlighted.
If you did not highlight the right area, you may click anywhere in the waveform to deselect and then try over again. When you are satisfied, press the delete key on your keyboard and the undesired part of the recording will be deleted.
Audacity has a filter which tries to remove the pops and clicks that are an inevitable by-product of vinyl, but in all honesty, it doesn't work very well. It's very hard for any filter to remove such noise without removing some of the presence of a sound as well. My advice is to not try to remove the pops and clicks; just considered it part of the "warmth" and "richness" of vinyl!
Separating the songs on your LP
If you have recorded one song off of a 45, you will be ready to save your work. If you have recorded one whole side of an album, you will probably want to split the file into separate tracks or songs. This is so that you can label each song when you finally import them into iTunes with the proper name, musician, and other information, as well as play the music in any order.
But what if you know you will always want to play all the pieces on the LP in the order in which they were recorded, and you cannot conceive of wanting to separate the music into separate songs or tracks? What if you do not want all those separate songs cluttering up iTunes anyway? Well, you can leave one entire side of an LP as a single file if you want to, but remember that there are mechanisms in iTunes, such as album view, to keep all of the tracks of a particular album organized and together, and even to always play in the same sequence.
Splitting recordings into separate tracks (songs)

The first step to saving each song on a recorded LP as separate files is to mark the tracks.
Place the record label or album jacket in front of you for reference.
With the I-beam tool selected, click at the beginning of the waveform, the point where you first started recording.
Click Project > Add Label at Selection or Tracks > Add Label at Selection, depending on which version of Audacity you have.
Audacity will add a label marker at the point of your selection ready for you to start typing the name of the song. (The label markers can be found below the waveform area in the Label Track area).
Click at the start of the second track on the waveform (you may need to zoom in a bit to do this precisely) choose Project > Add Label at Selection again, type the second label and so on.
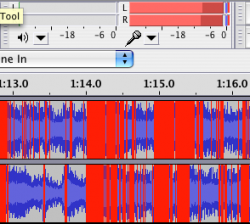
Audacity does have a feature that attempts to automatically mark the beginning of each track. It does this by analyzing the entire recorded file (i.e. the recording of the entire side of an LP) and tries to find periods of silence that meet certain criteria, such as being more than two seconds long. This command is called Silence Finder and is found under the A analyze menu. Personally, I find it easier just to set the markers for the various tracks myself, as I usually try to delete the excess silence at the end of each song anyway.
The above image shows the Audacity window after the Silence Finder command has been run. Notice the multiple label tracks that have been created at the points where Audacity found silences. (The red spike in the waveform on the lower track, by the way, is a place where the record skipped, another reason to digitize those records before further damage occurs!
Be sure to preview each song after you have made the marks to make sure you have placed them in the right positions.
Finally, to save the LP as separate songs, choose Export Multiple from the File menu. In the dialog box that appears, make sure that the "Labels," and the "Using Label/Track Name" buttons are selected. Click Export to save in your default file format (normally WAV for Windows and AIFF for Mac).
There is in downloadable plug-in that you can install in Audacity that will allow it to convert your recorded songs directly into MP3 format, but my advice is, don't use it! Instead, I will tell you a better way to convert your songs.
Bringing your songs into iTunes
Let iTunes convert your songs to MP3 or AAC format
Adding your songs to iTunes is a simple matter of dragging the song files from the directory into which you save them into the iTunes main window. Make sure that iTunes is in list view and click the Date Added column header. This will make your most newly imported songs jump to the top of the list (you may need to click the Date Added column header twice).
Since the songs you just imported are in raw WAV or AIFF format, they will be rather large. These are uncompressed formats and on average are about five times larger than MP3. This means that you will be able to fit far fewer of your songs on your iPod or other music player.
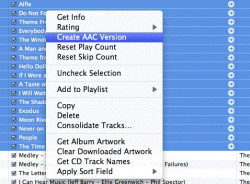
To remedy this, select all the newly imported songs, then right-click on one of the selected song files to bring up the contextual menu. Choose Create MP3 Version and iTunes will diligently convert the selected songs. If you don't click anywhere either during or after the conversions, the WAV or AIFF files will still be selected so you can hit the delete key on your keyboard to remove them, leaving the converted MP3 files.
An even better option is to convert the songs to AAC format rather than MP3. AAC creates a slightly better file quality with a slightly smaller file size than MP3. Contrary to popular belief, AAC is an open format that will not stop working anytime in the future. To make iTunes convert to AAC format, however, you must go to the General tab in iTunes preferences, click on the Import Settings button and choose AAC encoder if it is not already selected.
Adding song information and cover art - Google is your friend
Now that you have imported your music into iTunes, the final step is to add relevant information to each song, such as brand name, year recorded, composer, genre and any other information you wish. This information is saved as part of each song file, so if you ever wish to import your music into a music player program other than iTunes, the information will still be there.
Adding artwork to each of your songs will greatly increase the interest of your music library and will re-create the feeling of having the actual LP jackets in front of you. It will also allow you to to use Cover Flow view, a great way of browsing your music, in both iTunes and on your iPod or iPhone.
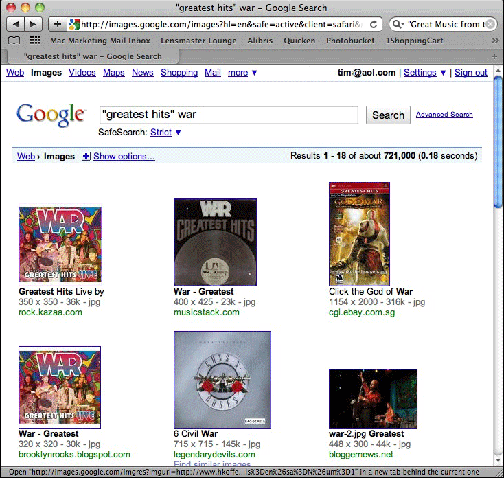
You can often find the relevant cover art through a Google image search. type the name of the album in quotes, followed by the name of the band. This will often bring up the exact album cover your looking for. If this doesn't work, try doing a regular Google search and clicking on some of the links that come up.

Scanning cover art
Ever notice an LP jacket won't fit on a scanner?
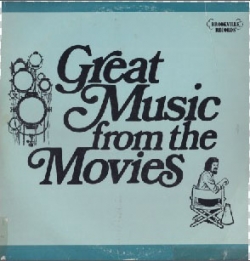
But sometimes you just can't find the album jacket online. Maybe a musician is too obscure, or the album title, like "Great Music From The Movies" is too generic. In such cases, a scanner or multifunction device comes in mighty handy.
Since album jackets are printed through a process called halftoning, you should be sure to set the de-screening option in your scanning software. Halftoning is a process by which all the shades of the spectrum are simulated through the use of tiny printed dots. However, since your computer screen is also made of tiny dots called pixels, and since the dots of the halftone don't usually line up with those of the screen, you get weird patterns called moire. This is corrected for by the de-screening algorithm of your scanning software, which smooths and blurs together the halftone dots in the final scan.
Stitching the portions of the scan together
Photoshop and Photoshop Elements makes it easy
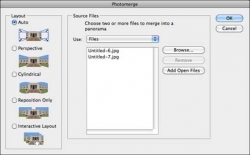
Aside from moire, there's one more hurdle of scanning LP jackets you need to surmount--that pesky problem that album covers are just too big to fit on the scanner bed -- at least on anything but a professional grade scanner. Not only is the scanner bed not wide enough, but unless you have a legal size scanner, it isn't even long enough! Both the bottom and the edges of an LP will be cut off on the scan. Fortunately, there are workarounds.
The easiest way is to scan the LP cover in sections, and then stitch them together in your photo editing program. Even though most scanner beds are not legal size, they are a bit bigger than 8.5 x 11. Mine measures 11.7 inches long. Still not large enough for an LP record jacket, but close enough. I simply scan the top portion of the jacket, then turn it 180° and scan the bottom portion.
Recent versions of Photoshop and Photoshop Elements have a nifty Photomerge command that will automatically stitch the two halves together for you. With the two halves of the LP jacket scanned and saved to disk, choose Photomerge Panorama from Photoshop's File menu. Choose the two scanned halves of your record jacket in the Open dialog and click the Auto Layout on the left-hand side. Click OK and, in about 30 seconds, your two scans will be merged into one nearly seamless record jacket.
The finished product
A little cropping and the jacket art is complete
The final scan looks pretty good. Two of the corners may be cut off because the jacket didn't fit completely along the width of the scanner, but I find that I can usually place the jacket on the scanning bed so that a non-crucial element gets cut off on the final scan. Judicious use of the cropping tool in Photoshop can convert the final scan to a perfect square shape à la a real record jacket. Save the stitched image for adding to iTunes.
A good resolution at which to save the final jacket is 600 x 600 dpi, which is the size of jacket artwork of the songs purchased from the iTunes store. Remember if you save the image at too high a resolution, it will bloat the size of your music file, as the cover artwork is stored as part of the music file itself. This will allow fewer songs to fit on your iPod. However, if you have iTunes or an iPod touch (or iPhone) and the album jackets are present on all your songs, you can make nifty use of the Cover Flow view in browsing your music collection.
Admiring your work in iTunes - With the music digitized and the jacket art scanned and added to the music file, it your work is completed!
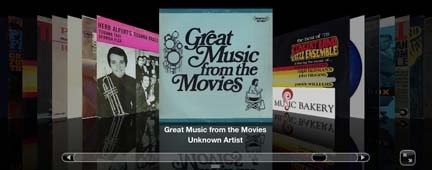
Here's the jacket art in iTunes' cover flow view. Looks pretty good, eh? Just like flipping through your real record collection, but without the excess bulk!


 Resolutions - What Does Resolution, Aspect Ratio, ppi Mean For Your Smartphone, Tablet, TV, or Monitor")