Create Medieval Text and Shield in Photoshop

In this tutorial I am going to show you the detailed technique I used to create super cool and glossy Medieval Style Text with default Font and Blending Options. We are also going to draw default Custom Shape in order to create Shield which will be a part of the Background for our Text.
Both Textures used to add unique touch to the dark Gradient Background are my own photos and unrestricted stock. You don't need my permission to use them for your own works.
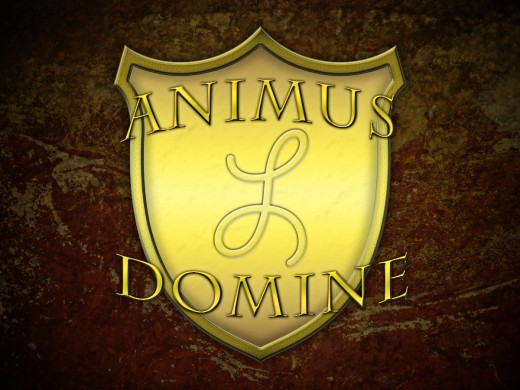
Well, this is what you are going to create:

STEP 1
First and foremost you have to create a separate folder where you should place all files you are going to use or create in the course of this tutorial.
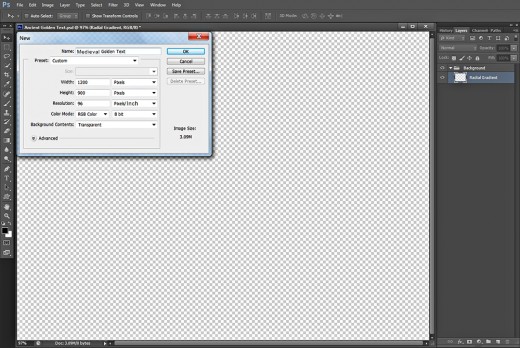
Now open Adobe Photoshop and create a new .psd file (File, New). Name it Medieval Golden Text for example, set its Width to 1200 Pixels and Height to 900 Pixels and insert 96 Pixels/Inch for Resolution. Choose RGB Color for Color Mode and Transparent for Background Contents.
If you intend to print your final result, set the Resolution to 300 Pixels/Inch and select CMYK Color for Color Mode.
After you are ready with the preparation of your document, rename Layer 1 to Radial Gradient and press Ctrl+G (Layer, Group Layers) to place it in a group. Call this new group Background.
Create Beautiful Background with Stone and Paint Texture
Steps 2-7 are very easy to be followed. Firstly you have to create dark Background with Radial Gradient, the you should add both Textures- Stone and Paint and change the blend modes of their layers in order to get awesome textured Background.
STEP 2
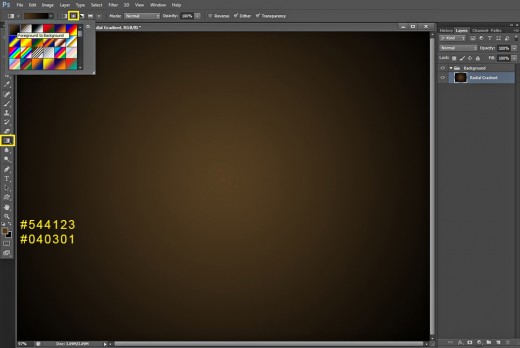
Keep your first layer (Radial Gradient) highlighted then Set Foreground color to #544123 and Background Color to #040301.
Take Gradient tool (or just press G key for short), then navigate to the Options bar and firstly open the Gradient Picker. Select the first Foreground to Background Gradient and click also Radial Gradient icon. Drag with the instrument from the middle to any corner of the canvas and you will get this Background:
STEP 3
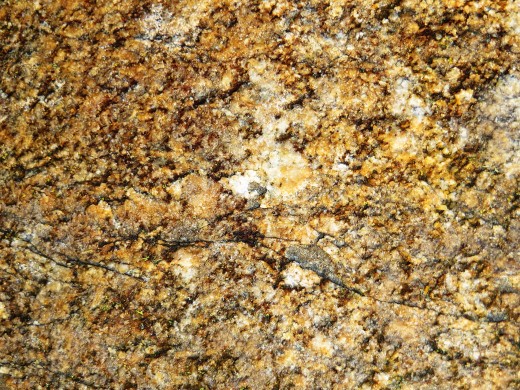
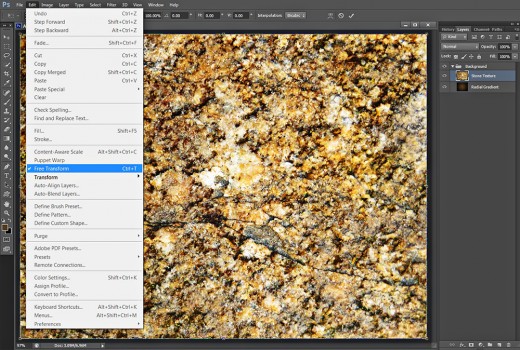
The first photo you have to download is the Stone Texture image shown below. Click on it to get it in high resolution, then right click on it and choose Save Image As to put it in your folder. I hope you followed my first step and created a folder where to keep your files.
STEP 4
Create a New Layer on top of Background group and name it Stone Texture. Open the Texture image in Photoshop, press Ctrl+A to Select it then press Ctrl+C to Copy the image. Go back to your Medieval Golden Text .psd file. Select Stone Texture layer and press Ctrl+V to Paste the Texture there.
The Texture photo is bigger that your canvas so you will have to resize it. For the purpose navigate to the Menu bar and select Edit, Free Transform. Move a chosen node in inner direction to make the Stone Texture cover your canvas. Press Enter to apply the Transformation when you are ready.
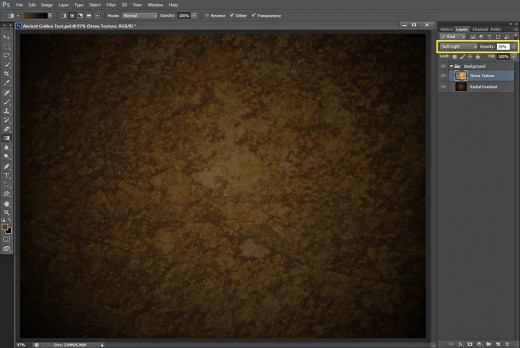
STEP 5
Change the Blend Mode of Stone Texture layer to Soft Light and reduce its Opacity to 35%.
STEP 6
The second photo you have to download is the following Paint Texture. See Step 3 for a reference.
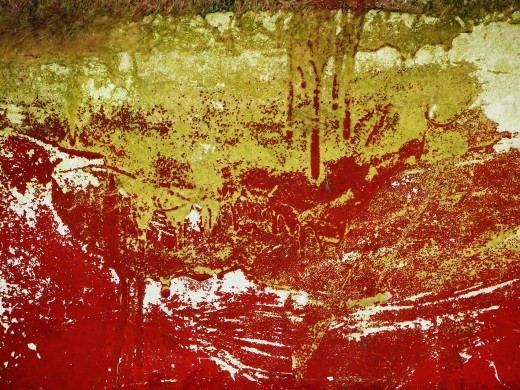
STEP 7
Create a New Layer on top of Background group and name it Paint Texture. Paste there the previously downloaded Texture and resize it using Edit, Free Transform (See Step 4).
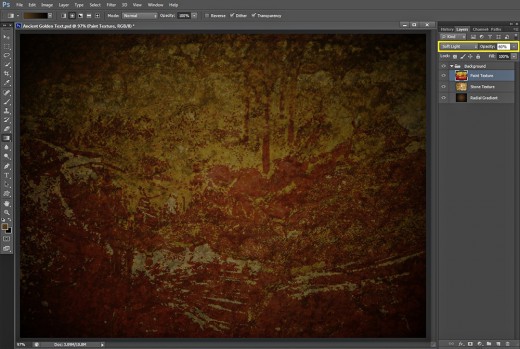
Change the Blend Mode of Paint Texture layer to Soft Light and lower its Opacity to 60%.
Create Golden Shield with Custom Shape Tool and Stroke
In Steps 8-25 your task will be to draw Shield using default Custom Shape. After that you are going to make the Shield shape looking made of metal with the help of Blending Options and especially Gradient Overlay.
You will finish your work on the Shield with adding a sign using Giddyup Std default Font and applying layer styles to give it 3D look.
STEP 8
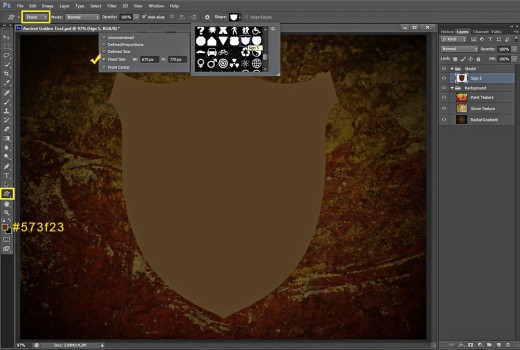
Create a New Layer on top of your Layers panel and call it Sign 5 after the Custom Shape we are going to draw in this step. Place the layer in a group called Shield.
The color we are going to use is of no importance as later we are going to apply Gradient Overlay, I have chosen #573f23 for Foreground Color.
Now select Custom Shape tool, in the Options Bar set its Mode to Pixels, then click on the Gear icon, check Fixed Size option and insert 675 Pixels for Width and 775 Pixels for Height. Find Sign 5 (default) Custom Shape from the Custom Shape Picker and draw it in the middle of the canvas.
STEP 9
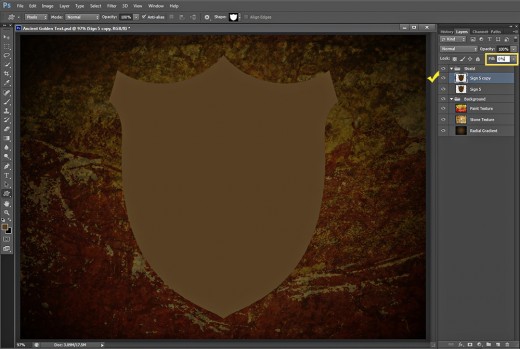
While Sign 5 layer is highlighted, press Ctrl+J (Layer, Duplicate Layer) to make a copy of it. Lower Fill Opacity of Sign 5 copy layer to 0%.
STEP 10
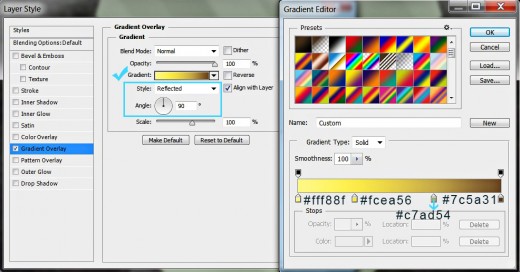
We have to cover our shield with gold now so double click on the original Sign 5 layer's thumbnail to activate Layer Style dialog box (Layer, Layer Style, Blending Options). Firstly tick Gradient Overlay Layer Style, choose Reflected for Style and set the Gradient Angle to 90 degrees then change the color stops like this:
First Color Stop (Location 0%): #fff88f
Second Color Stop (Location 28%): #fcea56
Third Color Stop (Location 67%): #c7ad54
Fourth Color Stop (Location 100%): #7c5a31.
STEP 11
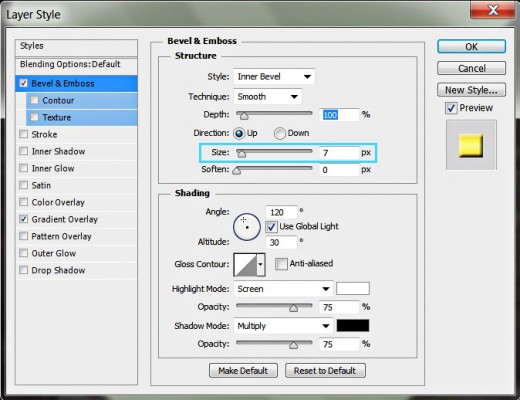
The second Layer Style we have to apply on Sign 5 layer is Bevel and Emboss. Slightly increase only its Size to 7px and leave all other settings as given by default.
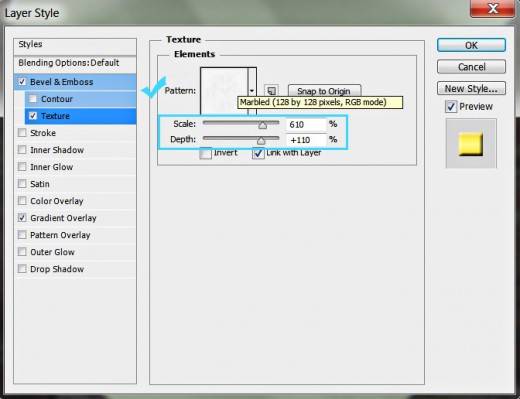
STEP 12
Let us make the surface of our shield a bit uneven, so check Texture Layer Style, select Marbled texture (128 by 128 pixels, RGB mode) from the Pattern Picker, then set its Scale to 610% and Depth to +110%.
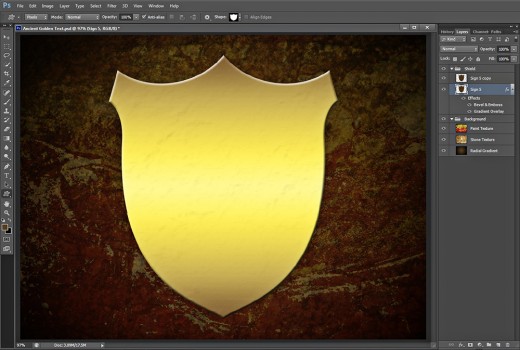
This is how the Shield shape will look so far after adding the Blending Options:
STEP 13
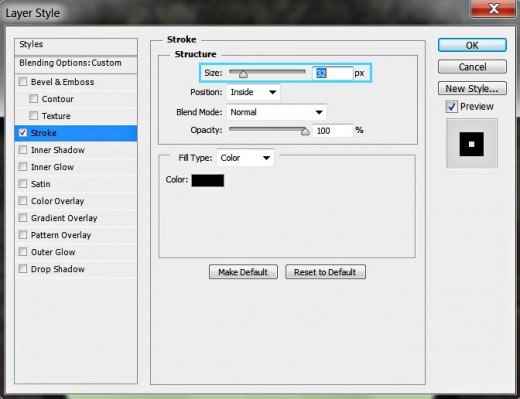
Now select Sign 5 copy layer, double click on its Layer's thumbnail to call Layer Style box and tick Stroke. Only increase its Size to 32px and leave unchanged the other default settings.
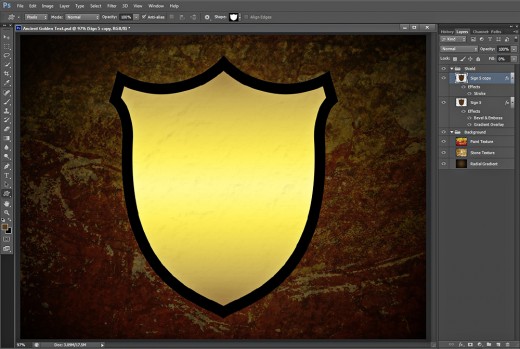
You should get the following result after adding Stroke to Sign 5 copy layer:
STEP 14
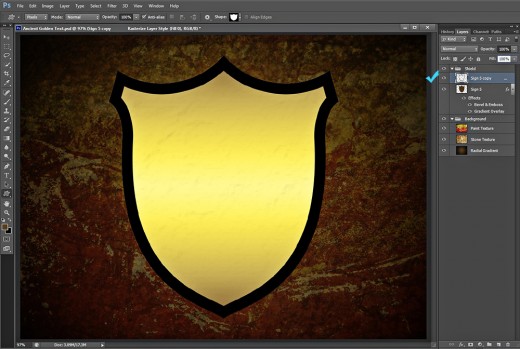
Right click on Sign 5 copy layer and choose Rasterize Layer Style from the fly out menu.
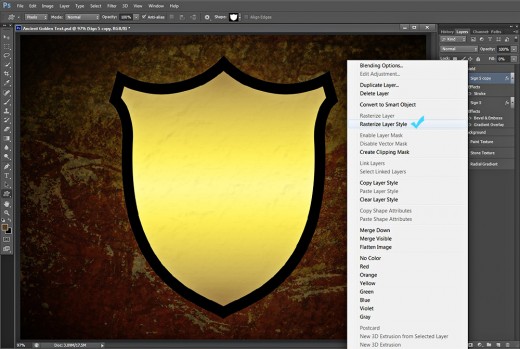
This is how your rasterized Sign 5 copy layer will look in Layers pane:
STEP 15
In this and the coming steps we have to apply layer styles on the stroke to create awesome metallic border for our shield.
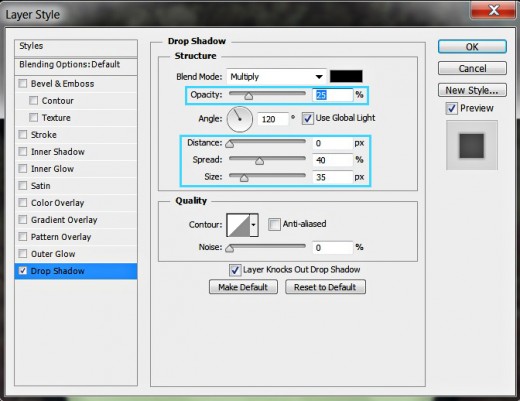
Double click on Sign 5 copy layer to call again Layer Style box and firstly tick Drop Shadow Layer Style. Reduce Opacity to 25% and Distance to 0px then increase Spread to 40% and Size to 35px.
STEP 16
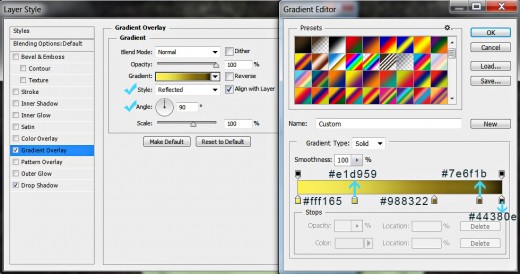
Now tick Gradient Overlay Layer Style in the dialog box, choose Reflected for Style, change the Gradient Angle to 90 degrees and change the color stops as follows:
First Color Stop (Location 0%): #fff165
Second Color Stop (Location 28%): #e1d959
Third Color Stop (Location 67%): #988322
Fourth Color Stop (Location 89%): #7e6f1b
Fifth Color Stop (Location 100%): #44380e.
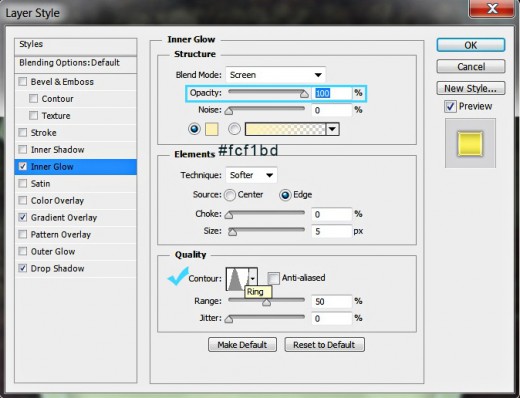
STEP 17
The third Layer Style we have to add to Sign 5 copy layer is Inner Glow. Heighten the value of Opacity to 100%, Set Color of Glow to #fcf1bd and choose Ring Contour from the Contour Picker.
STEP 18
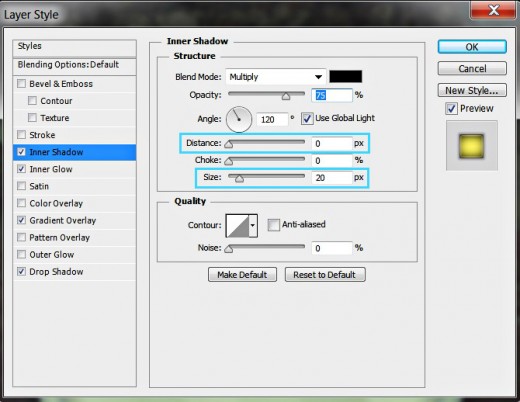
In this step we are going to darken the edges of our shield border. Tick Inner Shadow Layer Style then set Distance to 0px and increase the Size to 20px.
STEP 19
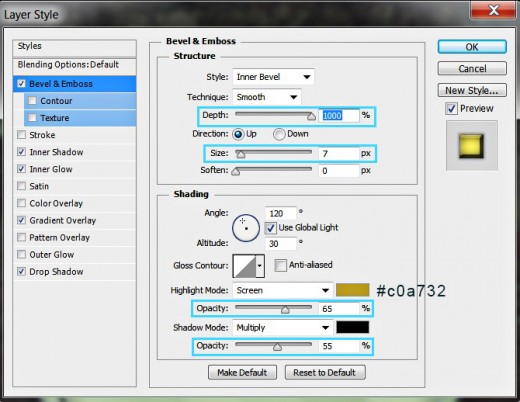
Apply also Bevel and Emboss Layer Style to add relief to the shield border. Increase the Depth to the maximum value of 1000%, change Size to 7px and Set Color for Highlight to #c0a732. Reduce Color for Highlight Opacity to 65% and Color of Shadow Opacity to 55%.
STEP 20
Tick also Texture Layer Style and from the Pattern Picker select Brush Pen on Canvas (150 by 150 pixels, Grayscale mode). Set its Depth to 5%.

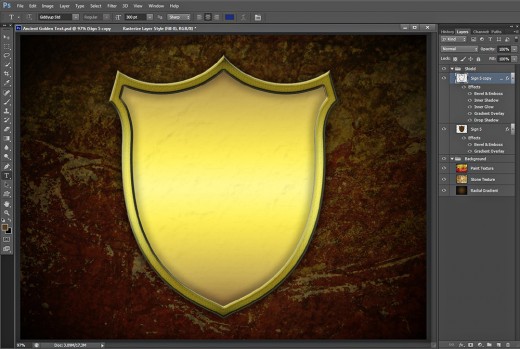
This is how our golden shield will look so far:
STEP 21
Now we should add a symbol or letter to beautify our shield. I have decided to add letter and for the purpose have used Horizontal Type tool and the default Giddyup Std Font of 300pt Size. I have set the Text Color to #243374. You can use another Font or Custom Shape if you like. Place L Text layer on top of Shield group.
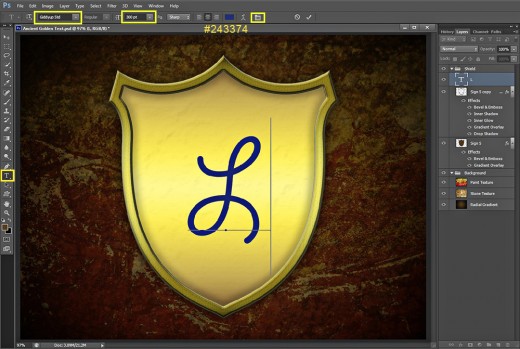
STEP 22
Reduce Fill Opacity of L Text layer (in my case) to only 5%. The Letter will almost disappear from the shield but you'll see it again after we start to apply Blending Options in the comming steps.
I recommend you not to Rasterize this Text layer in order to be able to edit it if you decide to type another letter or symbol.
STEP 23
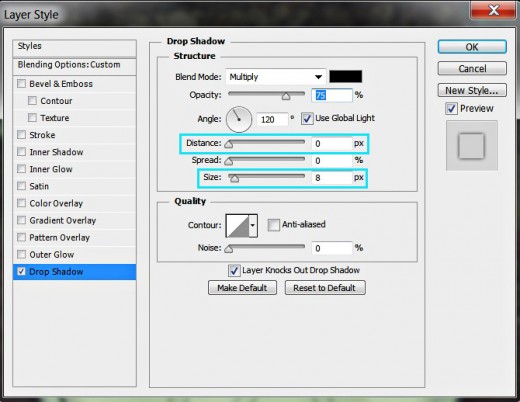
Right click on L Text layer and select Blending Options. Tick Drop Shadow Layer Style then reduce Distance to 0px and slightly increase Size to 8px.
STEP 24
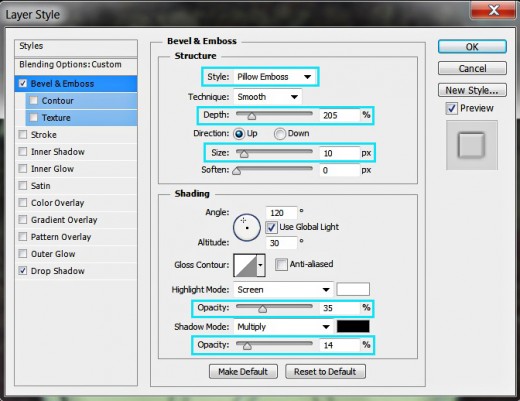
Now we are going to give our L Letter 3D Look. Simply tick Bevel and Emboss and set its Style to Pillow Emboss. Increase also Depth to 205% and Size to 10px.
We need also to change the parameters of Color for Highlight and Color of Shadow Opacity. Reduce the first to 35% and the second to 14% respectively.
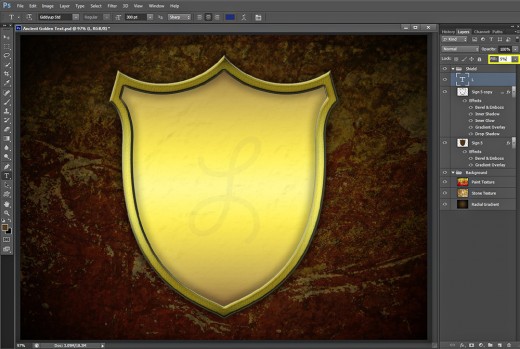
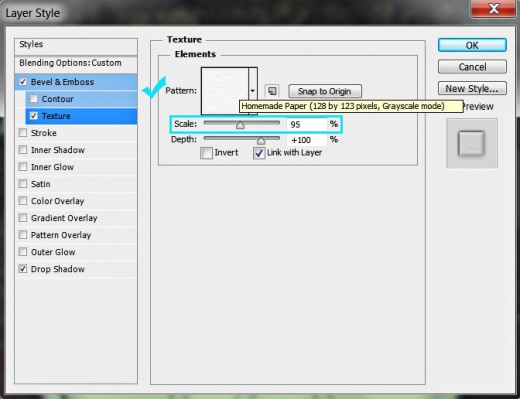
STEP 25
Check also Texture Layer Style and find Homemade Paper from the Pattern Picker (128 by 123 Pixels, Grayscale mode). Set its Scale to 95%.
The golden shield is ready. In the next steps we are going to create our Medieval Golden Text.

Create Medieval Golden Text with Charlemagne Font and Layer Styles
You'll finish your work with typing Text with the famous Charlemagne Font. After the Text is ready you have to use Warp Text option in order to distort both words, then your task is to add Shadow, Gradient, Inner Glow and Bevel and Emboss to create cool metallic effect.
STEP 26
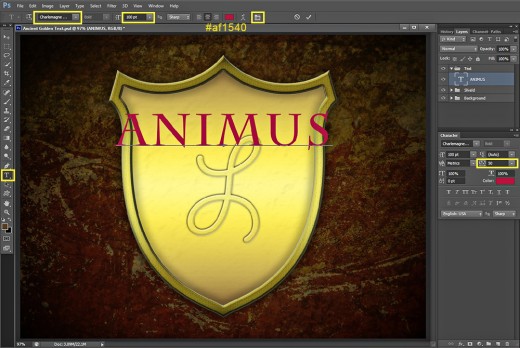
Take Horizontal Type tool and choose Charlemagne Std Font from Font Family drop down menu. Set the Font Size to 100pt and choose #af1540 for Text Color. Leave the Tracking to the default 50 then type Animus or any other word in capital letters.
Place Animus Text layer on top of Layers pane and put it in a group called Text.
STEP 27
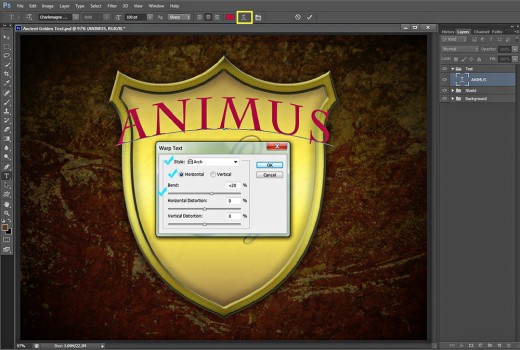
Highlight the Text you have just typed and click on Create Warped Text icon in the Options bar to call Warp Text dialog box. Choose Arch Warp from Style drop down menu and increase Bend option to +20%. You should get the following result.
STEP 28
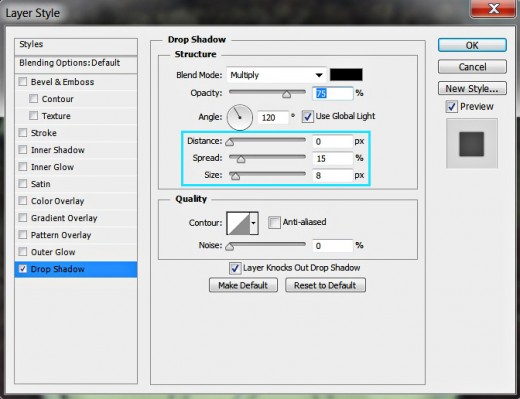
Right click on Animus Text layer and choose Blending Options. Firstly check Drop Shadow, reduce its Distance to 0px, then increase Spread to 15% and Size to 8px.
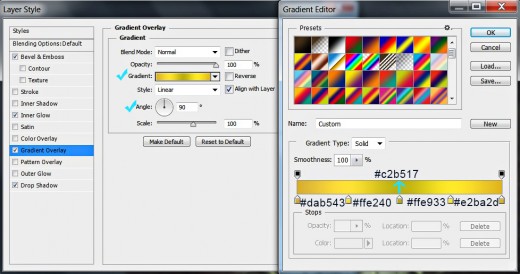
STEP 29
Let us add golden Gradient to our Text now. Tick Gradient Overlay Layer Style and check if its Angle is automatically set to 90 degrees. Change the color stops of the Gradient as follows:
First Color Stop (Location 0%): #dab543
Second Color Stop (Location 25%): #ffe240
Third Color Stop (Location 50%): #c2b517
Fourth Color Stop (Location 75%): #ffe933
Fifth Color Stop (Location 100%): #e2ba2d.
STEP 30
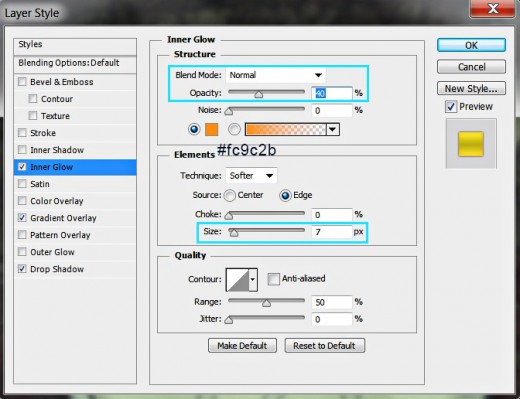
The next Layer Style we have to add to Animus Text layer is Inner Glow. Set its Blend Mode to Normal and Opacity to 40%. Insert #fc9c2b Color Code for Color of Glow and slightly increase Size to 7px.
STEP 31
It's time to add volume to our Text so check Bevel and Emboss Layer Style, change its Depth to 1000%, Size to 4px and Set Color of Glow to #ffec17.

This is how our first part of the Golden Medieval Text will look so far:

STEP 32
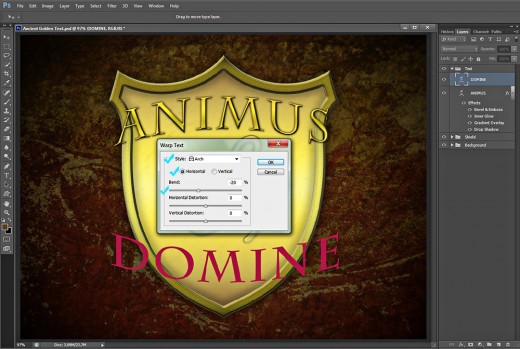
Now using the same Charlemagne Std Font as in Step 26 type Domine at the bottom half of the canvas and apply Arch Warp but this time set Bend to -20%.
STEP 33
We have to apply on the second part of the Text the same Layer Styles we already applied on the first one. Right click on Animus Text layer and select Copy Layer Style from the fly-out menu.
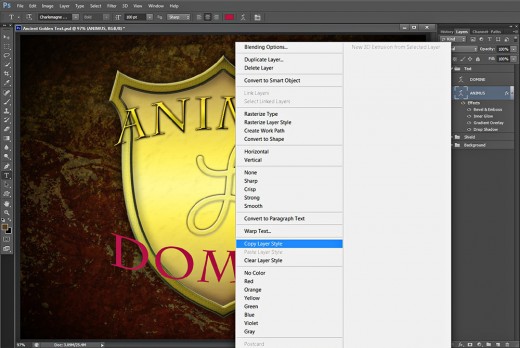
STEP 34
Now select Domine Text layer, right click on it and choose Paste Layer Style from the fly out menu.

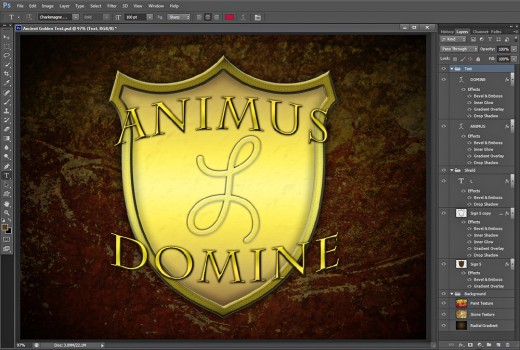
STEP 35
If you have followed all my steps, you should have these three groups of layers in Layers panel:
-
Background group with three layers in it: Radial Gradient, Stone Texture and Paint Texture;
-
Shield group which consists of three layers too: Sign 5, Sign 5 copy and L Text layer and
-
Text group with two layers in it: Animus Text layer and Domine Text layer.
STEP 36
This is my Medieval Golden Text saved in .jpg format. You can improve the quality of the image by applying Filter, Sharpen, Unsharp Mask. Just play with the settings until you are happy with the result.
Thank you very much for reading this tut. If you need something to be clarified, just leave a comment below. :)