Create Pastel Colored Splash Text Effect with Custom Shapes in Adobe Photoshop

From this tutorial you will learn all the steps to creating cool Splash text effect with default font and only two custom shapes. The font I have used is Brush Script Std and you can find it in any Photoshop version. Both custom shapes are Grime 7 and Artistic 6 which are exclusive for the higher versions, but you can successfully replace them with splash brushes and ordinary hard round brush.
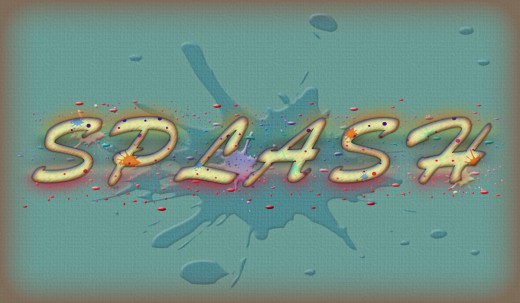
This is what you are going to create:
STEP 1
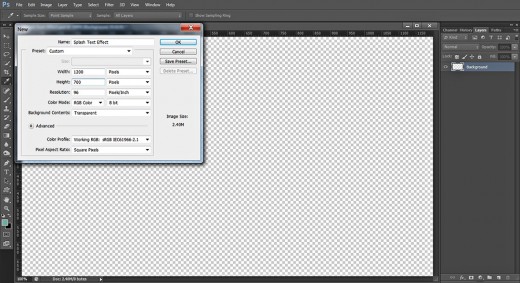
Let's get down to work with this first step. Star by creating a new .psd document, name it Splash Text Effect, insert 1200 Pixels for Width and 700 Pixels for Height and set the Resolution to 72 or 96 Pixels/Inch. Select also RGB Color Mode if you don't plan to print the text and choose Transparent for Background Contents.
Rename the transparent Layer 1 that you'll get in Layers panel to Background.
STEP 2
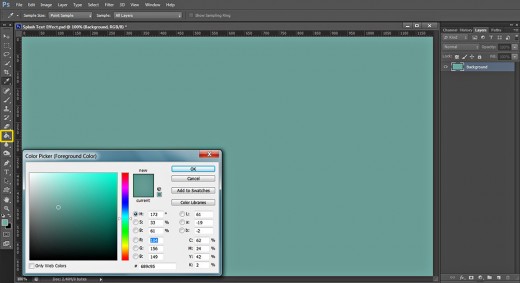
Change the Foreground Color to #689c95 and use Paint Bucket Tool to colorize your canvas.
STEP 3
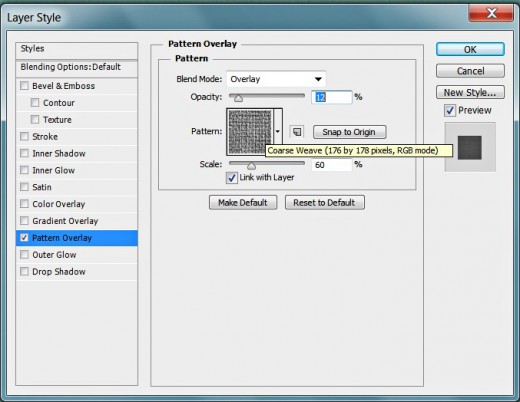
Double click on the Background layer's thumbnail or select Layer, Layer Style, Blending Options and check Pattern Overlay to give the Background a nice relief and texture. Insert the following settings:
Blend Mode: Overlay
Opacity: 12%
Pattern: Coarse Weave (176 by 178 pixels, RGB mode)
Scale: 60%
Link with Layer: checked.
STEP 4
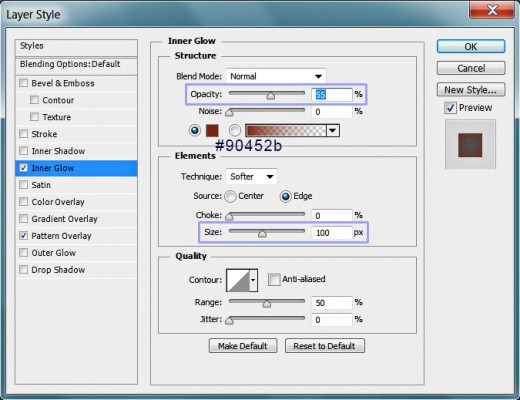
Add also brownish shades to the borders of your canvas. For the purpose check Inner Glow in the Layer Style dialog box, reduce Opacity to 55%, change Color of Glow to #90452b and increase the Inner Glow Size to 100px.
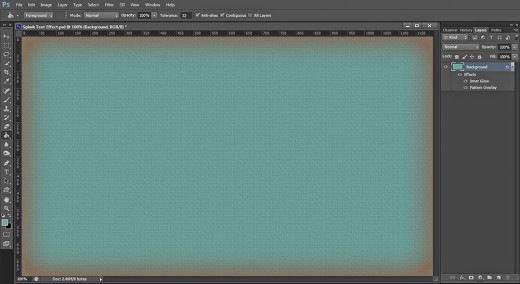
You'll create this Background after applying both Blending Options:
STEP 5
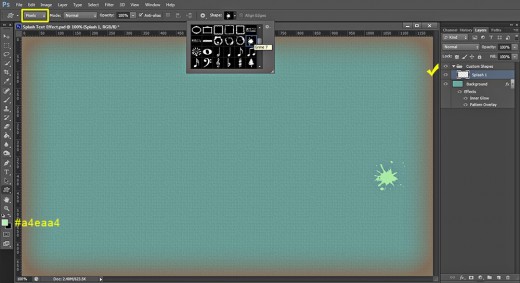
Change the Foreground Color to #a4eaa4 then Create a New Layer on top of Layers panel and name it Splash 1. Press Ctrl+G (Layer, Group Layers) or simply press the Folder icon at the bottom of Layers panel to place the newly created layer in a group. Rename this new Group 1 to Custom Shapes.
Now grab Custom Shape Tool, in the Options bar change its Mode to Pixels and find Grime 7 Custom Shape from the Picker which is also in the Options bar. Draw a tiny splash as you see on the screenshot below.
Instead of Custom Shape tool, you can download from the Web special splash brushes and use them to create the text and its background. Don't hesitate to use your imagination.
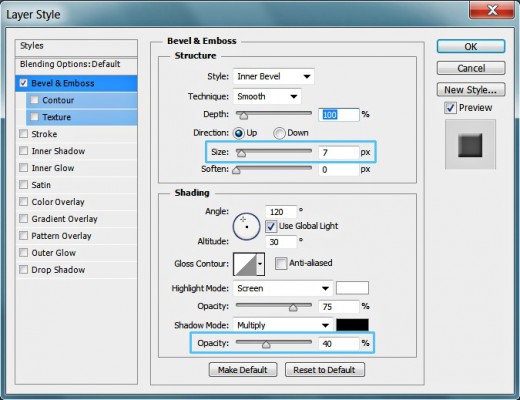
STEP 6
Double click on Splash 1 layer's thumbnail to add 3D effect, check Bevel and Emboss in Layer Style box. Increase only the Size to 7px and reduce Color of Shadow Opacity to 40%. On the screenshot given for the next step you'll see the result.
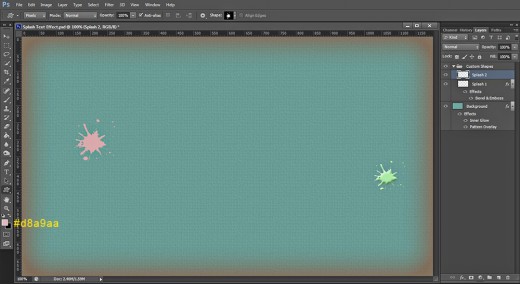
STEP 7
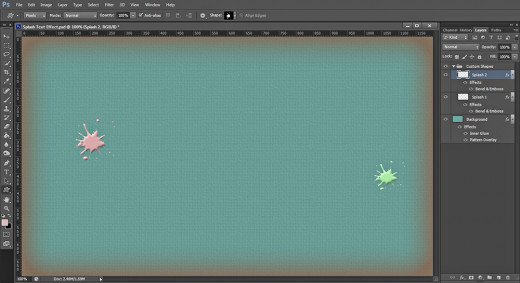
Now change the Foreground Color to #d8a9aa, Create a New Layer on top of Custom Shapes group and call it Splash 2 then draw a new pastel pink splash on the other side of the canvas:
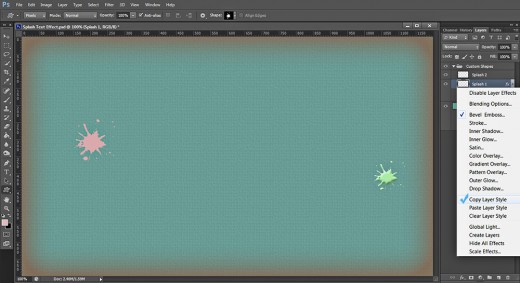
STEP 8
Right click on Splash 1 layer and select Copy Layer Style from the fly-out menu:
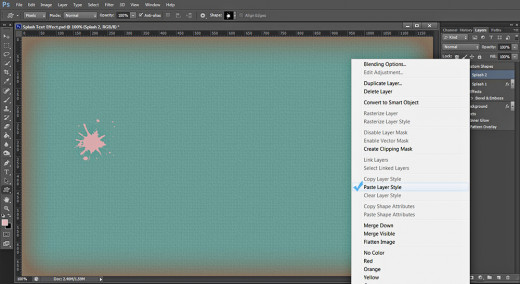
Now right click on Splash 2 layer and choose Paste Layer Style to apply the same Bevel and Emboss.
Here are the first two splashes after adding 3D effect to both of them:
STEP 9
Change the Foreground Color to #a4a9d8 then Create a New Layer on top of Custom Shapes group and call it Splash 3. Again using Grime 7 Custom Shape, draw a bluish splash. Copy the Bevel and Emboss Layer Style from any of the previous splashes and Paste it on Splash 3 layer.
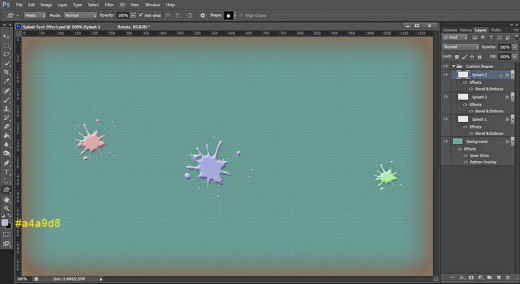
STEP 10
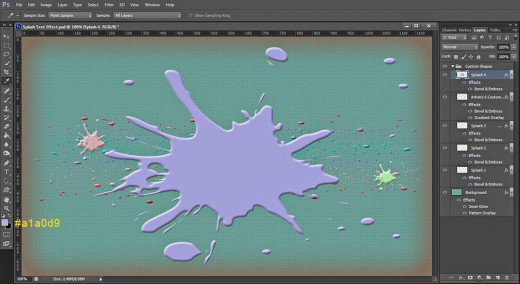
Now Create a New Layer on top of Custom Shapes group and name it Artistic 6 Custom Shape. Change your Foreground Color to nice orange- #d87341 then take Custom Shape tool in Pixels Mode, find Artistic 6 Shape from the Picker and drag on your canvas to draw the shape.
If your Photoshop version has not Artistic 6 Custom Shape, you can replace it with brushes, hard round brush is the simplest decision.
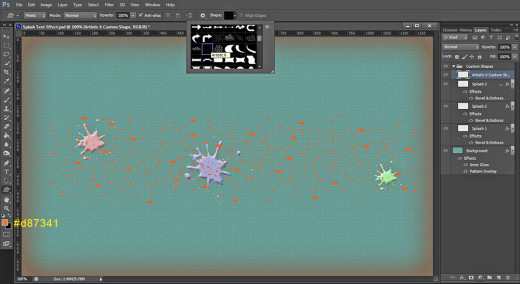
STEP 11
Copy the Bevel and Emboss Layer Style from any of the Splash layers then Paste it on Artistic 6 Custom Shape layer:
STEP 12
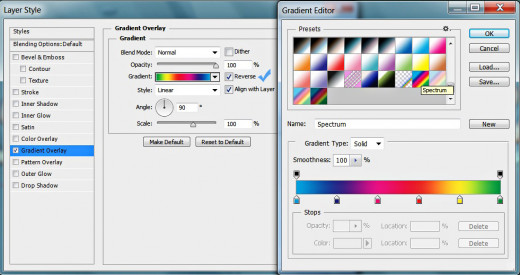
Double click on Artistic 6 Custom Shape layer's thumbnail to activate Layer Style box and check Gradient Overlay. Change its settings as follows:
Blend Mode: Normal
Dither: unchecked
Opacity: 100%
Select Red, Purple, Blue Gradient
from the Gradient Picker.
Reverse: unchecked
Style: Linear type of gradient
Align with Layer: checked
Angle: 90 degrees
Scale: 100%.

This should be the result on your canvas so far:
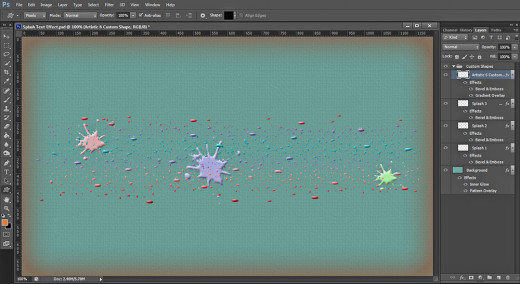
STEP 13
Create a New Layer on top of Custom Shapes group and name it Splash 4. Change the Foreground Color to #a1a0d9, grab Custom Shape Tool and select again Grime 7 Shape, then draw a big splash as you see on the following screenshot. Copy and Paste the Bevel and Emboss applied on the previous Splash layers.
STEP 14
Change the Blend Mode of Splash 4 layer to Color Burn and lower its Opacity to 30%.
With this action we finished our work in Custom Shapes group so our Background effects are ready.
STEP 15
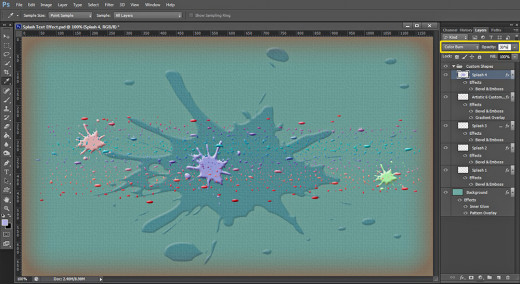
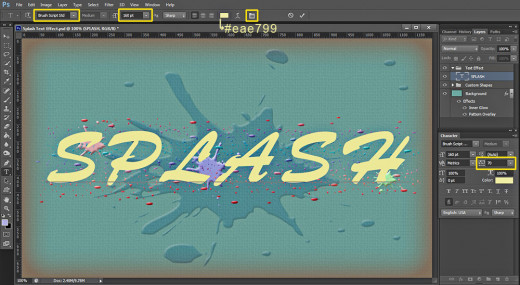
Now we have to start the most important part of this tutorial- the Text Effect creation. So grab Horizontal Type tool, find the default font Brush Script Std from the Font Family drop down menu and change the Font Size to 160pt. Set the Text Color to #eae799 and when you are ready with these settings, type Splash using capital letters. Now highlight the text and click on Toggle the Character and Paragraph Panels icon. Set the Tracking to 70.
With Splash text layer selected, press the Folder icon at the bottom of Layers panel to place the layer in a group and rename this new group to Text Effect. The group should be placed on top of Layers panel.
STEP 16
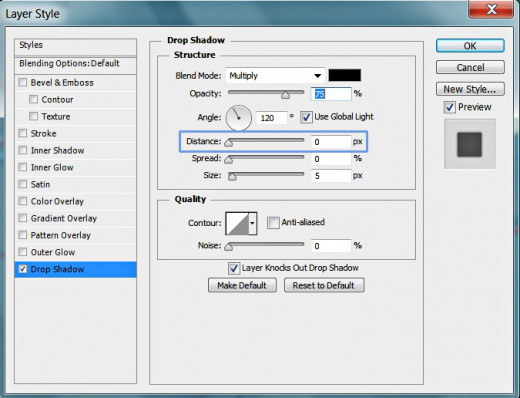
Right click on your Splash text layer and select Blending Options (Layer, Layer Style, Blending Options). Check Drop Shadow in the Layer Style box and only reduce the Distance to 0px. Leave all other settings as given by default.
Keep Layer Style dialog box active because we have to add another four Blending Options.
STEP 17
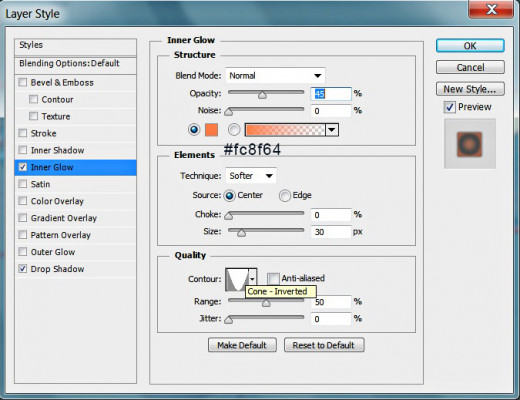
The second Layer Style to be applied on the text layer is this Inner Glow:
Blend Mode: Normal
Opacity: 45%
Noise: 0%
Color of Glow: #fc8f64
Technique: Softer
Source: Center
Choke: 0%
Size: 30px
Contour: Cone-Inverted
Anti-aliased: unchecked
Range: 50%.
Jitter: 0%.
STEP 18
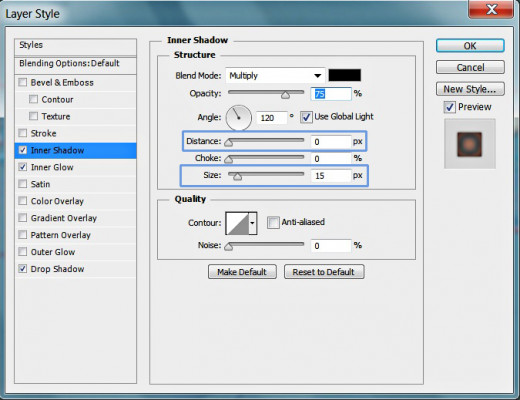
The next Layer Style to be added to Splash text layer is Inner Shadow. Leave most of its default settings, only lower the Distance to 0px and increase the Size to 15px.
STEP 19
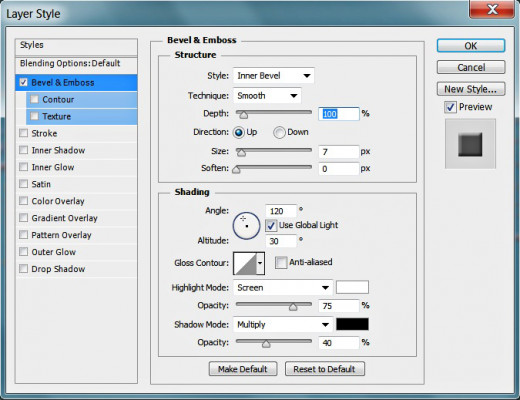
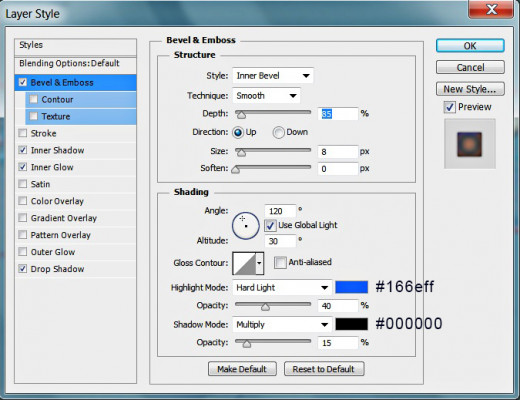
Now tick Bevel and Emboss Layer Style and change its settings as follows:
Style: Inner Bevel
Technique: Smooth
Depth: 85%
Direction: Up
Size: 8px
Soften: 0px
Angle: 120 degrees
Use Global Light: checked
Altitude: 30 degrees
Gloss Contour: Linear
Anti-aliased: not checked
Highlight Mode: Hard Light
Color for Highlight: #166eff
Opacity: 40%
Shadow Mode: Multiply
Color of Shadow: #000000
Opacity: 15%.
STEP 20
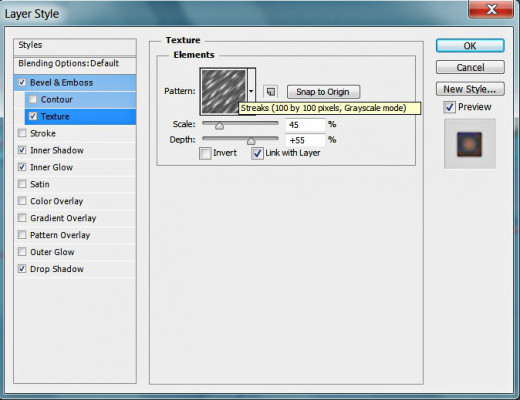
In this step we are going to beautify our Splash text with subtle streaks. Tick Texture Layer Style and insert the following settings:
Pattern: Streaks (100 by 100 pixels, Grayscale mode)
Scale: 45%
Depth: +55%
Invert: not checked
Link with Layer: checked.
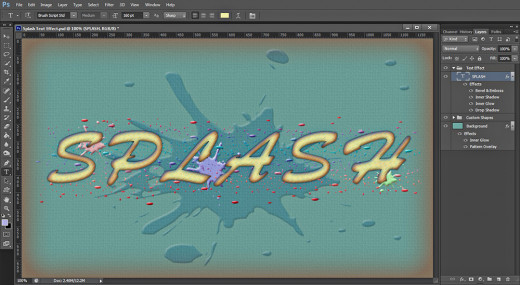
Well, this is our Splash text after applying on it all five Blending Options:
STEP 21
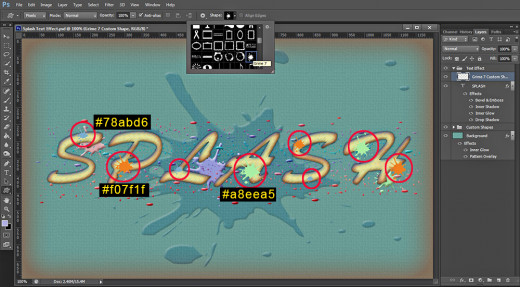
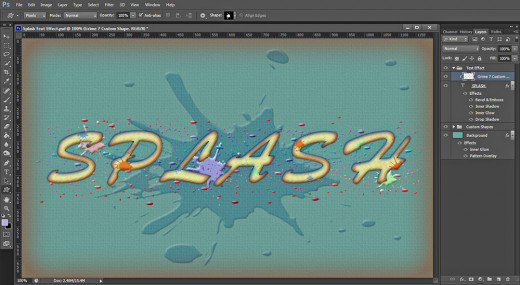
In this step we are going to use again Grime 7 Custom Shape. This time we are going to add multiple splashes. You can use brushes instead of the shape.
So take custom Shape Tool in Pixels Mode. Create a New Layer on top of Text Effect group and name it Grime 7 Custom Shape. Draw a few splashes (I have put all splashes in red circles for better visibility) using different colors. I have chosen these: #78abd6, #f07f1f and #a8eea5.
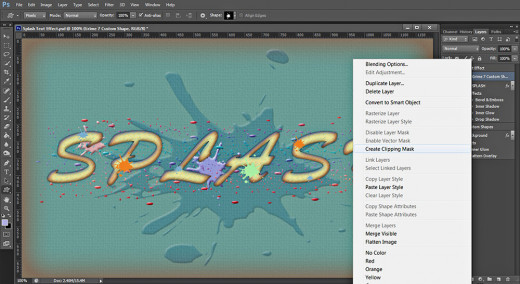
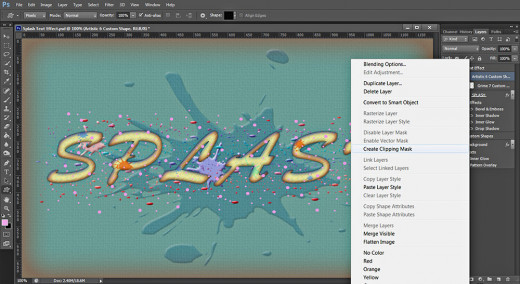
STEP 22
Right click on Grime 7 Custom Shape layer and select Create Clipping Mask.
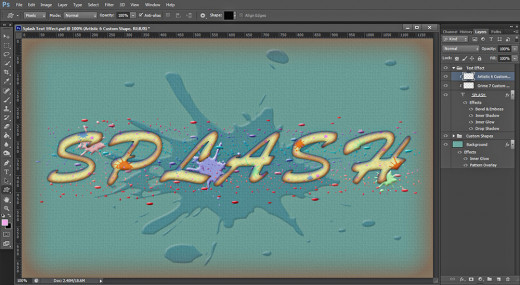
This is the result after applying the Clipping Mask:
STEP 23
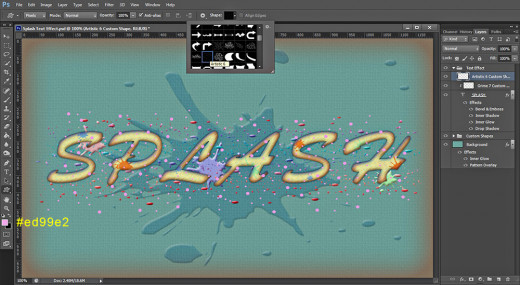
Create a New Layer on top of Text Effect group and name it Artistic 6 Custom Shape 2. Change the Foreground Color to #ed99e2, take Custom Shape tool in Pixels Mode and find again Artistic 6 shape. Draw it on your canvas so that it covers your Splash text.
STEP 24
Right click on Artistic 6 Custom Shape layer and choose Create Clipping Mask from the fly-out menu.
This is the outcome of the added Clipping Mask:
STEP 25
Double click on Artistic 6 Custom Shape layer's thumbnail to call Layer Style box, tick Gradient Overlay and select Spectrum Gradient from the Gradient Picker. Check Reverse. Leave all other default settings unchanged.
You should get the following outcome after applying the Spectrum Gradient on Artistic 6 Custom Shape layer.

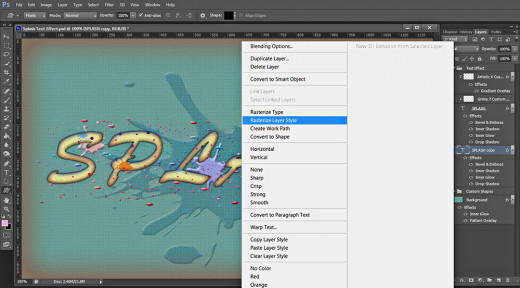
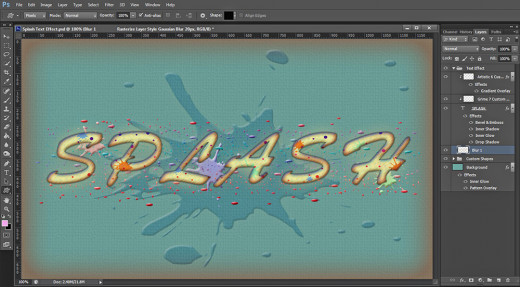
STEP 26
Now duplicate Splash text layer. Move the duplicated Splash copy layer below the original. There is one drawback here: when you copy the layer which plays the role of Masking Agent for the Clipping Mask (in our case the original Splash layer), the applied clipping masks will be released, so you have to apply them again.
STEP 27
Keep Splash copy layer highlighted, then right click on it and select Rasterize Layer Style.
STEP 28
In order to add watercolor effect behind our text, we are going to blur the contents of Splash copy layer. Navigate to the Menu bar and select Filter, Blur, Gausian Blur then set the Radius to 20px.
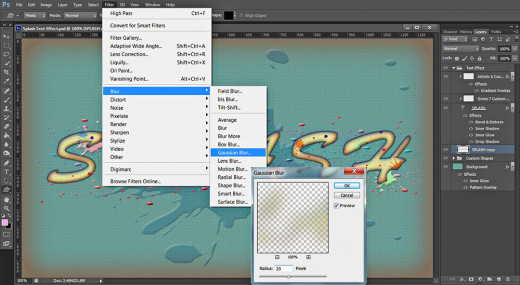
This is the result of the Gaussian Blur Filter. The effect is not much visible but we are going to improve the things in the coming steps.
As we applied Blur Filter on our Splash copy layer, rename it to Blur 1.
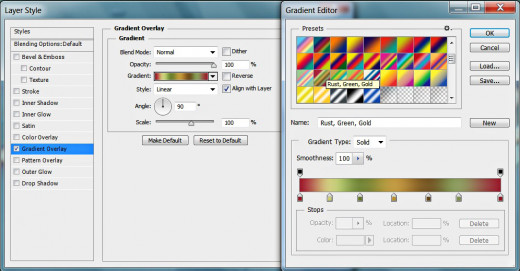
STEP 29
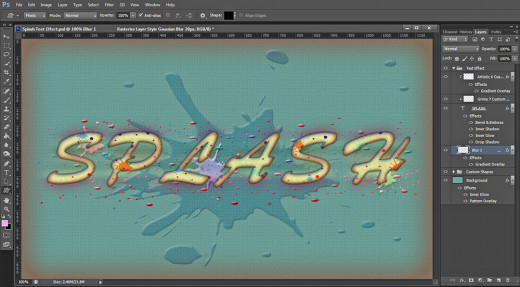
Apply Gradient Overlay Layer Style on our Blur 1 layer. Don't change the default settings in the Gradient Overlay box. Select only Rust, Green, Gold Gradient from the Gradient Picker.
This is the result after adding Rust, Green, Gold Gradient to Blur 1 layer.
STEP 30
Duplicate Blur 1 layer and move the duplicate below the original then rename it to Blur 2. Don't remove the previously applied Gradient Overlay. We are going to change it in the next step.
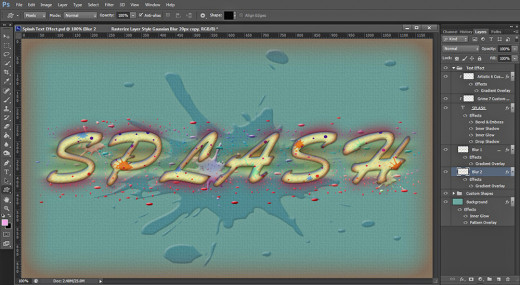
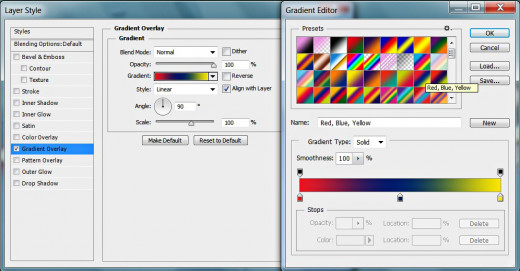
STEP 31
Now double click on the Gradient Overlay Layer Style below Blur 2 layer to activate the dialog box, then select Red, Blue, Yellow Gradient from the Gradient Picker.
STEP 32
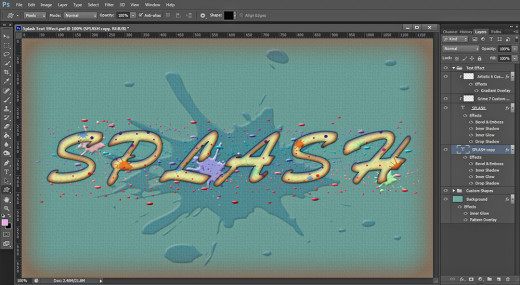
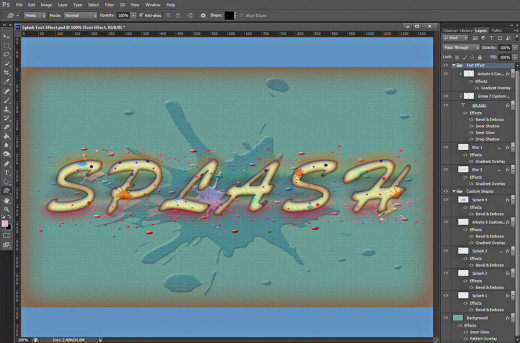
Our Splash text effect is ready. You should have these groups and layers (from bottom to top) in your Layers panel:
-
One separate Background layer
-
Custom Shapes group which includes Splash 1, Splash 2, Splash 3, Artistic 6 Custom Shape and Splash 4 layer and
-
Text Effect group with the following five layers in it: Blur 2, Blur 1, Splash text layer, Grime 7 Custom Shape and Artistic 6 Custom Shape 2 layer.
STEP 33
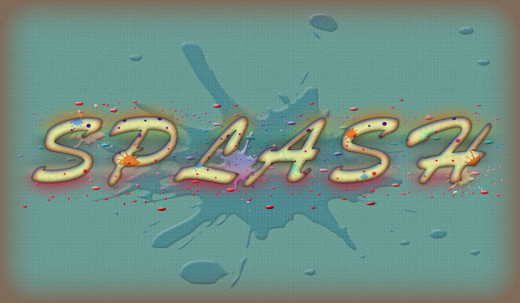
Below is the final result save in .jpg format. You can apply Filter, Sharpen, Unsharp Mask to improve the quality of the .jpg file.
Thank you very much for reading my tutorial. If you don't understand anything or have some questions, please don't hesitate to leave a comment.