Create Stroked Golden Text with Layer Styles and Stone Texture

From this tutorial you will learn how to create gorgeous golden text effect in Adobe Photoshop.
I have used Nueva Std default Font of Bold Style. What makes this Text Effect unique are the holes in the letters. You can get the impression that they are made by means of using Pen Tool Paths and then deleting the parts of the Text. No, I haven't used Delete key or Eraser Tool. Not even a single time. The trick with the holes in the text is achieved through Stroke Layer Style and reducing Fill Opacity of the Text layer. When you read this tut, you will be surprised how easy is to create this cool Text with holes.
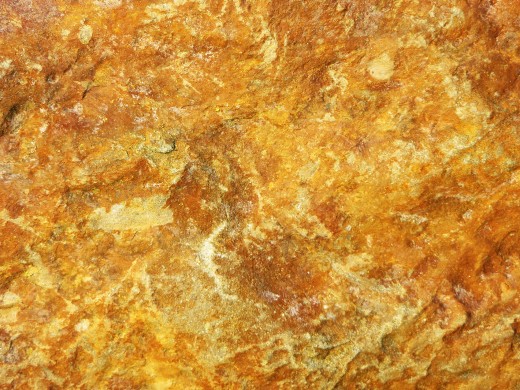
The background is also very easy to be created. I have used my photo of stone texture which is unrestricted stock.
You can create this Text Effect in any version of Adobe Photoshop.
Now let's get down to work. This is what you are going to create:

STEP 1
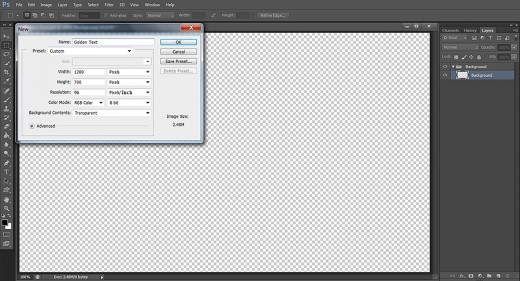
Start with opening your Adobe Photoshop and select File, New. Insert Golden Text for File Name, set Width to 1200 pixels and Height to 700 pixels. As I don't need to print my Text, I have chosen 96 Pixels/Inch for Resolution and RGB for Color Mode. Those of you who are to print the Text should set the Resolution to 300 Pixels/Inch and should choose CMYK for Color Mode.
I have also chosen Transparent for Background Contents because with this I'll get editable Layer 1 in my Layers panel. If I choose White or Background Color for Background Contents, I'll have to click twice on my Background to make it editable.
Double click on Layer 1 name and write Background in the white space to rename the layer. Then press Ctrl+G to place the layer it in a Group. Call this new Group Background too.
Colorize the Background with Red and Darken its Borders
In the next two steps you have to fill the Background layer with dark red color. After that you have to create Vignette Effect to darken the borders of the canvas. You should only apply black Inner Shadow with increased Opacity, Choke and Size options.
STEP 2
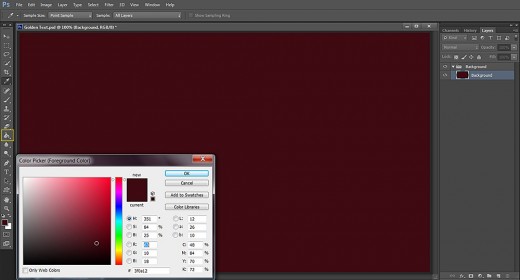
In your Tools bar Set the Foreground color to #3f0a12. Grab the Paint Bucket tool and use it to colorize your Background. You can do it also by going to the Menu bar and using Edit, Fill, Foreground Color option.
STEP 3
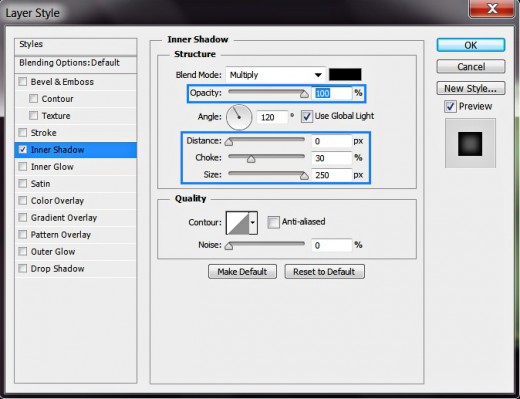
Double click on the Background layer or navigate to the Menu bar and select Layer, Layer Style, Blending Options and check Inner Shadow. Change its settings like this:
Blend Mode: Multiply
Color of Shadow: #000000
Opacity: 100%
Angle: 120 degrees
Use Global Light: checked
Distance: 0px
Choke: 50%
Size: 250px
Contour: Linear
Anti-aliased: unchecked
Noise: 0%.
Press OK button to close Layer Style dialog box.
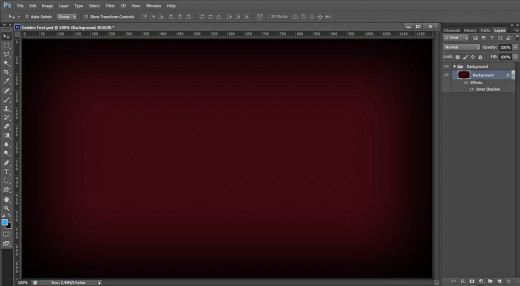
This is how your dark red Background will look after adding the Inner Shadow effect:
Texturize the Background with Yellow Stone Photo
In the coming three steps your task is to download cool Yellow Stone Texture and Paste it in a New Layer on top of Background group. You have to decrease its Size using Edit, Free Transform then change its Blend Mode and reduce Opacity option to make it transparent and blend it with the first dark red colored layer.
STEP 4
Click on the Yellow Stone Texture below in order to open it in a new window then right click and select Save Image As to save it in the folder on your computer where your Golden Text file is.
This Texture is my own photo and unrestricted stock. You can use it for your works.
STEP 5
Create a New Layer above the Background layer (on top of Background Group) and call it Yellow Stone Texture.
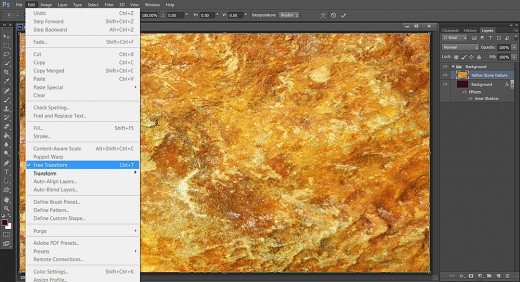
Open the already downloaded Yellow Stone Texture in Adobe Photoshop, press Ctrl+A to load selection on the whole texture image, then press Ctrl+C to copy it. Go back to your Golden Text .psd file, make sure that Yellow Stone Texture layer is highlighted and press Ctrl+V to paste the texture. As the Texture is bigger than your canvas, go to Edit, Free Transform and drag the nodes vertically and horizontally in order to resize the texture to cover your canvas. Press Enter to apply the Transformation.
STEP 6
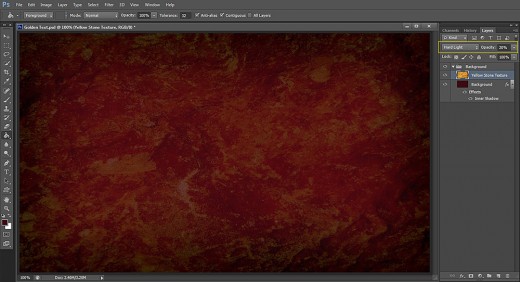
Now we need to make the Yellow Stone Texture transparent and darker in order to give our background really cool relief and color shades. So change the Blend Mode of Yellow Stone Texture layer to Hard Light and reduce its Opacity to 20%.
Type the Text, Add Stroke and Rasterize it
In Step 7-10 you have to type the Text using default Font then you should apply thick navy blue Stroke and reduce Fill Opacity to 0% in order to hide the contents of the Text and leave only the Stroke visible.
Your last step in this part of the tut is to Rasteerize the Layer Style. This will help you to be able to add new Blending Options in the next steps which will affect the Stroke only. If you don’t Rasterize it you won’t be able to apply layer styles on the Stroke, they will affect only the Text body.
STEP 7
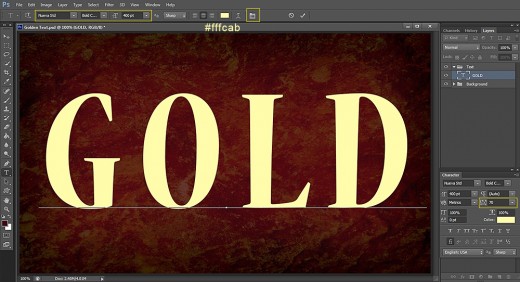
Now we'll start with the first Text layer. Select Horizontal Type tool from the Tools bar (or press the hot key T). Click on the Font Family drop down menu and choose Nueva Std default Font. Select Bold Style and Set the Font Size to 400pt. Choose #fffcab for Text Color then type Gold in Capital Letters. You can actually type any four-lettered word. Please, take into consideration that if you prefer to use another type of Font or the same Font but of different Size, you will probably need to adjust the settings of the Layer Styles which we are going to apply in the next steps, in order to get the same final Text result as mine.
Select the Gold text then click on Toggle the Character and Paragraph Panels icon in the Options bar and Set the Tracking for the Selected Characters to 70.
Press Ctrl+G to place the Text layer in a Group. Call the newly created Group Text.
STEP 8
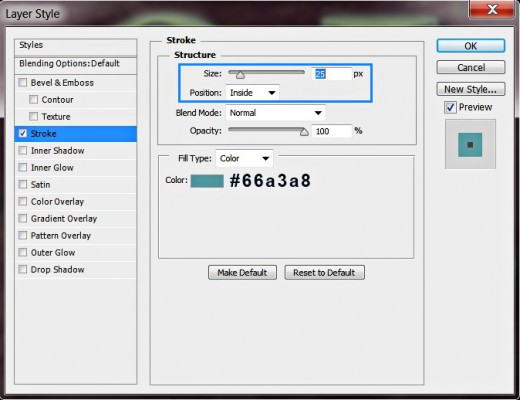
While your Gold Text layer is highlighted, right click on it, select Blending Options and tick Stroke (Layer, Layer Style, Blending Options). Apply these settings:
Size: 25px
Position: Inside
Blend Mode: Normal
Opacity: 100%
Fill Type: Color
Color of Stroke: #66a3a8.
Press OK button to apply the Stroke and to close Layer Style box.
STEP 9
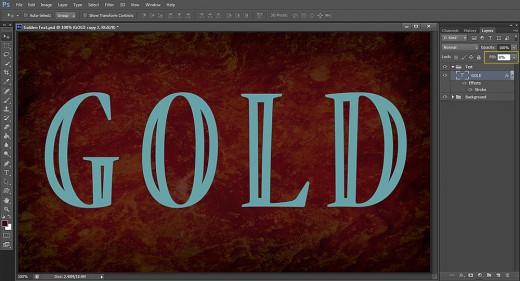
Below is shown the result you should get on your canvas. Now we have cool Text Effect with holes without using Eraser Tool, Pen Tool Paths etc. :)
You should reduce the Fill Opacity of Gold Text layer to 0%.
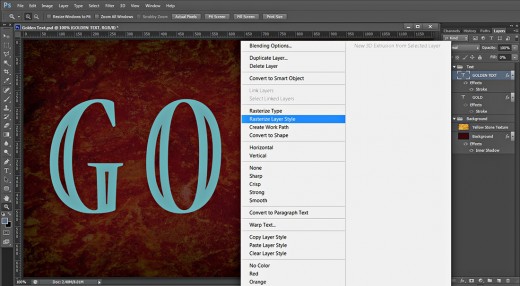
STEP 10
Duplicate Gold Text layer and rename the copied one from Gold copy to Golden Text. Right click on Golden Text layer and select Rasterize Layer Style in the fly-out menu. Thus we applied the Stroke Layer Style and turned the Text from vector to raster.
Keep the original Gold Text layer switched off. We’ll need it later.
Apply Seven Blending Options on Golden Text Layer
In Steps 11-17 you should apply layer styles on Golden Text layer. You need to add Shadow, yellow Glow, golden shaded Gradient with tree color stops, thin golden Stroke and 3D Effect. This will add volume and metal glow to your Text.
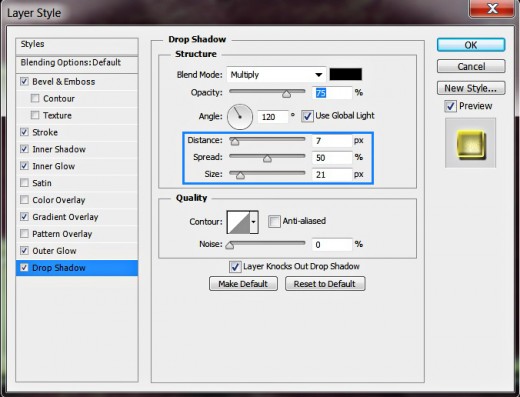
STEP 11
Double click on Golden Text layer to call Layer Style box and check Drop Shadow. Insert the following settings:
Blend Mode: Multiply
Color of Shadow: #000000
Opacity: 75%
Angle: 120 degrees
Use Global Light: checked
Distance: 7px
Spread: 50%
Size: 21px
Contour: Linear
Anti-aliased: unchecked
Noise: 0%.
Layer Knocks Out Drop Shadow: checked.
Keep Layer Style dialog box active as we have to add six more Blending Options in the next steps.
As you can see, I have switched off the three Gold Text layers. Later we'll need the original one. As for the two copies, better to keep them as a reference to remember our actions.
STEP 12
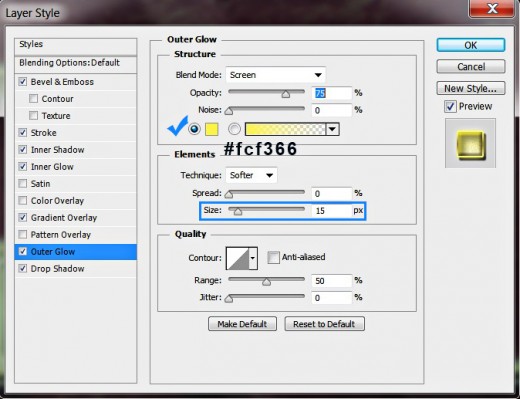
Let us add golden glow to our Text Effect. For the purpose check Outer Glow in Layer Style dialog box and insert these settings:
Blend Mode: Screen
Opacity: 75%
Noise: 0%
Color of Glow: #fcf366
Technique: Softer
Spread: 0%
Size: 15px
Contour: Linear
Anti-aliased: unchecked
Range: 50%.
Jitter: 0%.
STEP 13
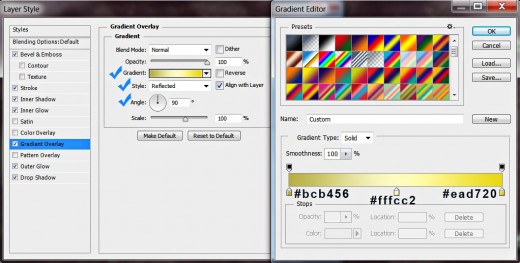
Now check Gradient Overlay in Layer Style dialog box to fill the Text with awesome golden shades. Change the settings as follows:
Blend Mode: Normal
Dither: unchecked
Opacity: 100%
Click to Edit the Gradient like this:
First Color Stop (Location 0%): #bcb456
Second Color Stop (Location 50%): #fffcc2
Third Color Stop (Location 100%): #ead720
Reverse: unchecked
Style: Reflected
Align with Layer: checked
Angle: 90 degrees
Scale: 100%.
STEP 14
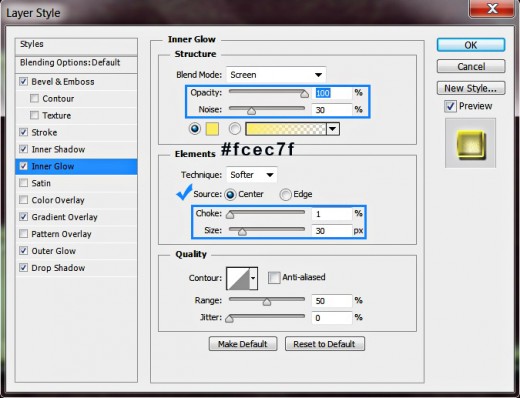
In this step we'll continue to add glow. Check Inner Glow Layer Style and insert these settings:
Blend Mode: Screen
Opacity: 100%
Noise: 30%
Color of Glow: #fcec7f
Technique: Softer
Source: Center
Choke: 1%
Size: 30px
Contour: Linear
Anti-aliased: unchecked
Range: 50%.
Jitter: 0%.
STEP 15
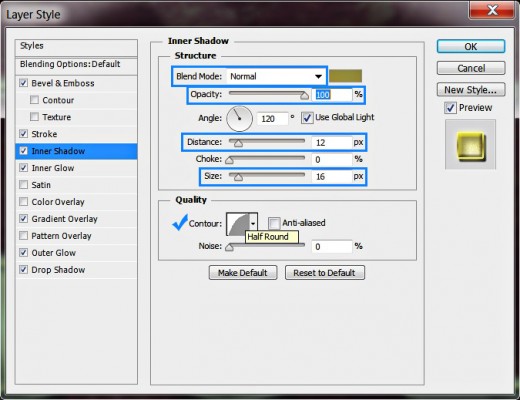
Now check Inner Shadow and change its settings as follows:
Blend Mode: Normal
Color of Shadow: #9d9954
Opacity: 100%
Angle: 120 degrees
Use Global Light: checked
Distance: 12px
Choke: 0%
Size: 16px
Contour: Half Round
Anti-aliased: unchecked
Noise: 0%.
STEP 16
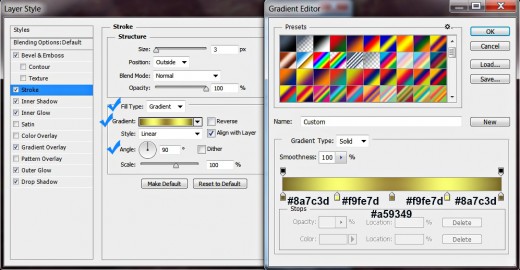
Now we are going to add golden border to our Text Effect. The next blending option to be checked in Layer Style box is Stroke. Insert these settings:
Size: 3px
Position: Outside
Blend Mode: Normal
Opacity: 100%
Fill Type: Gradient
Click to Edit the Gradient:
First Color Stop (Location 0%): #8a7c3d
Second Color Stop (Location 25%): #f9fe7d
Third Color Stop (Location 50%): #a59349
Fourth Color Stop (Location 75%): #f9fe7d
Fifth Color Stop (Location 100%): #8a7c3d
Reverse: unchecked
Style: Linear
Align with Layer: ticked
Angle: 90 degrees
Dither: not checked
Scale: 100%.
STEP 17
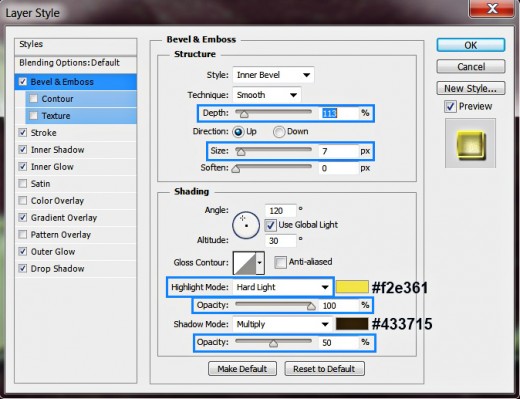
The last Layer Style to be added to Golden Text layer is Bevel and Emboss. Change the settings like this:
Style: Inner Bevel
Technique: Smooth
Depth: 113%
Direction: Up
Size: 7px
Soften: 0px
Angle: 120 degrees
Use Global Light: checked
Altitude: 30 degrees
Gloss Contour: Linear
Anti-aliased: not checked
Highlight Mode: Hard Light
Color for Highlight: #f2e361
Opacity: 100%
Shadow Mode: Multiply
Color of Shadow: #433715
Opacity: 50%.
Press OK button to close Layer Style box.
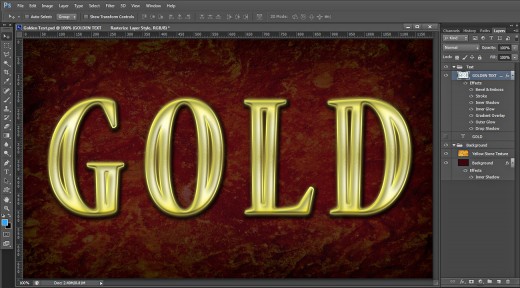
This should be your outcome after the seven layer styles have been added to the Golden Text layer:
Create Golden Pattern Layer to Improve the Texture and Glow
Your last task is to move Gold layer on top of Text group. You don’t need to Rasterize it.
You should apply default Woven Wide Pattern, golden Gradient, yellow Satin, thin dark Stroke and Bevel and Emboss with Rounded Steps Contour.
STEP 18
Now move the original Gold Text layer on top of Text Group. Remove its previously applied Stroke Layer Style, then rename the layer to Golden Pattern and reduce its Fill Opacity to 0%. You can Rasterize it if you like, but it is not obligatory.
STEP 19
Right click on the Golden Pattern Text layer and select Blending Options. Firstly check Pattern Overlay and add the following Pattern with these settings:
Blend Mode: Hard Light
Opacity: 8%
Pattern: Woven Wide (120 by 240 pixels, RGB mode)
Scale: 7%
Link with Layer: checked.
Still don't close Layer Style dialog box as we are going to add another four Blending Options in the next steps.

STEP 20
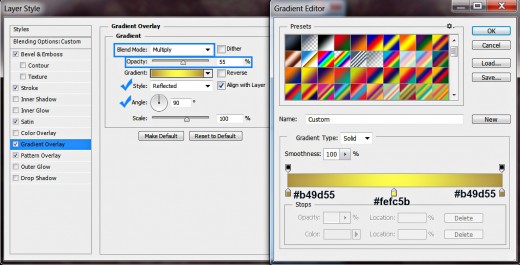
We are going to add more gold in this step. For the purpose tick Gradient Overlay and apply these settings:
Blend Mode: Multiply
Dither: not checked
Opacity: 55%
Click to Edit the Gradient:
First Color Stop (Location 0%): #b49d55
Second Color Stop (Location 50%): #fefc5b
Third Color Stop (Location 100%): #b49d55
Reverse: not checked
Style: Reflected
Align with Layer: ticked
Angle: 90 degrees
Dither: not checked
Scale: 100%.
STEP 21
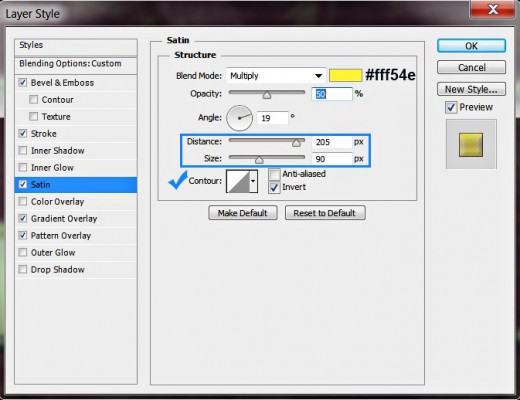
The next Layer Style to be applied on Golden Pattern Text layer is Satin. Insert the following settings:
Blend Mode: Multiply
Color of Effect: #fff54e
Opacity: 50%
Angle: 19 degrees
Distance: 205px
Size: 90px
Contour: Linear
Anti-aliased: unchecked
Invert: checked.
STEP 22
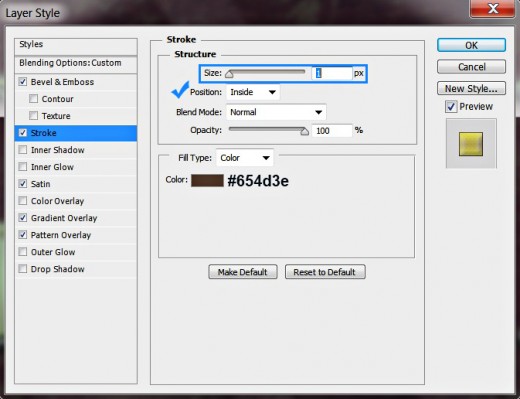
We are almost ready with our Golden Text Effect. Now tick Stroke Layer Style and insert the following settings:
Size: 1px
Position: Inside
Blend Mode: Normal
Opacity: 100%
Fill Type: Color
Color of Stroke: #654d3e.
STEP 23
The last Layer Style to be applied is Bevel and Emboss. Change its settings as follows:
Style: Inner Bevel
Technique: Smooth
Depth: 134%
Direction: Up
Size: 10px
Soften: 0px
Angle: 120 degrees
Use Global Light: checked
Altitude: 30 degrees
Gloss Contour: Rounded Steps
Anti-aliased: not checked
Highlight Mode: Hard Light
Color for Highlight: #faf453
Opacity: 30%
Shadow Mode: Multiply
Color of Shadow: #000000
Opacity: 20%.
Press OK button to close Layer Style dialog box.

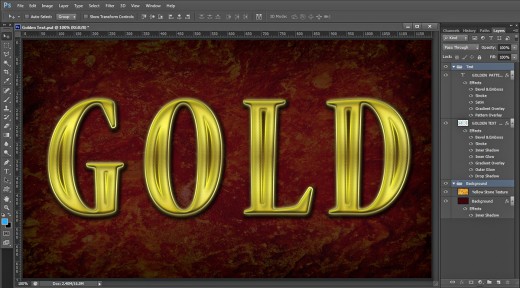
STEP 24
If you have followed correctly all my steps, you should have two groups of layers in your Layers panel:
- Background Group which consists of two layers: Background and Yellow Stone Texture.
- Text Group which contains Gold, Gold copy, Gold copy 2 layers (switched off, only for reference) and the main layers- Golden Text and Golden Pattern.
STEP 25
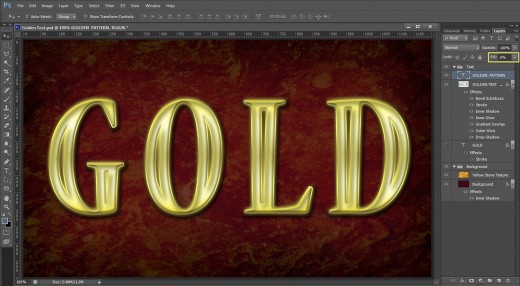
This is what you should get as a final result saved in .jpg format. Hope you enjoyed my tutorial and liked the trick with the holes in the Text. Good luck and have fun.

![Adobe Photoshop Elements 2018 [Old Version]](https://m.media-amazon.com/images/I/51AQ4wl7eOL._SL160_.jpg)


