5 Tips on Creating a Good Composition


Having a good composition in a photograph (or lack of one) can either make or break a piece. Learning how to compose images is crucial when creating anything that requires something to look good. Graphic design, cinematography, photography, painting, drawing, etc, all of these benefit from having good compositions.
Developing a good eye for composition takes time however. In order to improve, it's best to study what others have done and learn how to take a critical eye with your own work.
I'm going to be using photography examples for this, but you can easily apply this same principles to anything that requires you to create imagery. If you're looking at ways to improve your photography, you may be interested in another article I wrote: How to Take Better Photographs.

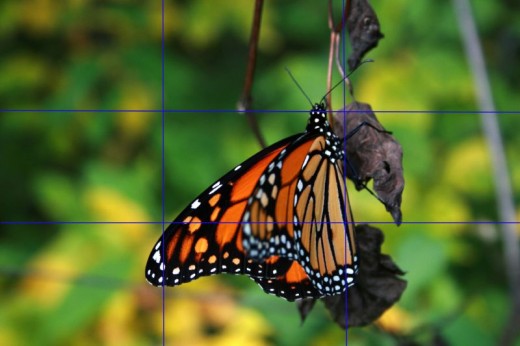
Always focus on the subject closest to the camera when doing portraiture. Even if it is just a few inches between the closest subject and the next.
1. Pick a Central Focus Point or a Subject
You may think that this a no-brainer, but this is very important. You don't want to squash everything you want into the image and not pick a central focal point. If you have multiple objects, even if it's a portrait, be sure to pick one to be the center.
This is very important with the focus of the image. You must decide which is the closest to the camera and what would make logical sense to be the focus. If you don't pick the right object or focus, you'll find that the image looks blurry, even if the subject you picked was in focus.
A good example of this is landscape photography or portraits. I'll admit that this took me a while to wrap my head around. I found myself coming back after a photography session with blurry looking images. It wasn't until I stopped and thought about what needed to be in focus in my composition that I was able to get past this and start coming home with better photos.
Examples of Focus in Photographs
Click thumbnail to view full-size


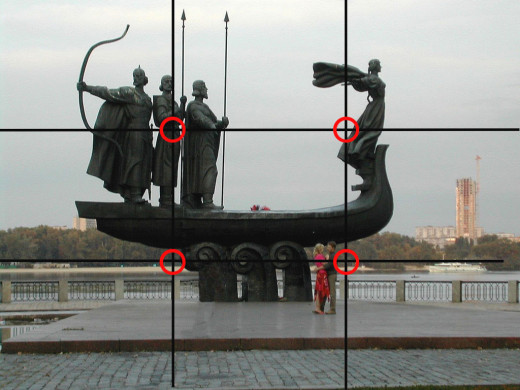
2. Apply the Rule of Thirds
This is something that you've probably heard before. It's an easy way to make an interesting composition by diving the image plane into thirds both vertically and horizontally.
Just because this rule is in place however, doesn't mean that you have to follow it exactly. It's a guideline to get a basic idea of how you want your composition to be. All situations present their own unique challenges. What works for one photograph or situation may not work in the next.
Camera Trick: A lot of cameras have built in overlays that bring up a guides to help you compose your image. If you don't have the eye for dividing your image yourself, this can be helpful.
Examples of the Rule of Thirds
Click thumbnail to view full-size


3. Focus on the Entire Composition
One of the easiest mistakes is to get so involved and focused on one detail that you forget to look at all the other elements. Then when you get home you realize that there was a branch sticking out of someone's head, or that the colors of a person's shirt matched the background too closely. Sometimes these can be fixed in Photoshop, but other times ruins the image.
If you have another person with you, ask them if they see anything that is out of place. If you're shooting on your own though, try to be diligent about giving your shot one final look.
Things to Look for Before Taking your Shot
- Anything that could like it's sticking out from someone's head. Be sure to check that there is no funny placement of objects in the foreground or in the background.
- Colors that match too closely between subject and background
- Correct focus (usually the closest object to the camera to lead the viewer's eye though the composition)
- Photobombers
- You can always take another shot just in case someone blinks or a car passes in the background
4. Create the Illusion of More
This is one principle that I have taken away from my art education. When creating a drawing or painting, if you could create the illusion that the piece extends beyond your frame, that was a great thing.
With photography, obviously there's more to your photograph than what you frame, but the trick is to create something that grabs your audience and makes them want to see what else was around your shot.

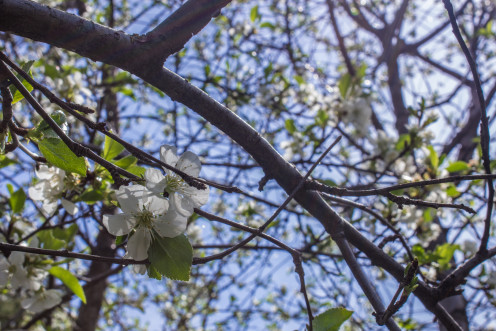
Using a lighter background than your foreground subject and adding a blur is a great way to separate your elements.
5. Separate Foreground and Background Elements
This creates a sense of depth within your image and helps separate the different elements, such as foreground and background. It also helps to bring focus to what you're trying to show your viewer.
Three Ways to Create Separation
- Use rim lighting on the object you want to bring attention to
- Utilize your camera's bokeh and blur the background. You may have to move your foreground object farther away from their background to create the needed blur. You can also change the aperture on your camera for the same effect.
- Light the subject so that the foreground object is lighter than the other elements
You may have to play around with the composition in order to place the focus in the right spot. Blurring the foreground can give some interesting effects, but it can also be hard to make it look like the whole photograph is in focus. If you're unsure, take two different versions of the same shot and review them later.
Conclusion and Final Thoughts
Creating a good composition is not always done on the first try. Sometimes it takes more than one attempt to be able to create something that grabs your attention. If you're wondering what it's like when I go through my photos after a session, you can read about it in this article: How to Find the "Keepers from a Photography Session"
Don't be afraid to change the camera or take multiple shots. Trust your instincts though. If you're unsure if something will work, try it and look at it with a critical eye. A lot of learning comes from experimentation so don't let yourself be confined to guides or rules that other photographers have set in place.


