How to Make Sundance Style Jewelry with Crystal and Pearl Beads

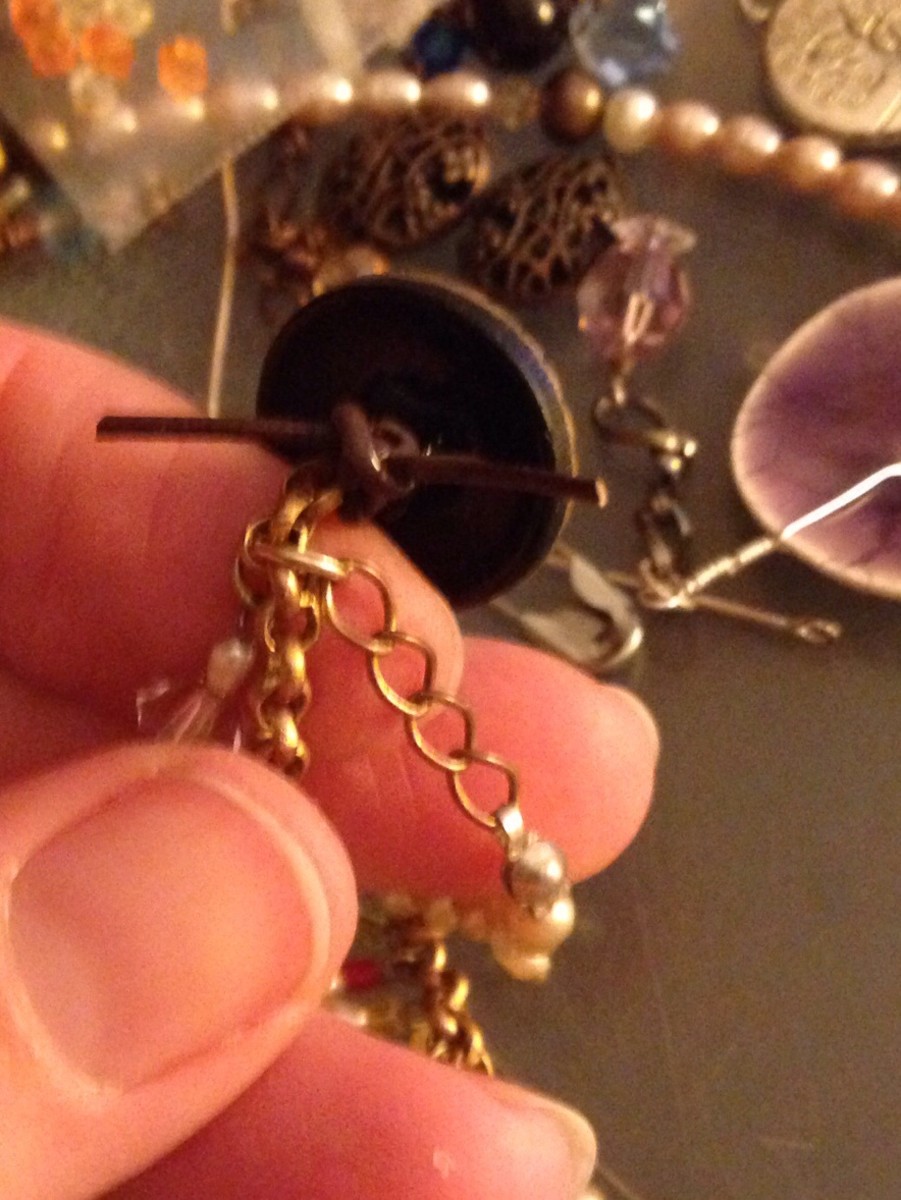
Sundance Style: Vintage Button Gypsy Bracelet

Tools Needed For Project
round nose pliers
awl (for placing knots)
flush cutters
Misc: Clear Nail Polish to hold Knots
Scissors
You can use a large sewing pin in place of an awl.
Materials List
You will need:
A 4 or 5 inch scrap brown 1 mm round leather cord
16 4 mm Czech glass beads for loop
5 3 mm crystal bicones amber
12 6 mm assorted crystal bicones
freshwater pearls
seed beads
gold-filled eyepins
gold-filled headpin
Several pieces of chain
gold-fillled open jump rings
1 Vintage self-shank button for clasp
12-15 inches C-lon cord
silk thread w/needle to string freshwater pearls
2 clamshell fold-over crimp covers
Getting Started
Tip: When making jewelry, save leftover bits of leather cord, excess Beadalon wire, sections of C-lon thread, etc. in a clear plastic bag for using in future projects. This Gypsy Bracelet is perfect for using up some of your scraps, including sections of chain. Simply join assorted lengths of chain using jump rings.
This Gypsy bracelet was inspired by a necklace I found at my local Goodwill. I deconstructed the piece to make three sections consisting of bits of chain (joined together using 4 mm open jump rings. To make these sections begin by placing a freshwater pearl on an eye pin. Next add a 6 mm crystal bicone and another freshwater pearl. Trim the eyepin so you have enough wire to form a loop. Make a loop with your round-nosed pliers and cut off excess. Now you should have a loop on each end. Repeat 10 times.
Eye Pin Tutorial
Make the Pearl Dangles
The dangles on this bracelet are created by placing a freshwater pearl followed by a seed bead on a 1.5 inch goldplated headpin. Loop each dangle onto a piece of chain. Alternate your spacing when attaching the dangles to the chain by skipping one link in between dangles. The dangles on this bracelet create movement. Once you have completed the dangles on one section, proceed to the next section.
Work This Bracelet In Sections

No Need to Measure Bracelet Sections
Use your wrist as a measuring tool. While working on this bracelet, I checked the length by determining how it fit my wrist. I like my bracelets a bit on the big side so I have plenty of room to move. Most women prefer a more tailored size. If you know who you are designing for, you can measure it out to make sure your finished piece will fit that person's lifestyle.
The best part about this bracelet is the Sundance-inspired feel. Bohemian style jewelry combines different styles for a charming effect. Beads look like they were placed randomly. Using various elements like leather cording plus metal chain creates a one-of-a-kind look.
For the freshwater pearl strand, string your threaded silk strand through a fold-over crimp cover (looks like a clamshell with a hole. Tie a few knots, use a bit of clear nail polish to keep your knots in place. Let dry before closing up the clamshell and trimming excess thread. On the remaining thread, string 7 freshwater pearls followed by a 3 mm amber crystal bicone, clear Czech glass bead, a larger top-drilled freshwater pearl, another clear Czech glass bead, a 3 mm amber bicone and repeat this pattern two more times. String the thread through the other silver clamshell crimp cover, tie a few knots in place, seal with nail polish and trim extra thread away. Once the nail polish dries, close the crimp cover and squeeze tightly shut with your flat nose pliers. That strand can then be joined with a bit of chain to your other sections.

Typewriter Key Jewelry is A Top Seller
My Typewriter Key lockets with sterling silver chain flew off the shelf as fast as I could make them. Great vintage typewriter keys with flat backs are perfect for adding to ring or bracelet blanks. Check out my Typewriter Key Jewelry here.
Other Articles
- It Works Greens Product Review
It Works Greens are made of 38 organically grown non-GMO herbs. Mix two scoops of the Greens powder with water or juice. Each serving has 8+ servings of fruits and vegetables...here's the truth... - How to Use Essential Oils for DIY Shampoo and Condit...
Essential oils are great for adding fragrance to DIY shampoos and conditioners. Peppermint, lavender and tea tree oil are all you need to mix up your own sulfate-free shampoo and conditioner. - How to Repair and Fix Damaged Hair
My damaged hair starting breaking off in clumps when I combed it. Learn how to reduce damage and what to do if your hair is breaking off. Plus the best hair treatment for dry, damaged hair. - Cheapskate Tips: Frugal Chick Tips For Huge Discount...
Here are easy ways to save money. Simple tips to help you save BIG and whittle away at your debt while still enjoying your life. Get started saving today and the extra money will really add up. - Easy Ways to Save Money with the Frugal Chick Saving...
Find easy ways to save money every day. Get great deals at thrift stores and squeeze your pennies into dimes. Keep more money in your wallet. Ask for more than you expect to when negotiating. - Make Your Own Typewriter Key Jewelry
Want to get started making your own typewriter key jewelry? These immediately sell out in certain letters. Here are a few ideas to get you started. - Creating Original Jewelry From Antique and Vintage B...
Jewelry designer Heather Walton showcases great ways to use vintage and antique buttons to liven up your jewelry designs.
Techniques
Make A Basic Crystal and Button Dangle
4 1/2 inches 0.6 mm gold colored wire
2 hole button
Round nose pliers
Wire Cutters
A. Thread the gold wire through the hole with the button in the center of the wire. Carefully wrap one piece around the other 2-3 times. Take the remaining piece of wire and form a small loop above your wrapped wire. Wrap with remaining wire and trim excess.
Save Your Scraps For Future Projects

Find Vintage Buttons On Ebay
I love to use antique and vintage buttons in my jewelry designs. My favorite are steel-cut and glass ones. Modern buttons are mostly plastic but the old ones have such great weight and were extremely well-made. I'm an old soul and love this very tangible link to the past. Ebay is a great place to find vintage buttons. If you can't get your hands on older buttons, there are plenty of modern materials that will give you a similar look. Most modern plastic buttons are extremely lightweight. I prefer the weight of the vintage buttons. They were made to withstand heavy use and even washing. Although vintage buttons are tricky to find, the payoff is well worth it. Many of my customers appreciate quality and are willing to pay top dollar for custom jewelry designs. Keep your eyes open and ask Grandma if you can take a peek in the family button jar.
Use Clear Nail Polish To Secure Knots
- When using knotting techniques in jewelry making, ALWAYS apply several generous coats of clear nail polish to keep knots secure for years. If you work with stretchy material like elastic, clear nail polish is a must. The flexible elastic has a way of undoing your knots and you are likely to have your just-finished piece wind up scattered all over the floor. Secure your knots with nail polish to prevent losing hours of time gathering beads. This is exactly what happened to me the night of my senior prom. My entire multi-strand necklace busted and I had to search all over a friend's bathroom for my beloved beads.
Cut Your Leather On the Long Side
- Knotting requires lots of C-Lon, leather, hemp or other stringing material. Be sure to measure out lots of material because you can't add on if your piece is too short. You will end up restringing the bracelet or necklace. Better to have extra at the end. Simply save those leftovers for another piece.
Beading Inspiration
Not sure how to get started? One of my favorite jewelry designers is Tokyo based Takako Samejima. Her books include Bead Fantasies II, III, and IV. Her work is perfect for more advanced jewelry designs. She uses great illustrations to show bead placement and works with gorgeous stones including agate, garnet, turquoise, citrine and more. I definitely recommend this free download of her book Bead Fantasies III. You won't be disappointed. Start with her basic designs and then try her more advanced tutorials. You can do it.
Best Bead Book Ever
Most Patient Jewelry Designer Ever
Related

DIY Jewelry Tutorial: How to Hand-Paint Beads With Acrylics

How to Make an Elastic Repurposed Button Bracelet: Easy DIY Jewelry Tutorial

How To Use Plarn For Braided Bracelet Jewelry Recycled Craft Projects

How to Make a Vintage Antique Button Ring: DIY Jewelry Making

How to Make Friendship Bracelets With Names, Letters, and Numbers
")

