HDR from a Single RAW File

HDR from Single Image
HDR photography is a great technique to create stunning photos, but lets be honest it does have a few drawbacks. One major drawback to HDR is having to bracket your shots to get 3 photos. By doing this it brings artifacts into play like ghosting, which is caused by your subject moving while bracketing your photos. Sometimes this can create a very interesting look, but other times it can be very unappealing. The best way to avoid ghosting is to take a single photo and tone map it rather than taking a series of bracketed shots. It's a really easy way to give your photos an HDR look, when you forget or can't bracket your images.
For this posting I am going to be referring to this technique as HDR. I know there is much debate about whether or not this is HDR photography. I may touch on this debate in the future, but for now we will call a single tonemapped image, HDR for the sake of keeping things simple.


Capturing RAW Image
If you're planning on using this technique you should try to find a scene that has low to medium contrast. The lower the contrast in your image, the better the results when using a single RAW file. You can determine the contrast by finding the darkest and brightest parts of your scene. If the difference is extreme, your scene probably has a high contrast. For high contrast scenes you should bracket your shots like normal when doing HDR photography. Single photo HDR will not work properly for high contrast type scenes. Once you have determined the contrast of your scene you will want to capture your source image as a RAW file. To capture an image in the RAW file type you will need to make sure that your camera supports it. Most D-SLR cameras will support it, however; not all point-and-shoot cameras will support RAW. To capture your photo using the RAW file type you will need to go into your camera settings and change the file type to RAW.
Why use a RAW file?
- RAW has a larger dynamic range. This means this file type can capture a wider range of light starting from the darkest point to the lightest point.
- You will not lose any data unlike when using a JPEG file type. RAW captures your photo as data that you can later process on your computer. In general files with more data can handle more post processing. The JPEG file type struggles with strong post processing without showing signs of noise.
- RAW does have a few drawbacks, like less contrast and sharpness. However, the benefits of using RAW are well suited for using HDR software on a single photo and definitely out weight the cons of using RAW.
Tips on Raw Converter Edits
When converting your photo to a TIFF file you may be tempted to make other adjustments, however; you should be careful with what you touch. Here is a list of things you can and can not edit when converting your RAW file to a TIFF for HDR photography.
Can NOT Edit
| Can Edit
|
|---|---|
Brightness
| White Balance
|
Sturation
| Chromatic Abbration
|
Contrast
| Color Noise
|
Shadows
| Lens Distortion
|
Curves
| |
Sharpening
| |
Exposure (Unless you are doing a Single Photo HDR)
|
Processing RAW File for HDR
To get the best results you should convert your RAW photo using a RAW converter, you should not use tonemapping software to do this. If you want you can use your tonemapping software to convert your file to a TIFF, but I feel most RAW converters do a better job of this. RAW converters are designed for one thing and that is to read RAW files and convert them to other file types. Tonemapping software usually has a RAW converter built-in as a secondary feature with very few options for editing.
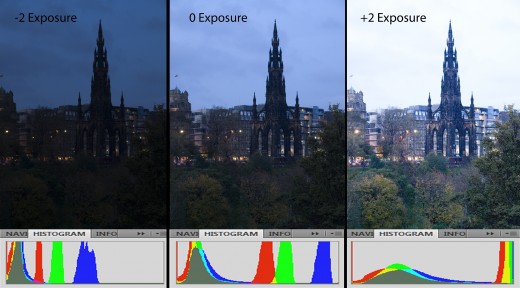
For single image HDR you will need to import your file in to your RAW converter multiple time. One of the times they will adjust the RAW file to an exposure of -2 so that all the highlights are well exposed, the second time they adjust it to +2 so that the shadows are well exposed. The third time they will not make any adjustments. This will create three images that are identical except for the exposures, which should all be different.
You should now have 3 TIFF files. (Use JPEG files if your tone mapping software does not work with TIFF files) Now it is time to open your tonemapping software and upload your files. After this point you can essentially use the same process that you would use when tone mapping a series of bracketed photos. If you do not know how to use tonemapping software and need help, try checking out my HDR tutorial.
Summary
Single photo HDR may not be true HDR, since it doesn't combine photos to create an image with an expanded range. However, it is a fun way to work with photos that you have taken in the past before you knew how to bracket photos for HDR. When I first learned about this I had a great time going through my old photos and experimenting with how I could improve them with tonemapping software. I hope you give this a try and have some fun with it.


