How to Design Rainbow Colored Heart Pendant Icon in Adobe Photoshop

From this tutorial you will learn how to create gorgeous rainbow colored Heart Pendant. You don't need special painting and drawing skills in order to achieve the final result. In the process of work we are going to use three Custom Shape tools, lots of Blending Options, Geometric Tools and Pen Tool paths. We'll also use Edit, Transform options to resize and rotate some of the shapes.
All Adobe Photoshop versions are applicable.
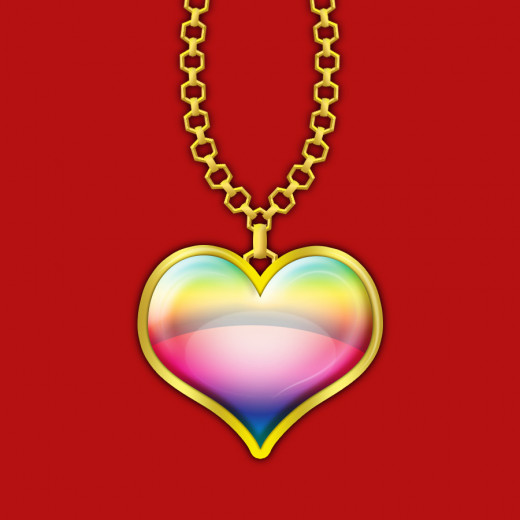
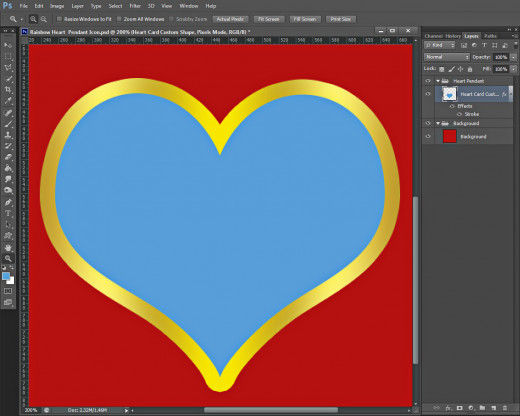
This is the Rainbow Heart Pendant which you are going to create:
Create New Photoshop Document with Square Canvas and Colorize the First Layer
In the coming two steps you have only to open a new .psd file and create square canvas of 900px Size for both Width and Height.
Your next task is to change the Foreground Color swatch in the Tools bar then to fill your first layer with red color using Paint Bucket tool or Edit, Fill, Foreground Color option.
STEP 1
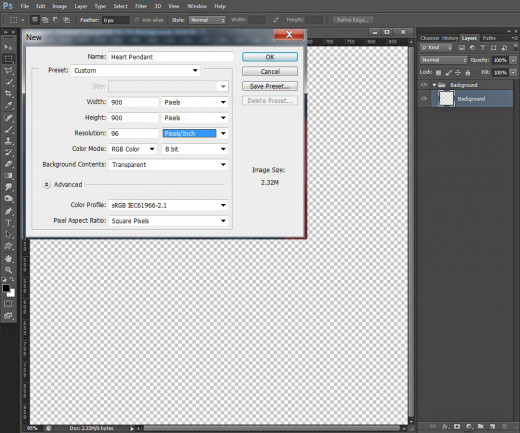
Start your work with opening Adobe Photoshop program. Select File, New in the Menu bar. When New dialog box appears on your screen, insert Heart Pendant for Name then set Width and Height to 900px both. As our Rainbow Heart is for online use, insert 72 or 96 Pixels/Inch for Resolution and select RGB Color from Color Mode drop down menu. I have chosen Transparent from Background Contents drop down menu as it automatically will create transparent and editable Layer 1 in Layers panel.
Rename Layer 1 to Background then press Ctrl+G to place it in a Group. Rename this new Group 1 to Background too.
STEP 2
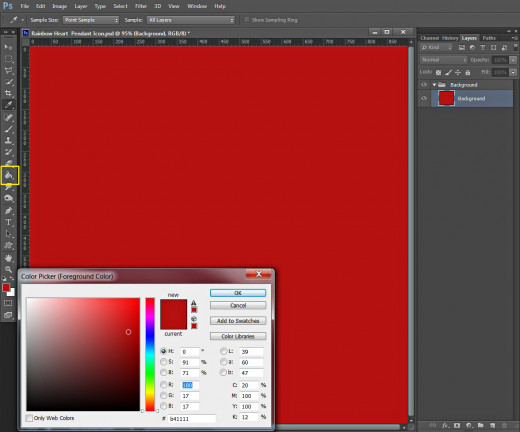
Click on Set Forgeround Color swatch in the Tools bar and insert #b41111 in the Color Picker box. Take Paint Bucket tool and while Background layer is highlighted, drag on the canvas to colorize it with red.
Create the Pendant Base using Heart Card Custom Shape and Custom Golden Gradient Stroke
In the coming three steps you have to draw blue Heart using default Custom Shape which is exclusive for all Photoshop versions. After that you have to apply on the Heart Shape layer thick Stroke Layer Style. For the purpose you have to choose Gradient type of Stroke and create the Color Stops to add awesome golden border to the Heart.
STEP 3
Create a New Layer on top of Layers panel and call it Heart Card Custom Shape. Press Ctrl+G to put it in a Group and rename the new Group to Heart Pendant.
Now change the Foreground color to #589ed9.
Grab Custom Shape tool and firstly set its Mode to Pixels in the Options bar. Select Heart Card shape from the Custom Shape Picker and draw a blue heart as you see on the following screenshot:

STEP 4
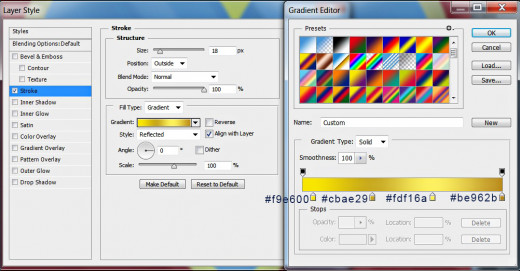
Now we are going to apply golden gradient stroke to our blue heart. Double click on Heart Card Custom Shape layer's thumbnail or go to Layer, Layer Style, Blending Options and check Stroke. Change its settings as follows:
Size: 18px
Position: Outside
Blend Mode: Normal
Opacity: 100%
Fill Type: Gradient
First Color Stop (Location 5%): #f9e600
Second Color Stop (Location 35%): #cbae29
Third Color Stop (Location 65%): #fdf16a
Fourth Color Stop (Location 100%): #be962b
Reverse: unchecked
Style: Reflected
Align with Layer: checked
Angle: 0 degrees
Dither: not checked
Scale: 100%.
Press OK button to apply the Stroke and to close the dialog box.
This is how your heart should look after being stroked with the golden gradient:
Duplicate the Heart Layer and Apply New Blending Options to the Copied One
In the coming six steps you should duplicate the Heart Shape layer and apply on it different Blending Options. You have to add greenish Shadow, Blue Dust Pattern Overlay, which is default for Photoshop, Spectrum Gradient (also default), light blue Inner Glow and 3D Effect of yellow shades.
STEP 5
Now duplicate Heart Card Custom Shape layer- press Ctrl+J or go to Layer, Duplicate Layer while it is selected. Remove the Stroke Layer Style of the duplicated layer- right click on it and select Clear Layer Style. In the next step we'll start our hard work on Heart Card Custom Shape copy layer.

STEP 6
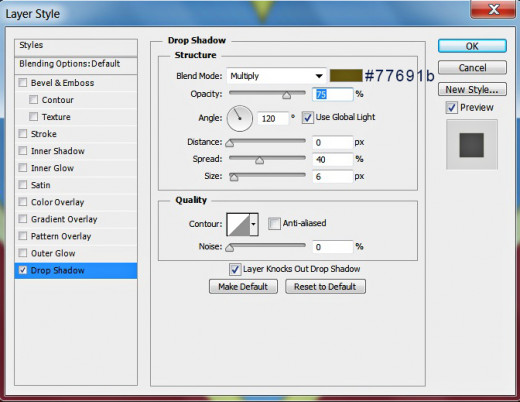
Double click on Heart Card Custom Shape copy layer's thumbnail to call Layer Style dialog box then firstly tick Drop Shadow and insert these settings:
Blend Mode: Multiply
Color of Shadow: #77691b
Opacity: 75%
Angle: 120 degrees
Use Global Light: checked
Distance: 0px
Spread: 40%
Size: 6px
Contour: Linear
Anti-aliased: unchecked
Noise: 0%.
Layer Knocks Out Drop Shadow: checked.
Keep Layer Style box active as we are to add another four Blending Options in the next steps.
STEP 7
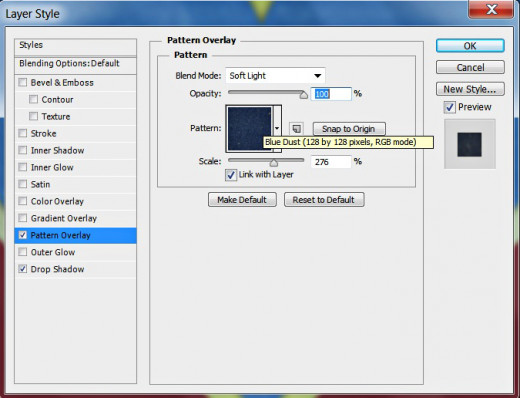
The second Layer Style to be added to Heart Card Custom Shape copy layer is Pattern Overlay. Apply the following settings:
Blend Mode: Soft Light
Opacity: 100%
Pattern: Blue Dust (128 by 128 pixels, RGB mode)
Scale: 276%
Link with Layer: checked
STEP 8
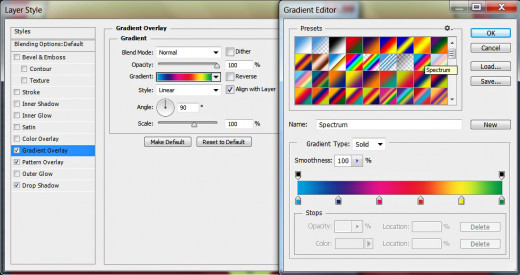
Now tick Gradient Overlay and insert the following settings:
Blend Mode: Normal
Dither: unchecked
Opacity: 100%
Check Spectrum Gradient
from the Gradient Picker.
Reverse: unchecked
Style: Linear
Align with Layer: checked
Angle: 90 degrees
Scale: 100%.
STEP 9
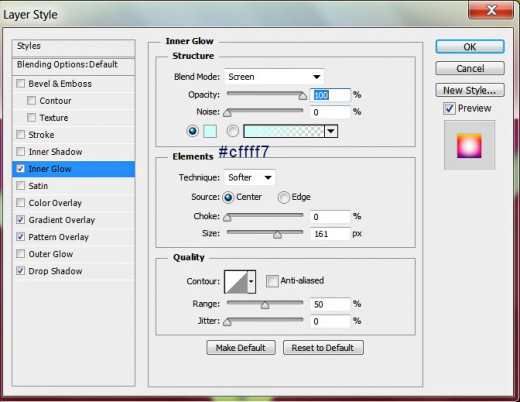
The fourth Layer Style to be applied is Inner Glow. Insert these settings:
Blend Mode: Screen
Opacity: 100%
Noise: 0%
Color of Glow: #cffff7
Technique: Softer
Source: Center
Choke: 0%
Size: 161px
Contour: Linear
Anti-aliased: unchecked
Range: 50%.
Jitter: 0%.
STEP 10
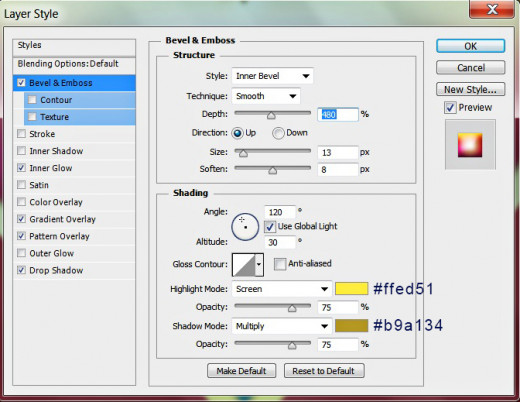
The last Layer Style to be added to Heart Card Custom Shape copy layer is Bevel and Emboss. Apply these settings:
Style: Inner Bevel
Technique: Smooth
Depth: 480%
Direction: Up
Size: 13px
Soften: 8px
Angle: 120 degrees
Use Global Light: checked
Altitude: 30 degrees
Gloss Contour: Linear
Anti-aliased: not checked
Highlight Mode: Screen
Color for Highlight: #ffed51
Opacity: 75%
Shadow Mode: Multiply
Color of Shadow: #b9a134
Opacity: 75%.
Press OK button in order to apply all five Blending Options and to close Layer Style dialog box.
This is the result you should get after processing Heart Card Custom Shape and Heart Card Custom Shape copy layer:

Create Golden Chain with Hexagon Frame and Banner Custom Shape
In Steps 11-20 you should create the Golden Chain of your Rainbow Colored Heart Jewel. For the purpose you have to use two custom shapes (both exclusive for all Photoshop versions)- Hexagon Frame and Banner 3.
In order to give the Chain Golden shades and 3D Effect, you have to apply on the Hexagon Frame layer Bevel and Emboss and Contour, then you should add to the Banner 3 layer Custom Gradient which you have to create using my screenshot, and Bevel and Emboss.
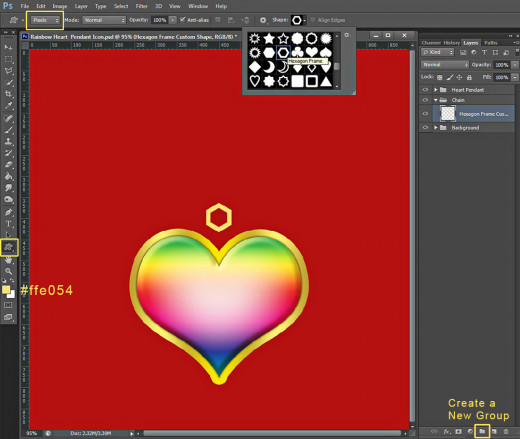
STEP 11
Click on Create a New Group icon (the folder) at the bottom of Layers panel and rename the newly created Group to Chain. Place it between Background and Heart Pendant Group. Create a New layer within this new Chain Group and call it Hexagon Frame Custom shape.
Now change the Foreground color to #ffe054 and Grab Custom Shape Tool again in Pixels Mode. Select Hexagon Frame from the Custom Shape Picker and draw the shape as you see on the following screenshot. Rotate and adjust the shape using Edit, Free Transform.
STEP 12
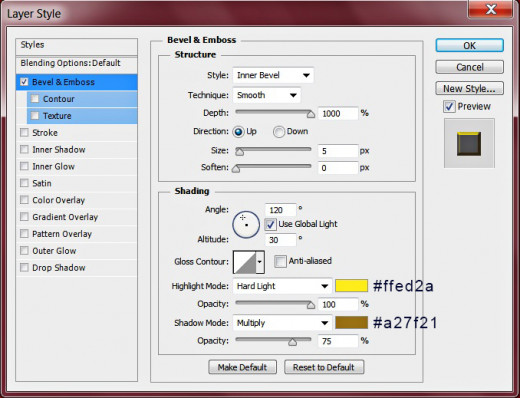
Now we are going to add 3D effect to the Hexagon Frame Custom Shape. Double click on its layer's thumbnail and apply this Bevel and Emboss:
Style: Inner Bevel
Technique: Smooth
Depth: 1000%
Direction: Up
Size: 5px
Soften: 0px
Angle: 120 degrees
Use Global Light: checked
Altitude: 30 degrees
Gloss Contour: Linear
Anti-aliased: not checked
Highlight Mode: Hard Light
Color for Highlight: #ffed2a
Opacity: 100%
Shadow Mode: Multiply
Color of Shadow: #a27f21
Opacity: 75%.
Keep Layer Style box opened for a while.
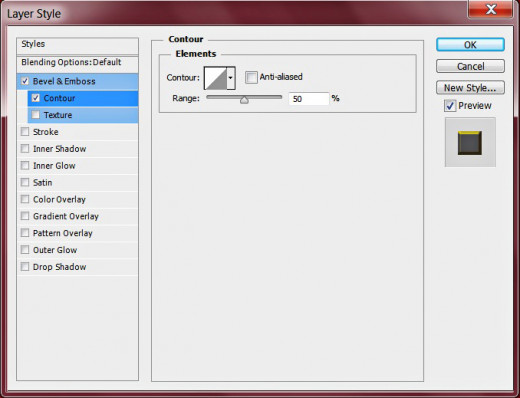
STEP 13
Now only check Contour Layer Style without changing its default settings.
STEP 14
Duplicate Hexagon Frame layer nine times and use Edit, Free Transform to resize and rotate the duplicated hexagons. As you can see from the screenshot below, I have renamed the nine duplicated layers from Segment 1 to Segment 9 and have placed them below the original Hexagon Frame Custom Shape layer.
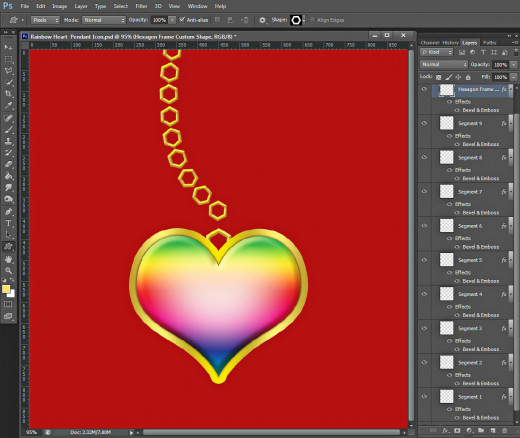
STEP 15
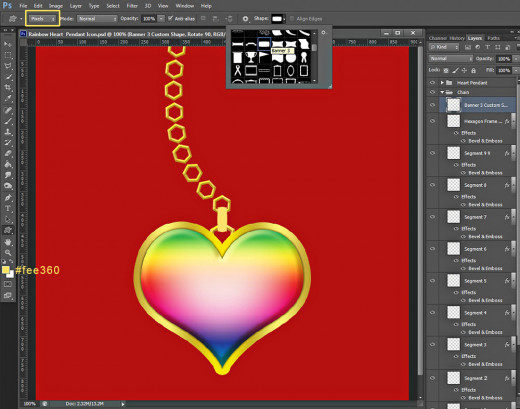
Create a New Layer on top of Chain Group and name it Banner 3 Custom Shape.
Change the Foreground Color to #fee360, take Custom Shape Tool in Pixels Mode, find Banner 3 in the Custom Shape Picker and draw the shape on your canvas. In order to rotate the shape vertically, apply Edit, Transform, Rotate 90 degrees CW and press Enter to apply the Transformation. Place the Banner 3 Shape as you see on the screenshot below.
STEP 16
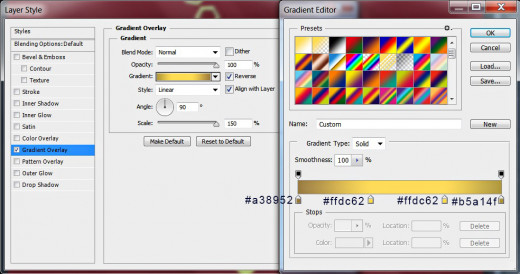
Let us turn Banner 3 Custom Shape into a golden segment of our Rainbow Heart chain. Firstly apply this Gradient Overlay:
Blend Mode: Normal
Dither: unchecked
Opacity: 100%
First Color Stop (Location 0%): #a38952
Second Color Stop (Location 36%): #ffdc62
Third Color Stop (Location 72%): #ffdc62
Fourth Color Stop (Location 100%): #b5a14f
Reverse: checked
Style: Linear
Align with Layer: checked
Angle: 90 degrees
Scale: 150%.
Keep Layer Style dialog box opened as we are going to add 3D effect in the next step.
STEP 17
It is time to add Bevel and Emboss. Change the settings like this:
Style: Inner Bevel
Technique: Smooth
Depth: 184%
Direction: Up
Size: 10px
Soften: 11px
Angle: 120 degrees
Use Global Light: checked
Altitude: 30 degrees
Gloss Contour: Linear
Anti-aliased: not checked
Highlight Mode: Hard Light
Color for Highlight: #ffed2a
Opacity: 100%
Shadow Mode: Multiply
Color of Shadow: #a27f21
Opacity: 75%.
Press OK button to close Layer Style box.

STEP 18
Duplicate Banner 3 Custom Shape eight times, resize and rotate the duplicates and arrange them to connect the hexagon segments. See the following screenshot for a reference.
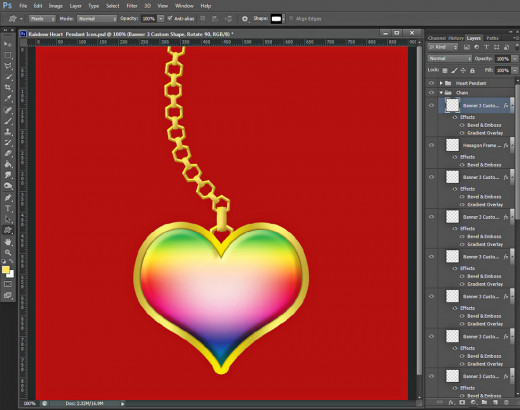
STEP 19
Now select all duplicated hexagon and banner shapes, right click and select Merge Layers. Don't merge the original Hexagon Frame and Banner 3 layer. Rename the new merged layer to Merged Left.
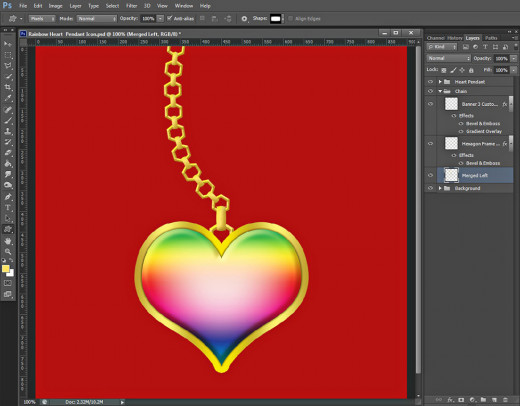
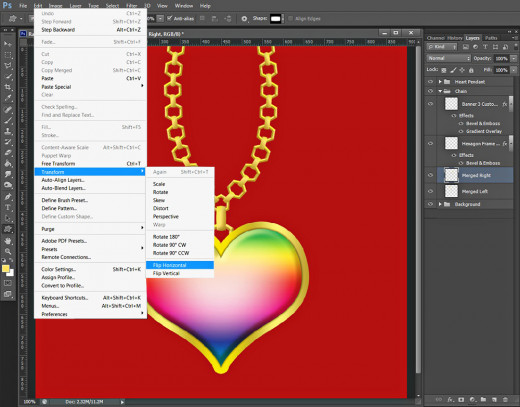
STEP 20
Duplicate Merged Left layer and rename the copied one to Merged Right. Apply Edit, Transform, Flip Horizontal and move the right part of the chain to be fixed to the left one as you see on the screenshot below. Press Enter to apply the Transformation.
Add Glow Effects Using Selections, Elliptical Marquee Tool and Pen Tool
In Steps 21-36 you have to add six types of Glow effects to the Heart Pendant. Firstly, you are to Load Selection on the Heart then Cut part of it with Elliptical Marquee tool, change its Blend Mode and Fill Opacity and Add Bevel and Emboss to it.
The next Glow effects you have to create with the help of Elliptical Marquee tool and Gradient as well as with Pen tool (in Paths Mode).
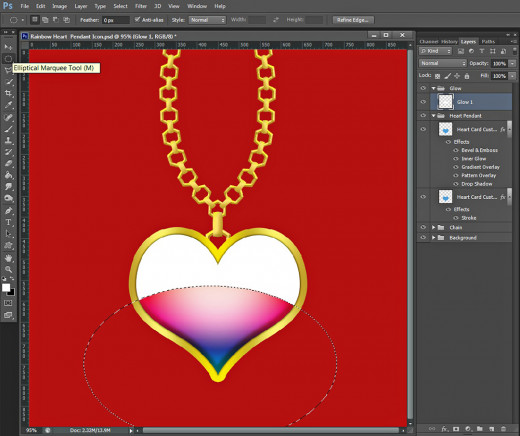
STEP 21
Press D then X key to set Foreground/Background color to White/Black. Create a new Group on top of Layers panel and name it Glow. Create also a new layer in this Glow Group and call it Glow 1.
Now press Ctrl and click on any of both Heart Card layer's thumbnail to Load Selection. While Glow 1 layer is selected, use Paint Bucket tool or Edit, Fill, Foreground color to fill the selection with white. Press Ctrl+D to deselect.

STEP 22
Use Elliptical Marquee Tool to draw a selection which includes the bottom half of the white heart shape and press Delete key. Deselect (Ctrl+D) when you are ready.
STEP 23
Change Blend Mode of Glow 1 layer to Soft Light and reduce its Fill Opacity to 20%.
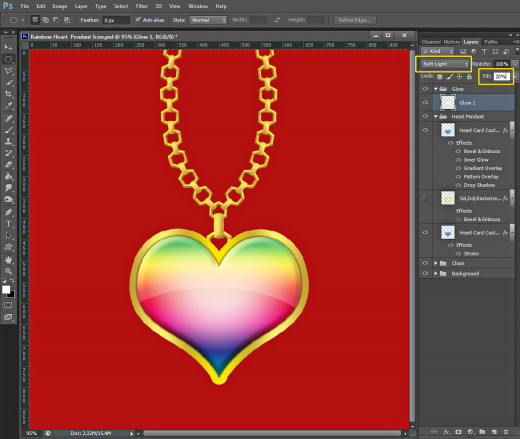
STEP 24
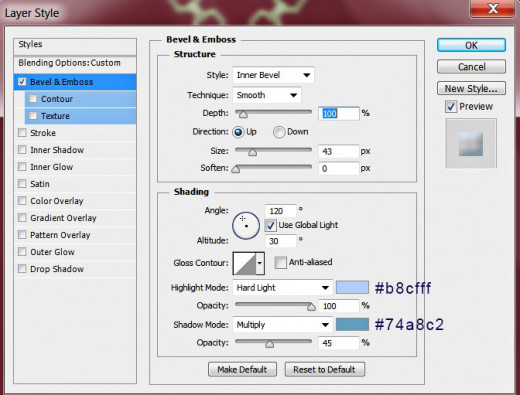
Let us make our first glow more prominent. Double click on Glow 1 layer's thumbnail and apply this Bevel and Emboss:
Style: Inner Bevel
Technique: Smooth
Depth: 100%
Direction: Up
Size: 43px
Soften: 0px
Angle: 120 degrees
Use Global Light: checked
Altitude: 30 degrees
Gloss Contour: Linear
Anti-aliased: not checked
Highlight Mode: Hard Light
Color for Highlight: #b8cfff
Opacity: 100%
Shadow Mode: Multiply
Color of Shadow: #74a8c2
Opacity: 45%.
Press OK button to apply the effect.
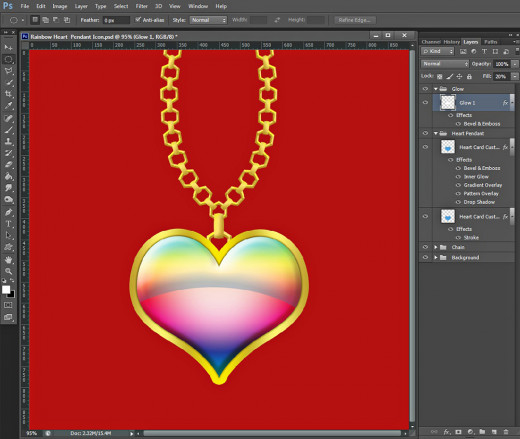
This is the result you should get after adding Bevel and Emboss to Glow 1 layer.
STEP 25
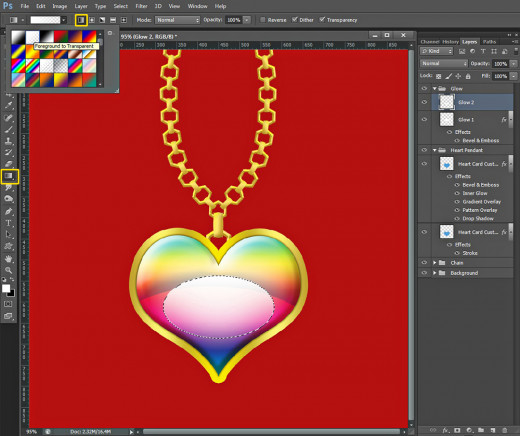
Create a New Layer on top of Glow Group and call it Glow 2. With Elliptical Marquee Tool draw an ellipse as you see on the screenshot below. Set your Foreground color to white, take Gradient tool (hot key G), select Foreground to Transparent Gradient from the Gradient Picker and choose Linear Type of Gradient in the Options bar. Drag with Gradient tool within the elliptical selection. Press Ctrl+D to remove the Selection when you are ready.
STEP 26
Change Blend Mode of Glow 2 layer to Soft Light and lower its Opacity to 45%.
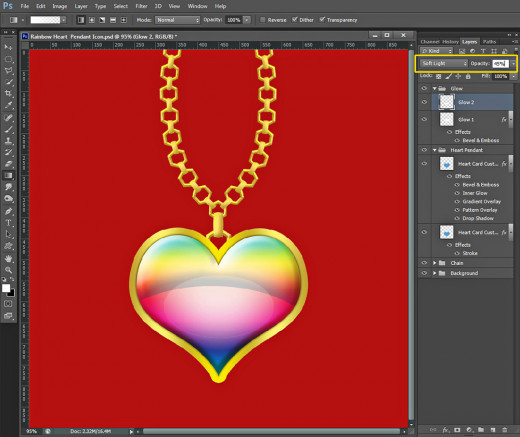
STEP 27
Create a New Glow 3 Layer on top of Glow Group. Check if your Foreground color is set to white, then select Brush Tool, take Soft Round Brush from the Brush Preset Picker and change its Size to 9px. Take Pen Tool and draw a path at the upper left part of the golden heart shaped frame as you see on this screenshot:
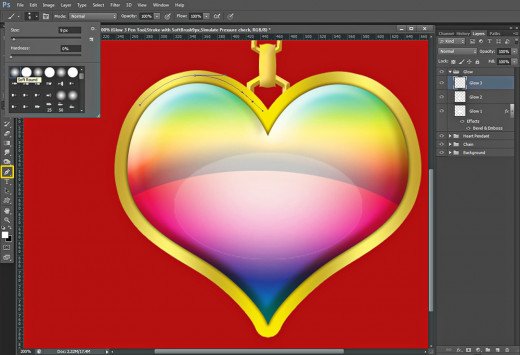
STEP 28
With Pen Tool selected, right click on the Path, select Stroke Path, choose Brush from Tool drop down menu and tick Simulate Pressure.

STEP 29
Press Delete key to remove the Pen Tool Path and you'll have the following result:
STEP 30
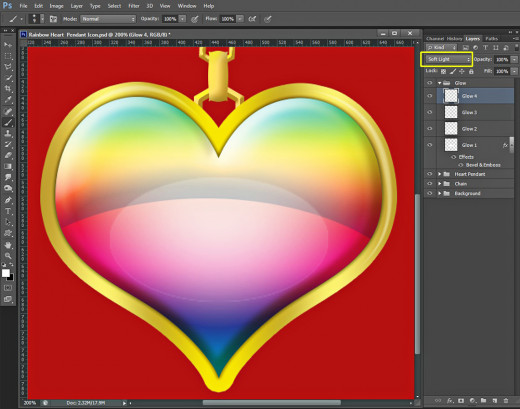
Change Blend Mode of Glow 3 layer to Soft Light. We need the glow effects to be subtle.
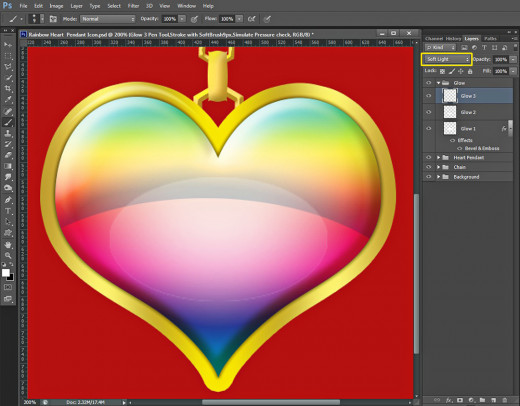
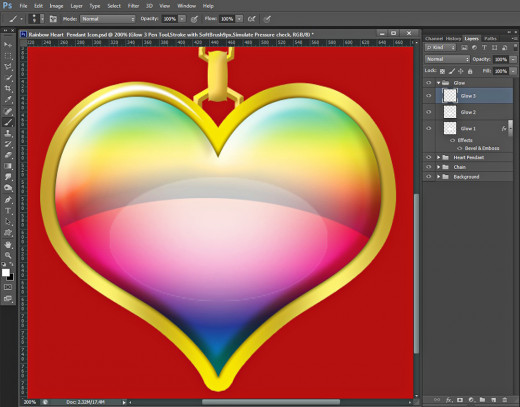
STEP 31
Create a New Layer on top of Glow Group and name it Glow 4. Repeat Steps 27-29 to create a new white Pen Tool Path at the right side of the golden frame. See the screenshot below for a reference.
STEP 32
Change Blend Mode of Glow 4 layer to Soft Light.
STEP 33
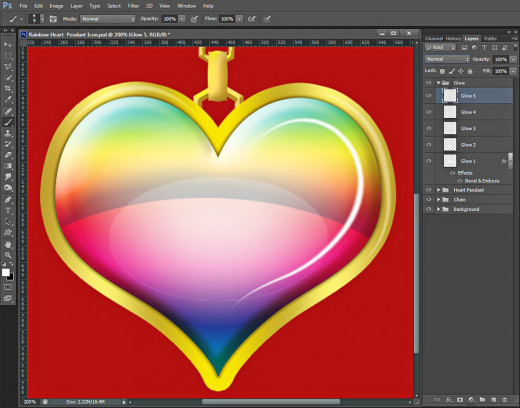
Create another Glow layer on top of Glow Group. Call it Glow 5 then again draw Pen Tool Path stroked with white 9px Soft Round Brush as you see on the screenshot.
STEP 34
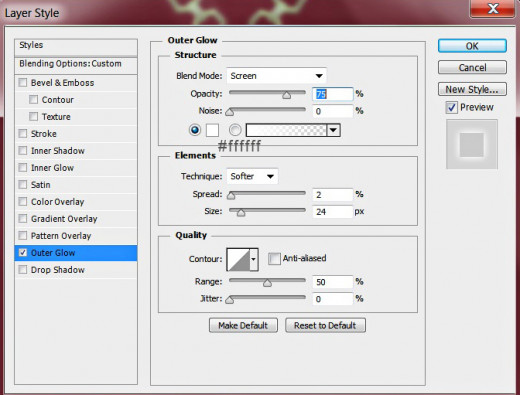
Apply on Glow 5 layer this Outer Glow Layer Style:
Blend Mode: Screen
Opacity: 75%
Noise: 0%
Color of Glow: #ffffff
Technique: Softer
Spread: 2%
Size: 24px
Contour: Linear
Anti-aliased: unchecked
Range: 50%.
Jitter: 0%.
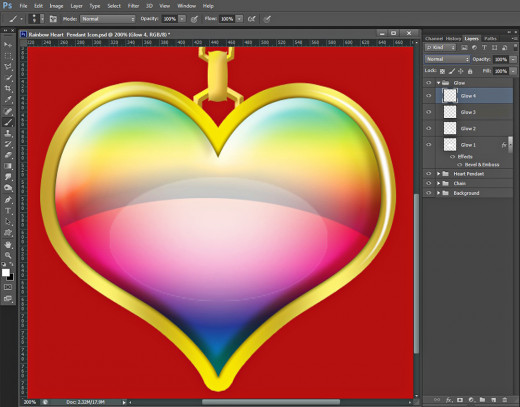
Change Blend Mode of Glow 5 layer to Soft Light and your Rainbow Heart will look like this:
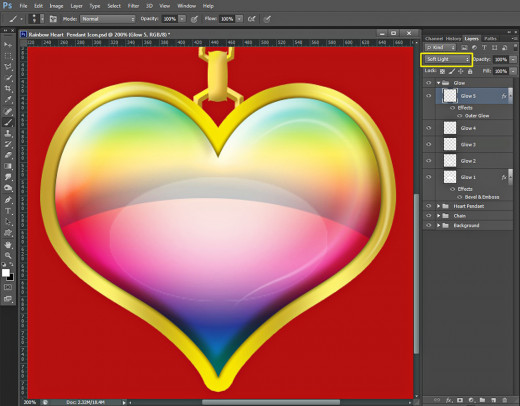
STEP 35
Create a New Layer on top of Glow Group and rename it to Glow 6. Draw a crescent shaped Pen Tool Path at the upper left side of the Rainbow Heart and stroke it again with white Soft Round Brush of 9px Size.

STEP 36
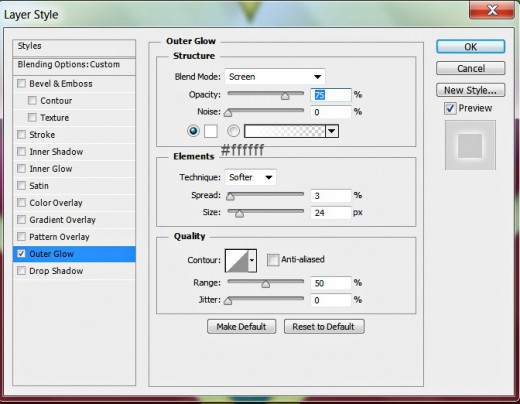
Apply on Glow 6 layer the following Outer Glow Layer Style:
Blend Mode: Screen
Opacity: 75%
Noise: 0%
Color of Glow: #ffffff
Technique: Softer
Spread: 3%
Size: 24px
Contour: Linear
Anti-aliased: unchecked
Range: 50%.
Jitter: 0%.
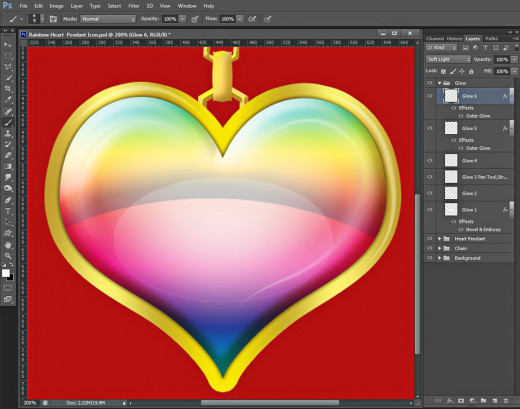
We are ready with our work in Glow Group. Our Rainbow Heart is Ready too. In the next steps we are going to add shadow.
Add Shadow Using Hue/Saturation Option and Gaussian Blur Filter
From the next step till the end of this tutorial you have to add Shadow to your gorgeous Heart Pendant. You need only to duplicate the Heart Pendant and Chain groups and to Merge them. After that you have to use Hue/Saturation option to darken the duplicated Heart shape then to apply Gaussian Blur Filter and voila! Your jewel is ready.
STEP 37
Duplicate both Heart Pendant and Chain Group. While the duplicated Heart Pendant copy and Chain copy groups are selected, right click and select Merge Layers.
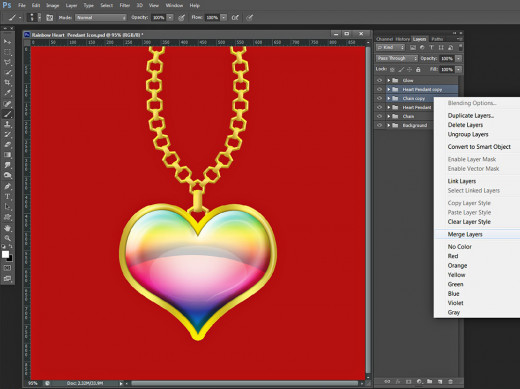
STEP 38
Rename the newly created merged layer in the previous step to Shadow.

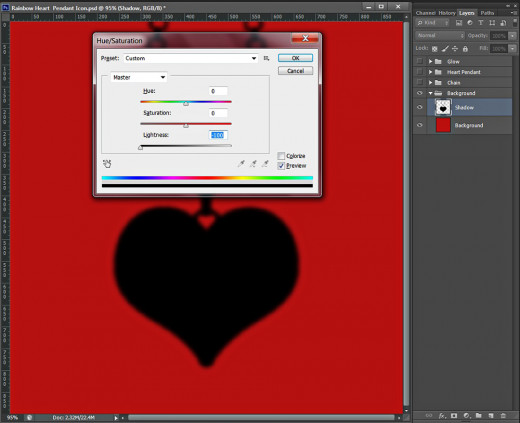
STEP 39
Firstly move Shadow layer in Background Group then press Ctrl+U (Image, Adjustments, Hue/Saturation) and move the Lightness slider to -100. As you can see, I have switched off the upper groups for a better visibility. Your Heart Pendant Shadow should get black. It looks a bit blurred and in the next step you'll see why. :)
STEP 40
Now go to Filter, Blur, Gaussian Blur and set the Radius to 5.5 Pixels.
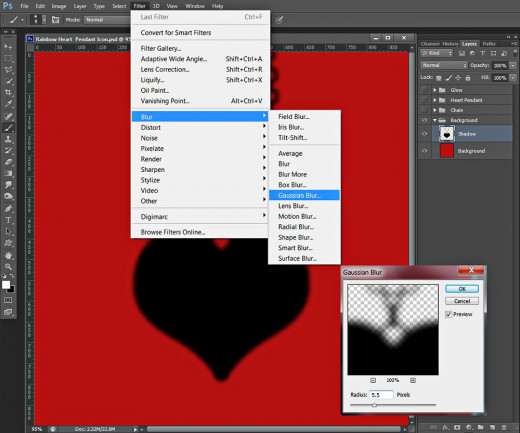
This is how your Shadow will look after applying Hue/Saturation and Gaussian Blur.
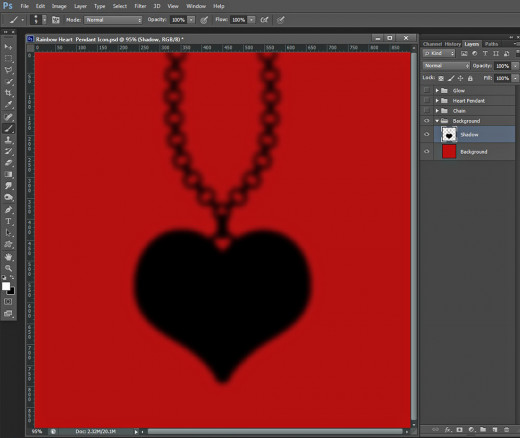
STEP 41
Now switch back the visibility of the upper groups of layers. We finished our work on the Rainbow Heart Pendant. If you have followed all my steps in detail, you should have four groups in Layers panel: Background, Chain, Heart Pendant and Glow Group.
Only one recommendation. As you can see the outline of the elliptical glow (Glow 2 layer) is a bit rough. You can improve it by using Blur Tool- just go about the ellipse with it to soften the outline.
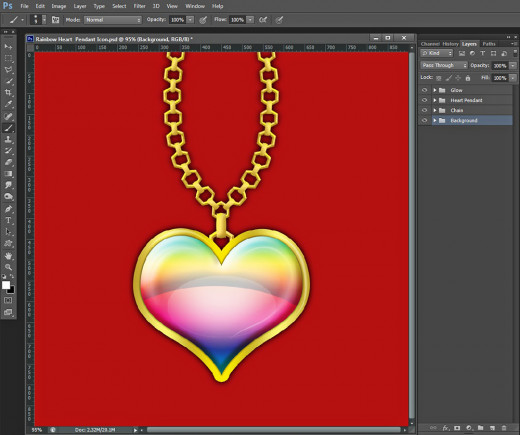
STEP 42
This is our Rainbow Heart Pendant saved in .jpg format. Beautiful, isn't it?
Hope you found this tutorial awesome and easy to follow. I did my best to explain everything in detail that's why it contains more than forty steps.
Thanks a lot for reading and have a great day! :)