- HubPages»
- Arts and Design»
- Photography»
- Digital Photography
How to Use Lightroom to Remove Unwanted Objects from Your Image Background

Nothing describes the product on your website like a clear and detailed image. The content you have on the website will tell the prospective customer all the details and information about the product, but the image will clearly tell him what the product is and how it looks. A good picture could also be a huge motivator, encouraging a website visitor to change into a customer.
A photographer takes great care to ensure the product image is crystal clear, but even there may be unwanted objects in the background that could reduce the picture quality and take the customer’s eye away from the main product in focus. Such unwanted objects can be easily removed from the image background using Lightroom. Import photographs from your hard drive or hard disk to the software and easily edit photographs.
This software has lots of tools that you can use to remove unnecessary elements from the image. Listed below are the different Lightroom tools that can be used to remove unwanted objects from the photograph background.
Visualize Spots
The Visualize Spots tool will come handy when the image has minute elements that may distract the viewer from the photograph’s subject.
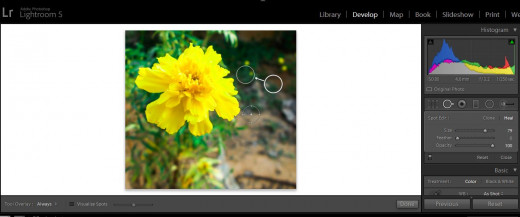
Go to the Develop Module
Select Spot Removal Tool
Click on the Visualize Spots Checkbox. Once you select this option, the image is inverted and you will be able to see the image outline.
Use the contrast threshold slider to clearly view imperfections like dust, dots and other small items. After you’ve zoomed the unwanted elements, remove them using the spot removal tool.
Spot Removal Tool
Using this tool, you can remove unwanted objects like poles, people, wiring, tree or anything else from the picture frame. Here are the steps you can follow to use the Spot Removal Tool.
- Go to the Develop Module
- Select Spot Removal Tool (Keyboard shortcut Q)
- Choose the clone option
- In the photograph, select the area that has the unwanted elements. The selection can be identified by a white marquee area.
- Use the clone tool to duplicate another area that has the background you require in the selected area
- Increase or decrease the tool area using keyboard shortcuts left bracket ([) and right bracket (]) respectively
Objects you don’t want in your image frame can be hidden using this technique.
Graduated Filter
When you want to mask large areas, you can make use of the Graduated Filter option.
Choose the Graduated Filter option
Select the area you want to mask
Increase shadows, highlights, contrast and exposure
Decrease saturation and clarity
When you use this Lightroom tool, the unwanted background can be changed to blend in with the existing background.

Heal Tool
This Lightroom tool works almost similar to that of a clone tool, but the only difference is that the clone tool duplicates one part of the background area in another place to hide unwanted images. The heal tool, on the other hand, matches the texture, shade and light of the selected area to that of the clear background area. The steps to follow are same as the previous tool. Here, when you go to the Develop module, you select the heal option instead of the clone option.
This photo editing software offers both manual and automatic options to make the changes. Use the slash key (/) to make use of the auto mode. Manually, select the area and move it to the area that has the unwanted elements.
If you want to re-touch your photographs using Lightroom, you can download the authentic software and get the product key to use it. It is a pretty easy photo editing software to learn and use. You can easily work with most photographs using this software.