Making Bracelets with Kids

Kids and crafts go together. The same can be said for making bracelets. Whether you want to set your child up with something he or she can bead while mom is making jewelry or you are just looking for a great project for the two of you to do together there are lots of options for you.
By Ages
I have grouped projects into categories by ages. This is a general idea of when a child will have the skills necessary to complete the project. It isn't a guarantee. After all, each child is different. Yours may have the skills before the age that is suggested or not yet possess them by time the age is reached. That is okay, the age on the projects is just a guideline!
3-5
Most kids will be able to begin the most basic of projects by about three years old. The big thing to remember is that they have a short attention span and may be ready to be done long before older children. Work with it by letting them make several projects of offering them something else to do. Also be willing to let them go when they are done sitting still. If you are using it as a group project then have a second activity ready that the kids can do as they finish.
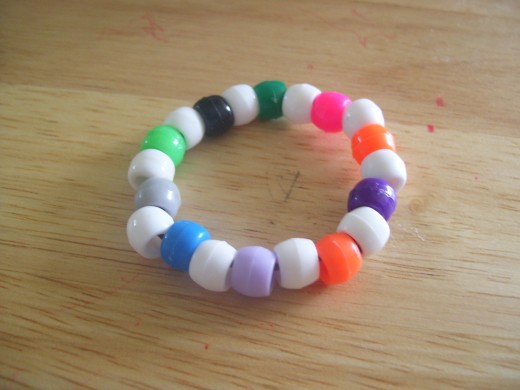
Plastic Beads
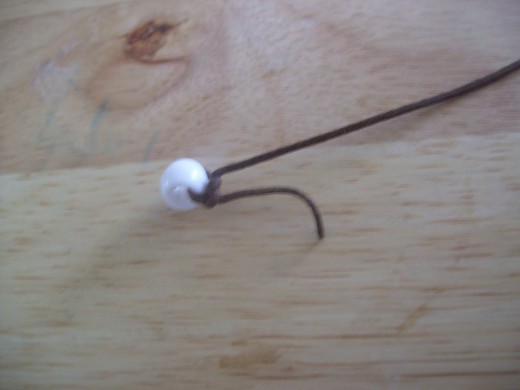
Small fingers make plastic beads in a large size the perfect option for bracelet making. Pony beads are smooth making them good to wear on the wrist and come in a wide range of colors (you can even get them in sparkly and glow in the dark). Plus they aren't expensive and are easy to use with large wholes. As for stringing materials you can use leather cord, waxed cotton, hemp, and even yarn. If your stringing material is soft you will want to harden the end with glue or fingernail polish. This will make it easier to string the beads without a needle.
- Cut your stringing material about ten inches. Sure they won't need that much, but it will make it easier for you to finish it off.
- Make sure it is easy to add beads. Either with glue or finger nail polish or even all by itself.
- Tie one bead on the end. Then let the child add beads of their choice on to the string.
- When they are done cut off the end bead (or untie it if it is easy to do).
- Make sure it is large enough for their hand to get through and tie it off.
It is always best to have this be something that can slip on and off. That way you don't have to help them put it on only to take it off a second later and put it back on two seconds beyond that. If they loose it they can make another and you are out a couple of pennies.
If you are doing this activity with a large group then cut your strings, prepare them, and tie your stopper bead on before the group sits down to make their bracelet.
Also make sure that you never critize their designs. Sure they will probably look like a little kid made them! After all, a little kid did make them!

Pasta Option
For a change of pace you can use pasta for the same project. Choose pastas that will be smooth and won't hurt. One great option is wagon wheel pasta, but plain elbow noodles also work well. You can then get them in fancy colors naturally (usually regular, orangish, and green) or you can dye them using food coloring. Add a few drops of food coloring to water. Then soak for 10-20 minutes. Set out on wax paper to dry. You can use them any time after they are dry. They can be stored in a ziploc bag for use whenever you are ready.
5-8
As kids get older they get finer tuned in their fine motor skills. Because of that the projects can get a little harder and you can find yourself able to do more with them. Remember they will still need help. You should help them start and finish each project. If you are working with a group it is still a good idea to start all the projects before you get to the group and also to have another activity ready for when they finish (as different people will finish at different times).
It should also be noted that kids in this age range will still enjoy the plastic beading project and most will even like making a bracelet with pasta as well.

Memory Wire
Memory wire is so easy to use that most five year olds can do it. You should make this with only one or two loops so it is easier to thred then the project shown. As for bead choices mix together some seed beads and some e-beads which are fairly inexpensive with a few specialty beads so that they can add special ones as well.
- Cut the wire. Use heavy duty wire cutters such as those found in the toolbox rather then those in your craft kit.
- Fold one end over. This requires some work, but is the easiest, fastest, and cheapest way to finish memory wire.
- Let your child bead the memory wire, adding beads how he or she sees fit.
- When they are done trim it (some kids will get bored and be done before they have finished two coils, as long as it is done enough to go around their wrist once let them go), and fold the last end over.
This is another great project because they can take it on and off at will and won't be needing help. Plus they will feel accomplished at having made a "real" piece of jewelry. Remember their design will still look like a little kid made it.
8 and Up
While eight year olds and up will still enjoy making memory wire bracelets, most have the ability to work with harder to manipulate materials. You should also keep in mind that your 8 year old or even your 10 year old may be very happy with the plastic bead bracelet as well. Don't get over hung up on the ages.
Bead Stringing
As your child gets older simple bead stinging is a possibility. You can help them create great projects this way.
- Cut nylon coated beading wire to about four inches larger then their wrist.
- Attach a clasp using a crimp bead.
- Let your child bead the bracelet.
- When it is long enough to wrap around their wrist finish the piece off by adding a crimp bead, a clasp, and then running the wire back through the crimp bead and crimping it.
- Trim all your wires and add glue for strength.
They have now made a simple strung bracelet. For more ideas see 15 Minute Bracelets Anyone Can Make.
- How to Crimp a Crimp Bead
Crimping is very important to easy bracelet making and with this step by step article including pictures it can be easy to learn how to do. - Unique Perler Bead Bracelets
If you are looking for something fun and a little different then this is the way to go!
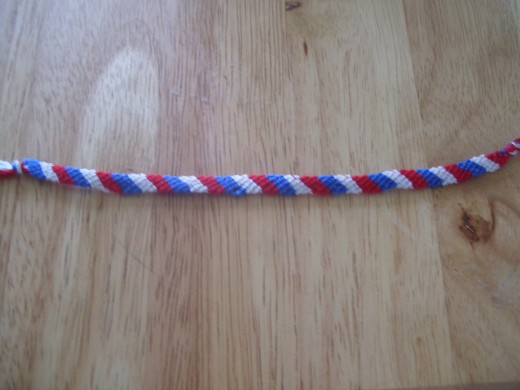
Friendship Bracelets
At some point, friendship bracelets become all the rage and everyone wants one. This can be a great project to do with your older children and can provide hours of entertainment for them. There are several different ways to make a friendship bracelet and that makes it a bit more then we have room for here. For more information see 5 Fantastic Friendship Bracelet Designs.
Both young boys and girls enjoy making beaded jewelry and bracelets. You can have fun with this as a project for a group or even as a project for your own children or child. You can even use these as projects for them to work on while you are doing your own beading. Just make sure that your young children are supervised. Especially really young ones who might still be inclinded to stick a bead in their mouth. Other then that, these projects can be a lot of fun!