ArtsAutosBooksBusinessEducationEntertainmentFamilyFashionFoodGamesGenderHealthHolidaysHomeHubPagesPersonal FinancePetsPoliticsReligionSportsTechnologyTravel

5 Digital Photo Editing Tips for Scrapbookers

Updated on October 13, 2014
Photograph of "Dad's Briefcase" - a scrapbook box.
Photograph of "Dad's Briefcase" - a scrapbook box. | Source

Five Tips to Liven up your Digital Photographs

This page demonstrates five editing tips to enhance a digital photo. You will see how to take off pounds, whiten teeth, remove unwanted blemishes, add text and do spot coloring for dramatic effects.

Even if you're not a scrapbooker, you are likely to find helpful and interesting tips to liven up your photographs or create those artistic effects you've admired.

You already know how to resize, remove redeye and correct color, but those techniques barely scratch the surface of what a good photo or graphics editing software application can do.

How About a Digital Diet?

Before and After photo showing how to remove pounds through photo editing .
Before and After photo showing how to remove pounds through photo editing . | Source

Tip 1: The Instant Weight Loss Solution

How to take off pounds digitally

With Photoshop Elements or Adobe Photoshop, its easy to take off those five pounds that the camera added. Heck, take off more than that if you want, but keep in mind that people will be suspicious if you suddenly become slim and trim in your photos!

Refer to the Duck Photo shown to the right. In the Before photo, the duck has a significant potbelly. It is considerably smaller in the After picture.

Here's how to do it.

1. Open the photograph in your photo editing software

2. Make a duplicate layer and work on this new layer.

3.Using the Polygonal Selection Tool, select the part of the photo that you want to shrink.

4. With this area selected, go to Edit>Transform>Distort. Click Okay. A draggable box with handles appears around your selection.

5. Grab one of the handles and resize the selection. Click the Enter key when ready.

6. Using the Clone Tool, fill in the missing background areas.

And Bingo! There you are. Instant weight loss.

To Enhance or Not to Enhance?

Do you agree with digitally editing photographs?

See results
Spot Coloring done on Statue using photo editing software
Spot Coloring done on Statue using photo editing software | Source

Tip 2: Add Instant Spot Color

Create the dramatic look of a colorized black and white photo in minutes using your Adobe software. In the Aboriginal statue photo, the "bright blue" background is converted to black and white, while the colorful statue appears in all its splendor.

Here's how to do it;

1. Open your image in your photo editing software

2. Create a new layer using Layer>New Layer>Duplicate.

3. Select the new layer, and convert that layer to Black and White. You can do this with the keyboard command of Alt+Control+B (on the PC).

4. Using the Eraser tool, erase the areas where you want the color to appear. Use the Zoom in tool for better vision while you are dong it.

And that's all there is too it.

This trick is particularly helpful in cases where you have a busy background and you want your main subject to stand out. You turn the "busy" into black and white and let your main element keep its full color.
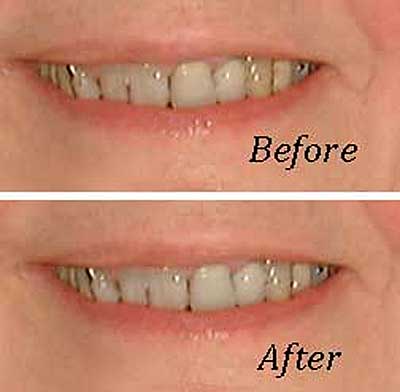
Before and after photo showing teeth whitened by digital editing software
Before and after photo showing teeth whitened by digital editing software | Source

Tip 3: Digital Dentistry

Teeth looking a little yellow in the photograph? Whiten them instantly. Here's how:

1. Open your photograph in your photo editing software.

2. Using the Polygonal Lasso Tool, select the teeth.

3. Image>Adjustments>Hue/Saturation. Select Yellow in the edit box. Desaturate the yellow slightly by dragging the marker to the left. Next, brighten the teeth by dragging the Lightness Marker to the right.

And there you have, whiter, brighter teeth without the use of chemical whiteners!

Tip: You can use this same technique to modify any area you want a color change.
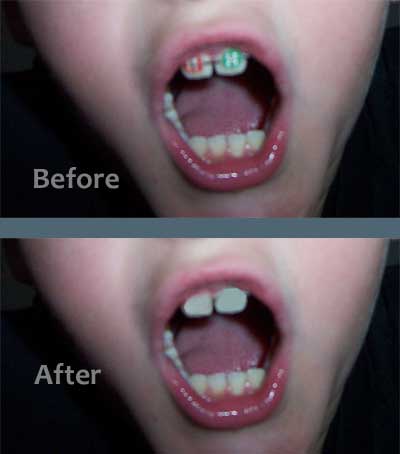
Before and after photo of braces removed with photo editing software
Before and after photo of braces removed with photo editing software | Source

Tip 4: The Extreme Makeover

Embarrassed by a blemish or wrinkle on your skin, hair blowing in the breeze or a piece of spinach caught in your teeth?

Use the Clone Tool to graft over it with a piece of "skin" that pleases you. First, select the Clone tool. Then Windows users, Alt-Click and Mac users Option-Click on the area of "good skin" you want to graft. Next, click on the blemish or other trouble spot. As you move your mouse, the area will fill with the color from the area you selected by Alt Clicking.

In the picture shown, the boy had painted teeth for Halloween. I Alt clicked on the bottom teeth, then grafted that color to the top teeth.

Often you can use this technique to remove any unwanted element in a picture.

Photo of  cat with text added with photo editing software
Photo of cat with text added with photo editing software | Source

Tip 5: Add Text Captions to the Photograph

As you can see from the photographs on the other tips, you can add textual information to a photo. Naturally, you can add as much or as little as you want. You can use the Eyedropper Tool to pick up a color from the photograph, and use that color for the text, or you can use black or white or any color you choose. You can add an effect such as a drop shadow to the text, or you can stroke the layer to give a different color outline.

© 2008 June Campbell

working

This website uses cookies

As a user in the EEA, your approval is needed on a few things. To provide a better website experience, hubpages.com uses cookies (and other similar technologies) and may collect, process, and share personal data. Please choose which areas of our service you consent to our doing so.

For more information on managing or withdrawing consents and how we handle data, visit our Privacy Policy at: https://corp.maven.io/privacy-policy

Show Details
Necessary
HubPages Device IDThis is used to identify particular browsers or devices when the access the service, and is used for security reasons.
LoginThis is necessary to sign in to the HubPages Service.
Google RecaptchaThis is used to prevent bots and spam. (Privacy Policy)
AkismetThis is used to detect comment spam. (Privacy Policy)
HubPages Google AnalyticsThis is used to provide data on traffic to our website, all personally identifyable data is anonymized. (Privacy Policy)
HubPages Traffic PixelThis is used to collect data on traffic to articles and other pages on our site. Unless you are signed in to a HubPages account, all personally identifiable information is anonymized.
Amazon Web ServicesThis is a cloud services platform that we used to host our service. (Privacy Policy)
CloudflareThis is a cloud CDN service that we use to efficiently deliver files required for our service to operate such as javascript, cascading style sheets, images, and videos. (Privacy Policy)
Google Hosted LibrariesJavascript software libraries such as jQuery are loaded at endpoints on the googleapis.com or gstatic.com domains, for performance and efficiency reasons. (Privacy Policy)
Features
Google Custom SearchThis is feature allows you to search the site. (Privacy Policy)
Google MapsSome articles have Google Maps embedded in them. (Privacy Policy)
Google ChartsThis is used to display charts and graphs on articles and the author center. (Privacy Policy)
Google AdSense Host APIThis service allows you to sign up for or associate a Google AdSense account with HubPages, so that you can earn money from ads on your articles. No data is shared unless you engage with this feature. (Privacy Policy)
Google YouTubeSome articles have YouTube videos embedded in them. (Privacy Policy)
VimeoSome articles have Vimeo videos embedded in them. (Privacy Policy)
PaypalThis is used for a registered author who enrolls in the HubPages Earnings program and requests to be paid via PayPal. No data is shared with Paypal unless you engage with this feature. (Privacy Policy)
Facebook LoginYou can use this to streamline signing up for, or signing in to your Hubpages account. No data is shared with Facebook unless you engage with this feature. (Privacy Policy)
MavenThis supports the Maven widget and search functionality. (Privacy Policy)
Marketing
Google AdSenseThis is an ad network. (Privacy Policy)
Google DoubleClickGoogle provides ad serving technology and runs an ad network. (Privacy Policy)
Index ExchangeThis is an ad network. (Privacy Policy)
SovrnThis is an ad network. (Privacy Policy)
Facebook AdsThis is an ad network. (Privacy Policy)
Amazon Unified Ad MarketplaceThis is an ad network. (Privacy Policy)
AppNexusThis is an ad network. (Privacy Policy)
OpenxThis is an ad network. (Privacy Policy)
Rubicon ProjectThis is an ad network. (Privacy Policy)
TripleLiftThis is an ad network. (Privacy Policy)
Say MediaWe partner with Say Media to deliver ad campaigns on our sites. (Privacy Policy)
Remarketing PixelsWe may use remarketing pixels from advertising networks such as Google AdWords, Bing Ads, and Facebook in order to advertise the HubPages Service to people that have visited our sites.
Conversion Tracking PixelsWe may use conversion tracking pixels from advertising networks such as Google AdWords, Bing Ads, and Facebook in order to identify when an advertisement has successfully resulted in the desired action, such as signing up for the HubPages Service or publishing an article on the HubPages Service.
Statistics
Author Google AnalyticsThis is used to provide traffic data and reports to the authors of articles on the HubPages Service. (Privacy Policy)
ComscoreComScore is a media measurement and analytics company providing marketing data and analytics to enterprises, media and advertising agencies, and publishers. Non-consent will result in ComScore only processing obfuscated personal data. (Privacy Policy)
Amazon Tracking PixelSome articles display amazon products as part of the Amazon Affiliate program, this pixel provides traffic statistics for those products (Privacy Policy)
ClickscoThis is a data management platform studying reader behavior (Privacy Policy)