Build Your Own Lathe
Make Chess Pieces, Table Legs, etc.
There’s really no substitute for a lathe - the kind that was built to be a lathe. They are amazing machines. But then they bring with them amazing prices. Before I started my series on making certain “power tools,” I didn’t ever imagine I’d be trying to make a lathe. But make one I did, with my drill. It barely does the job, and I didn’t add an attachment that helps you to make the same pattern over and over (maybe some day....), but if you want a quick job or a quick fix-it without the tremendous investment, try this.
Before I start, I would like to reiterate something I said in one or two of my other how-to’s: Always be safety-conscious. As you’re preparing to make or do something with power tools, always try to imagine the things that can go wrong, and prepare an action that will quickly and safely get you out of the danger. Give Murphy a little respect for this type of thing. Also, if you leave a tool sitting out - especially one of these assembled contraptions I teach here - use the safety features of the machines, or build a safety feature into them, and use them before leaving the area. When you build something new, and if there is a possibility that children will be roaming the nest, the new device will peak their curiosity and they may try a few buttons.
As I mentioned before, the lathe is basically my drill. In a previous hub I made a “drill press” using a board with a hole drilled in it to accept the horizontal gripper handle of the drill. In this project, I’m using the same board. The handle goes into the hole, and the drill is immobilized with strapping tape or some other system you may have. Before you make the final adjustments in the immobilizing process, put a long bit into the chuck, or a long, perfectly straight dowel. As you push on the trigger lightly (to make the bit turn slowly), put a piece of wood under the bit. Make sure the top and bottom sides of the wood are parallel. Add more wood or thin wedges, if necessary, to raise the wood until it is touching the bit. Adjust the angle of the drill until the entire underside of the bit is touching the wood, and tighten slightly, enough to keep the drill from moving. Next, remove the bit and put in a 1-inch (more or less) flared bit, like the one you see in Fig. 2a.

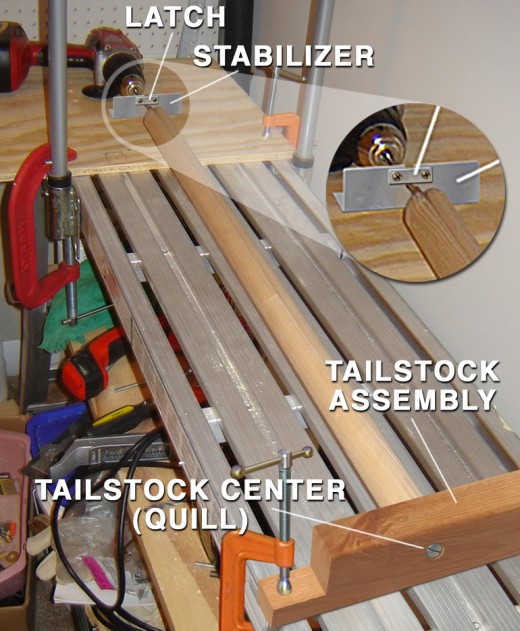
Build a “stabilizer” unit under the bit (see Fig. 1): Get a simple 90-degree bracket, and cut a U-shaped slot in it, making its depth low enough to accommodate the bit comfortably. Later, after testing your lathe for “wobble,” if you need to adjust the depth of the slot, you can either cut more out, or insert some thin wedges between the bracket and your plywood base.
Make a “latch” (also in Fig. 1) to check the vertical wobble of the bit, using bolts and lock washers. In the bracket, make slots so to allow vertical adjustments. In the latch, make only the rounded holes. One bolt of the latch can hang free until the lathe is ready for final assembly. But for now, tighten each bolt and test the motion of your bit. Make sure the drill is not trying to wobble, for using a stabilizer that’s off center. Another thing that causes wobble is a bit that’s crooked. If this is the case, find one that doesn’t wobble, and use that one.
Next, make the “Tailstock Assembly” (see Fig. 2c): Get a bolt for the “quill” (“center pin” as shown in 2c and labeled in Fig. 1) and a nut to hold it in place. Fashion a piece of wood like the one pictured in Fig. 2c - that is, with a corner cut out of each end so the wood can be fastened to the workbench with C-clamps. Position the board on the work bench next to the drill bit’s point while still in the drill, and mark where the hole will be. You may want to put the hole just a little low, in case you need to make an adjustment, later. It’s better to make it lower, than to make it high, because if the center quill ends up too high, you’ll have to drill another hole. If it’s too low, you can add thin wedges under the assembly.
Drill a hole the same size as the bolt and put the bolt through the hole. Tighten the nut, then proceed to file a point into the bolt. After I got a rough point filed off, I used a sander bit in my drill to smooth it down and to remove burrs so I could get the nut off, if I needed to. Use C-clamps to put the tailstock assembly in its approximate position.
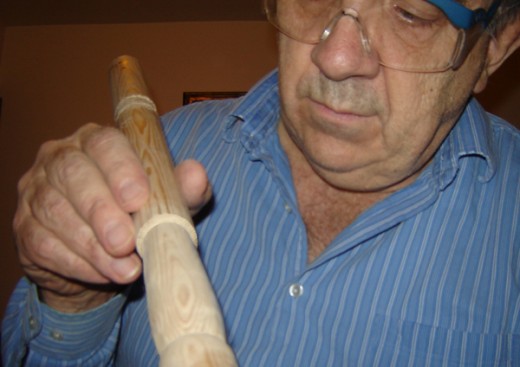
Prepare a dowel for the lathe. If possible, use soft wood. Cut a slot into one end (see Fig. 2b). Make sure the slot is wide enough and deep enough to accept a good portion of the flared drill bit. This is so that there will be plenty of power transferred to the dowel for turning. Too shallow of a slot could eventually cause the slot to widen, or could split the wood, and cause the dowel to break free. Don’t use a dowel size that will leave narrow “half-moons” on each side of the slot; a thinner dowel will probably split under the pressure when you apply a chisel or sandpaper to the wood. If you need a thinner finished product, you can slim down the dowel by cutting slots into it first (while the lathe is moving it), then chiseling out the excess. This is what I did for the piece in Fig. 3, on the tapered end. I cut the slots by using the point of another tapered drill bit.
On the other end of the dowel, make a hole dead center, if you can. This will be used for the “Tailstock Quill” (see Fig. 2c). Mark it, then start it with a centering punch like the one pictured in Fig. 2d. Make the hole with the point of a flared bit like the one I’m using here, because it needs to be cone-shaped. Don’t make it deeper than the protruding length of the Center Quill you made. Finish off the hole with another treatment of your center punch, wobbling your hand in circles to widen the cone.
Another Way to Make a Lathe
Now, you’re ready to assemble the lathe. Remove the flared bit from the drill. Insert the bit into the dowel’s slot, getting it as centered as possible. If you can get a bit whose hole diameter is the same size as the dowel’s cross-section diameter, it will be easier to center the bit on the dowel. Push it into the wood gently, then use a hammer to lightly tap it in until the guide point on the bit has fully entered the wood at the bottom of the slot. It will also help to pound the outer points of the flared part into the wood as well.
Place blocks of wood on the workbench with the idea of having them support the dowel while you attach it and the bit to the drill. Put the bit with the dowel into the drill’s chuck, lowering the shaft of the bit into the “stabilizer,” and resting the dowel on the blocks of wood. Tighten the chuck, and the bolts of the “stabilizer latch,” making sure it doesn’t press too tightly on the bit. Lightly push the drill’s trigger to see if you’ve put the dowel in proper alignment with the drill bit. If the other end of the dowel moves sideways, make an adjustment by gently tilting the dowel in a direction that corresponds with the flared portion of the bit. When you’re happy that it seems centered, then pull the tailstock assembly forward, positioning it so that the center quill enters into the dowel’s hole. As a precaution - so that the dowel doesn’t fight with the bolt - you may want to put a flat washer on the quill before inserting the center into the dowel’s hole.
Tighten the tailstock assembly’s C-clamps when there is a gentle but firm connection. Again, test the alignment by gently pushing the trigger. If it appears the drill is working harder at a certain point in the dowel’s rotation, then re-position the tailstock assembly only in small increments until the drill ceases to complain. You’ll learn to know which direction to move it when you study the subtle movements of the drill or its chuck, or the movement of the bit within the stabilizer unit. When these adjustments are done, you are ready to tighten things down and begin the work.
If your drill comes with a trigger lock, you may want to forego using it until you get used to the total experience. While learning, you may accidentally push your chisel too far into the dowel. If that happens, you’ll need to stop the drill immediately. I used only one hand while I made the piece shown here: one hand on the trigger, and one hand to fashion the design.
My drill comes with two gears: one for speed, and one for torque power. The gear for torque power was sufficient to do the main carving, and the high speed was used when I sanded it.
To carve, I put my chisels up through the slots of my workbench, from under the table. (In the photos here, you’ll notice that it is made of aluminum, with slots in the top.) I then turned the chisel sideways, lodging it tightly between two runners. I usually put the chisel at an angle so I could gradually tip it up to increase the depth of the carving. If you can find chisels with curved blades, this will work better, will cut faster and more smoothly. When I made the slots for the tapered part, I used a tapered drill bit like the one holding the dowel. Surprisingly, I was able to do this from above the table: I set the base of the bit against the table top, and leaned it into the dowel - the dowel turning away from the tip, of course! The tip of that kind of bit is very good for cutting narrow grooves, and I achieved deep cuts quite rapidly. As explained above, I then chiseled it down, then put it back on the lathe to smooth it out.
My lathe is now sitting in pieces, easily tucked away in the corner of the room. No one out of the loop suspects I even have a lathe in my possession. And if I move, I can ask my neighbor to move it, without him knowing he’s moved a lathe. And he won’t even ask me if he can borrow it! So there are some of the advantages of owning this type of lathe.


