How to Install Tile Floor

Install tile floor

Tile Floor in a Shower
Installing tile floor in a shower is not difficult and can greatly add to the overall appearance. This article and pictures are of our recent remodel of our Master Bathroom. Previously we had a glass neo-angled shower. Anyone who has glass shower doors or walls knows the difficulty of keeping them clean and spotless. Glass walls + hard water/soap = headache.
We started by tearing out the old shower and making our own shower pan with cement. The important part here is to make sure there is a gentle slope to the drain from all angles.
Gentle Slope

We used mosaic tiles on the floor. These are small tiles held together with bits of glue for ease of use. Thin set mortar is used to set the tiles in place. Using a tile trowel, the kind with square teeth, spread the mortar. Waves create air pockets for both suction and quick drying. Make sure you use an appropriate sized trowel. Different thicknesses of tile require different trowels.
mosaic tile

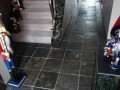
There are spacers for these small tiles, however we didn't use them. One tip that we stumbled upon is: if a wall is slightly out of square, avoid running a straight line up against it. It will only exaggerate the flaw. We bought the square drain thinking it would be easier to tile around it, however, we turned the tile a quarter turn to disguise the running walls. See photo below.

There were many individual triangles to cut, but it was worth it. One has to stare really hard to see the run of the wall. Next is grouting. We recommend using pre-mixed grout on floors, especially shower floors. The consistency is always true. Bagged powdered grout is cheaper, but unless you know your grout consistencies, stick to pre-mixed for floors. Using a floater trowel, spread the grout over the cracks at a 45 degree angle. Press hard and add more grout if necessary to fill the cracks. Turn the float to 90 degrees and wipe off the excess. Use a grout sponge that's damp to wipe excess grout. Don't push with the sponge or you'll remove your grout.

Grout needs to set for at least 48 hours before sealing. Use a quality sealant that will retard mold and mildew for several years. It is very much worth the money to go with quality. Follow the instructions on the bottle for application.
The finished product- See below.
Finished

Related links
- www.make-my-own-house.com
make my own house is an instructional site for beginning home builders that want to save on labor costs by doing some or all of the work themselves.