Great Nails: Decorating Tools For Nail Art

What do your nails have to say?
So we covered the secrets and tips of having great healthy looking natural nails. Once you achieved the desired look there are many options to decorating and polishing your fantastic nails. In a world where fashion and accessories says volume about a person's personality and interests, is it any wonder your nails can do the same thing? In addition, the market targeting nail designs and tools is vastly expanding. The days of airbrushing designs are over, rhinestones, fimos and nail stickers are all the rage! Nowadays people are expressing themselves more and more through nail art, creating a design with colors associating with a holiday, an event or just a mood. Anyone can do their own nail art that looks professionally done and can last up to week. Here are a few tips and tricks to help you accomplish that beautiful look that will make you feel original and one of a kind.


Nail Tools
Before you can start with any type of nail decoration, there are a few tools that you will need to help you create your style of choice.
1.) Nail Dotting Tools - These are tools that can be used to create dots and circles on your nails. They can be purchased online or in a beauty store and usually run for under $5.00. The set comes in 5 and the tool run in various sizes. They can create small, medium and large dots. Before I purchased my set of dotting tools I made some at home which gave me the same effect. I used an old eye liner pencil with the cap on. The top was circular in shape and when dipped into polish I was able to replicate the same design, however the size was bigger than the biggest size my dotting tool could offer. It worked great for a design where I just wanted different size circles. I sometimes also used a pencil point to draw little dots on my nails. They were the smallest dots I designed with. As you can see, you can be creative and try to find "tools" around your home that can help you have the same design without really spending money.
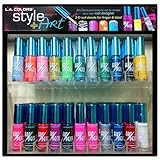
2.) Nail Polish - The simplest form of all the nail tools you will need. Nail polishes range from prices, colors, density and appeal. They come in high gloss shiny and matte color. The can be as complex as having added proteins and oils which can help stimulate nail growth and durability. Within the last two years I have expanded my nail polish collection. I have visited many beauty stores and saw the enormous amounts of polish available to consumers. Some are very expensive that can easily cost over $10.00 while others cost a mere .99 cents. My collection has almost every color in almost every shade. One can ask if having more than a few colors is that big of a deal? To them I say, you can't get a bright enough orange for the summer. There is something satisfying about finding a perfect red hue that makes you feel like Christmas. The color wheel for polishes is diverse and fits all styles and characteristics. Golds, blues, violets, reds, glitters, blacks, grays, whites, greens, oranges, emeralds, lavenders, browns, rubies and the list goes on and on. The shelf life of a nail polish is typically 2 years. After that, application gets tricky as the polish will most likely be clumpy and sticky. If you're an avid user, you will go through a bottle a lot quicker than the recommended shelf life.
3.) Nail Glitters - I found my nail glitters at a .99 cents store unexpectedly and was so excited to try them out. You can usually find nail polish glitters that can top off your nail design but when I saw these I just saw a more versatile way of using them. A pack came with small glitters (smaller than the ones in the polish form) and larger sized glitters (large enough to pick up with a dotting tool) which I used to highlight a specific design. You can sprinkle them on your wet coat of polish making them stick and giving your nails more dimension. You can use one glitter color or combine 2 or more colors for a colorful look.
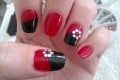
4.) Rhinestones/Beads - One of the most popular and glitzy way of designing your nails is by using rhinestones. Rhinestones add a bit of a crystal/diamond affect on your nails which a lot of women love because of the girly aspect. You can get this nail art anywhere, even in a craft store like Michael's. However online, will probably have the best deal for more product. Rhinestones come in different sizes and shapes. There are teardrop rhinestones, diamond shape, heart and star shapes as well. When you purchase rhinestones in bundles (especially on the web), sometimes you can come across rhinestones mixed in with beads. Beads add an elegant flair to your design. They can be used for brides and bridal parties coming in a pearl and milky color. This particular decoration is 3D and will not lay flat on your nail. It is essential to apply a clear coat before applying the rhinestone/bead, pressing down once applied and top off with another clear coat. To prevent your stones/bead from falling off before your week long manicure, every 2-3 days put on a fresh top coat.
5.) Fimo Nail Canes - These small canes made of polymer clay are really coming up in the world. They can be purchased as their original forms in small canes or already cut up into slices ready for use. I purchased them in canes and it came with razors so I could cut them up myself. They can be a little cheaper than already buying them sliced up. The trick to getting the perfect fimo is trying to slice them as thin as possible. Too thick will not allow it to adhere correctly to your nail. Fimos come in rich live looking colors, often in fruit design like apples, oranges, grapefruits and lemons. They really put a girly and fun spiral to your nails. Very trendy during the summer for a light, 3D and corky look. There is no doubt with these show-stoppers you will get compliments left and right. Just like rhinestones, it is important to use a clear coat to make sure the fimos stay put.
6.) Nail Strip Polish - Nail polishes that come with a stripper brush rather than the conventional nail polish brush. The stripper brush helps make lines (vertical and horizontal) which can be used to make wavy, straight or zig zag lines. I love using these brushes to write small words or numbers on my nails. I also make plaid designs with different colors which makes my nails look so intricate and like it took a lot of time. Decorating with this polish is super easy and convenient. It takes some getting used to get the precision down but with practice you will be creating professional nail designs one won't know if you went to the salon or not.
Everyday more and more tools are being introduced into today's market to aid in the creation of unique and beautiful nail designs. Here are a few to start you off and show you that fabulous nails are a few short steps away.