- HubPages»
- Technology»
- Computers & Software»
- Computer Software
Tutorial: How to Add Metadata to photos with "Photome"(for Windows)


Tutorial: How to Add Metadata with free software "Photome"
This is a follow up tutorial to the article Metadata in your photographs to help improve SEO
which explains how you could add metadata to your images to improve SEO and enhance chances of getting more traffic. If you are not aware of what Metadata is, please visit the article mentioned above. In short,metadata is "data about the data". It is information imbedded in a webpage,video or photograph to do with,Copyright,keywords,location and so on. The following tutorial will show you with image and video, how you can do this at home on your Windows Operating system.
Photome Tutorial-The video is a bit fuzzy so you can refer to the images below for clearer impressions
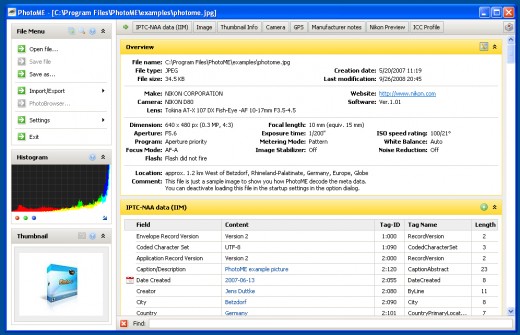
The interface
Once you have installed your free software from Photome. The interface looks like the image below. Take time to see what information you can put into your file by studying this interface.(Not necessary but will give you an idea of how metadata is used.)
Photome Interface- Click to enlarge
Opening a file in Photome
Opening a file in the programme is standard. Go to the top of the menu as illustrated in the photograph below and click on open file. SOme files and formats will not open. This must be a bug with in the software so i recommend you start with Jpeg photographs.
Selecting your photo for meta data editing

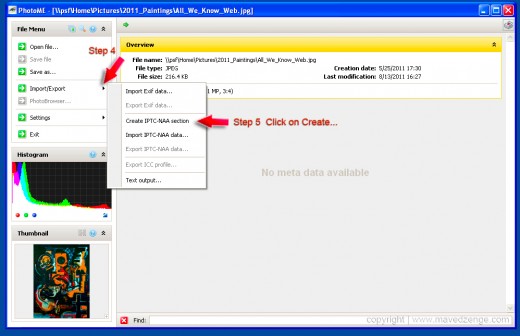
Import export data- Or create your custom meta data
If you are familiar with using meta data, you might already have files stored on your computer. Use the Import/Export button to bring them into the photograph. Otherwise click the same button to create your own data such as Title, Creator,copyright,keywords and so on. Go through to step 5 which is clicking on the "Create IPTC-NAA section"-Please see image below. This will lead you on to a page with options for meta tags.
Creating your meta data
Adding metatags
Click on the green circle with a plus on the right of the screen in the second yellow band. This will open your panel for meta tags.
Adding metatags Screenshot

Selecting your meta tag
The next image illustrates the different meta tags you can input into your file,select one from the menu and click add
Selecting then adding meta tags


End.Save
This is all that is required. You can add as many fields as you like because meta data does not make the photograph file any bigger,further more,it is embedded within the photographs data for search engines to read so it is not visible to the eye.
NOTE: You can do all this in Bridge which ships with Adobe products. If you are not using Adobe and would like a free photo editing software that will get the job done you can try Ifranview. You can get the link from here.


