How to do a Screen Capture on a PC or a Mac

My Own Screen Captured

A screen capture (also known as a print screen or screen shot) is an image taken of what is currently visible on your computer's monitor. It is a useful tool that can come in handy in many situations, but most people have never even heard of it before.
Creating a screen capture is very easy, but is done in completely different ways depending on whether you are using a PC or a Mac. Below I will explain how to create both in two separate step-by-step tutorials.
Screen Capture on a PC
Creating a screen capture on a PC requires a little more time than a Mac. Let's get started:
1. Unlike Macs, PCs actually have a specific key made just for doing a screen capture. Look at your keyboard for a key with the word "print screen" on it. Usually this key is located in the upper right hand side of your keyboard. When you find it, press it! This automatically tells your computer to take a screen capture of whatever is on your monitor at the time.
2. After you've pressed the print screen button, you need to open a program that you will be able to paste your screen capture through. In this tutorial I will be using Photoshop cs4, but you can use any editing program you have available such as word or paint. I like to use editing programs that have a crop tool, because most of the time I don't want the entire screen, I just want a portion of it.
After you open your editing program, create a new document, and don't be concerned with the size. With programs like Photoshop, the new document will already be the exact size of your screen capture.
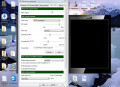
A Full Screen Capture on a PC

3. Right click your mouse and select "paste" (or hit ctrl + v). Your screen capture should appear in its full size. If you wanted a shot of your entire monitor you can now save your screen capture as a jpeg, png, or whatever you choose. In Photoshop this is done by selecting File>Save As, and then selecting your image type from the drop down menu.
Saving a jpeg to your desktop can be as simple as clicking and dragging your image from your program onto your desktop. Although this is not the case with all programs, it's certainly worth a try!
. Be sure to save your new screen capture in a location where you will be able to find it later. Once you save it, you're done! Pretty easy right?
Suppose you did not want the entire monitor though. What if all you wanted was to save a small portion of your screen shot? This is where the use of a photo editing program really comes into play. Take these extra steps to capture exactly what you want:

4. With your screen capture pasted into your photo editing program, find the crop tool. Not all programs will have a crop tool, but all photo editing programs should have some form of tool that does a similar thing.
With the crop tool selected, left click just outside of the area you want to keep. I like to click in the upper left hand corner. While still holding the left mouse button, drag the mouse to the opposite corner across your selection (you should see a dotted square forming). Let go of the left button on the mouse and look at your selection.

5. When you let go of your mouse, you should be able to easily see your selection. In Photoshop, your selection is indicated by a square that is lighter than the rest of the canvas. The selection will also have marching ants (moving dotted lines) circling around the edge.
Click and drag the small white squares in each corner of your selection to adjust the size to the way you want it. When you're happy with your selection, hit ENTER.

5. Once you have cropped your desired selection, the remainder of the canvas will disappear and you will be left with your cropped selection only. You are now ready to save your image to your computer. Remember to save your image in a place where you will be able to find it again!
To save an image in Photoshop, click File>Save As, and choose an extension such as .jpg or .png from the drop down menu.
Your cropped screen capture is complete and ready to use!
Screen Capture on a Mac
Creating a screen capture on a Mac is, in my opinion, much easier and more effective than on a PC. Although Macs do not have a special "print screen" key, they also do not require the use of any photo editing program. Follow these simple steps to create either a full, or cropped screen capture on your Mac:
Full Screen Capture
To create a screen capture of your entire monitor, use the following hot key combination:
command + shift + 3 (For those of you who don't know what the command key is, it is the key to the left of the spacebar with a small apple logo on it)
Voila! Your screen capture is complete. There is no need to use a separate program, because your Mac will automatically save a jpeg of this screen capture and place it right on your desktop for you to reach! Thank you Mac!
Cropped Screen Capture
If you only want to take a picture of a small portion of your desktop, such as a conversation or a coupon, use this hot key combination instead:
command + shift + 4 (For those of you who don't know what the command key is, it is the key to the left of the spacebar with a small apple logo on it)
When you press this hot key combination, a small cursor that is shaped like a plus sign will appear. This cursor acts the same way that a crop tool would. Line the cursor up with a corner of your selection, click and drag the cursor to the exact opposite corner across your selection. You will be able to see your selection as you are dragging it. When you let go of your mouse button, your Mac will automatically take a picture of the selection you just created.
That's it! At this point you should be able to see a jpeg appear on your desktop of your cropped screen capture.
You're Ready To Start!
Creating a screen capture is an extremely useful function that is often overlooked on computers. Once you learn how to do this handy trick, you'll find yourself using it more often than you would have ever imagined!