- HubPages»
- Technology»
- Computers & Software»
- Computer Software»
- Office Software Suites»
- Microsoft Office
Techie Corner:Microsoft Word - Instructions for the Novice

Microsoft Word Buttons


Microsoft Word
![Microsoft Word 2013 (1PC/1User) [Download]](https://m.media-amazon.com/images/I/410D2pEo0tL._SL160_.jpg)
From the beginning…Word for the Novice
Microsoft Word is a word processing program that provides you with the tools to create professional looking documents, reports, business cards, mailing letters and much more.
For this training, I've used Microsoft 2007, but most of these features are found in all versions.
Some conventions:
Often I may refer to the Microsoft Office Button. This button is located in the top left hand side of your screen.
The Ribbon
Microsoft Office 2007 uses what is called a ribbon instead of the normal menus that you may be used to in older versions of Office. The ribbon is displayed across the top of the screen with all of its commands featured underneath it. You can set up the ribbon the way you want to by clicking on the down arrow to the right of the Quick Access toolbar. You can press Ctrl+F1 to hide the ribbon and then press it again to have it appear again.
Using the Keyboard Instead of the Mouse
If you prefer to use the keyboard instead of the mouse, you can use the Alt key + another specified key to achieve the results you desire. To access what these keyboard shortcuts are, click Alt once. You will see the keyboard shortcut highlighted in the menu and various places throughout the screen. If you wanted to access ‘Home’ click Atl+H. To hide these from view, click Alt again.
The Differences Between Save and Save As
If you are saving the document for the first time, click the Office button>Save will open a dialog box, as shown, allowing you to choose which folder you wish to save in along with the file name, and type. If you have already saved the document once, clicking ‘Save’ will cause the screen to flash, and your documents updates will have been saved.
From the side column, choose where you want to save your work.
File Name: Type the name of the document.
Choosing Save As type is for: You may want to change the type to a template, rich text, Microsoft 2003 version, etc. Here is where you can choose which type of document this will be.
When you have created a template or document, typed in some additional text (or took some out) and want this document to be saved without changing the original template, choose ‘Save As.’
Copying Items to the Clipboard
To copy any word or picture to the clipboard, highlight the item and either right click on it and click copy, select Ctrl + C, or on the ribbon, click the copy icon. (Copying the item just makes a copy for you to paste elsewhere, but keeps the original word or picture where it is. Cutting the items works similarly except that it removes the item from its original location for you to paste it elsewhere). The key combination to cut is Ctrl + X.
To paste the word or picture, put your cursor in the space you wish to paste in and choose paste from the Home menu, or click Ctrl+V, or right click and select ‘Paste.’
Note that there are differences between the Windows Clipboard and Office Clipboard. If you are working anywhere in Microsoft Office, you can have up to twenty four items in your clipboard to choose from. To view all of the items in your clipboard, click on ‘Clipboard’ from the Home menu in Word.
If you copy something from Windows, it only stays in the clipboard one time. If you click copy on something else, the newest copied item stays in the Windows clipboard. There is no option like the one in Word to view previously copied clipboard items.
Quick Access Toolbar
At the top left hand portion of the screen is a quick access toolbar that comes with default tools in there for to use.
You can also add items to by selecting the Office button>Word Options>Customize. Then highlight the item you wish to add and click the Add>> button.
Password Protection

Let's Begin!
To begin, open Word, double click the Word icon on your desktop, or by Selecting Start>> Programs>>Microsoft Word.
You will be brought to a blank screen resembling a blank piece of paper. To begin entering information, you can start typing on this blank page. If you want to go through a specialized wizard for formatting letters, resumes, memos, faxes, etc., click on File>> New. You will be brought to a new screen, enabling you to choose templates. From here, select the document you would like the Word wizard to help you create. You may want to experiment with each choice to see which type work for you.
You can choose a template or a document.
The difference between them both is that a document is specific to one occasion, i.e., a one-time letter to your friend without formatting. A template will create a document that you can use various times, providing that you choose SAVE AS after each change. For example, Fax Letterhead. This will always contain your header and footer information, along with any additional detail you add that you want to appear on all your faxes.
Blank Documents
A few important things before we begin. I recommend that you save your work in intervals of every ten minutes. Also remember which folder you saved it in! This is not required, but it is imperative if you plan to work on sizable documents. There is nothing more frustrating than working for three hours on a document, only to have your computer decide it wants to take a nap, and there is no sign of your work ANYWHERE! Believe me, I have done this and have never forgotten it. So, make a mental note before anything else, to save your work.
*There is a feature called auto save that automatically saves your work for you in a recovery file. This feature should also be checked. To do this:
- Select the Microsoft Office button in the top left hand corner.
- In the bottom right, click on ‘Word Options.’
- Click Save in the left column.
- In the ‘Save AutoRecover information every __minutes’ box, enter the interval for how often you want Microsoft Word to save documents. More information is recovered if there is a power failure the more frequently it saves. Should be about every 5-10 minutes. Also- if you want to change the format in which it saves, change the default of Word Document in the ‘Save files in this format’ field.
Passwords
If you have any sensitive material, you may want to password protect your documents, select the Microsoft Office Button>Prepare>Encrypt Document. The following screen will appear. Enter in the password you wish to use to open this document. **If you lose this password, it cannot be recovered! Keep your passwords in safe protected place.
If a password is required to open the document, enter a password in the ‘Password to Open’ text box. You will be prompted to enter it once more. Click ‘OK’ once completed.
To password protect the document so that it can be opened but not edited, click on Review>Protect Document>Restrict Format and Editing. Choose the types of restrictions you want on this document. Then select ‘Yes, Start Enforcing Protection.’
You will then be prompted to enter a password. Note however, that users WILL be able to come into the document and remove this password. (They will need to know the password to remove it).
If you want to remove the password, go to Review>Protect Document>Restrict Format and Editing and click on ‘Stop Protection’ from the bottom of the screen. You will be required to enter the password to stop protection on this document.
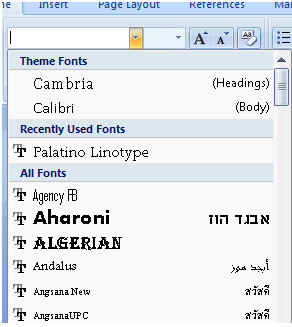
Some Available Fonts
Formatting
Font-Style, Shape, Size
You may already have in mind a particular font that you use. For example, if you are using Californian FB, you may want to change the text to Calabria.
- Highlight all the text by clicking Select>Select All from the Home ribbon bar. This will highlight all of the text in the document.
- Click on the Font option in the ‘Home’ ribbon and choose the font of your choice. You can also right click and click on ‘Font.’
- Choose the desired text from the down arrow in the font field. You can also change the font style, size, color, underline style and special effects if you click the down arrow in the Font Style field Size field, Font Color, Underline Style fields. Experiment also with the Effects field by checking each option off and viewing its appearance in the Preview field at the bottom of the dialog box. (If you want to ALWAYS have this font style, size, color, etc., click the Default button on the bottom left of the dialog box).
- When you have chosen your desired Font formatting, click Ok and you will be brought back to your document.
You can also select your font before you type anything on the document by using steps 2-4.
Please Note: When you change text on a document you have already formatted, this font change may ALSO affect the spacing and formatting of your document. You will want to look over your document to make sure the spacing and formatting is correct.
Spell Check
Whether you have completed your document or you are still creating it, you can have Word perform a spell check for you to locate any errors and suggest replacements. To set up the way Word performs spell check, click on the office button>Word Options>Proofing.
To perform a spell check, simply click on Review>Spelling & Grammar. A box will appear depending upon whether a grammatical or spelling error exists. The upper box will contain the actual text from your document. The bottom box – (labeled Suggestions) will contain either grammatical suggestions or possible words that may fit what you may have meant to spell, (or it will simply say No suggestions). You then have four or five options. They are
- Ignore-Ignore Word’s advice as you may have typed it exactly as you want it after all, for example an acronym or name of a company.
- Ignore Rule -Ignore the rule that Word suggests.
- Next Sentence-Skip to the Next Sentence
- Change-If you agree with Word’s suggestions. This will automatically change the grammar in its location.
- Explain- will give some insight into why this is considered an error.
Additional Options:
- Ignore All-if that last name is listed many times.
- Add to Dictionary-Add the unaccepted text into Word’s dictionary so that it will not appear in spell check as an error.
- Change-Use this if you made a mistake and accept Word’s suggestions. Since there may be more than one suggestion, make sure you highlight the one you want to accept before clicking ‘Change.’
- Change All-If you realize that you have incorrectly spelled a certain piece of text incorrectly, click ‘Change All’ to correct any duplicates of that text.
- Autocorrect- This will automatically correct words based on a predefined list. You can edit this list. To do so click on the Office Button>Word Options>Proofing>Autocorrect. For instance, if you commonly misspell a certain word, type the ‘misspelled’ word in the ‘Replace’ box and the correctly spelled word in the ‘With Box.’
Find and Replace
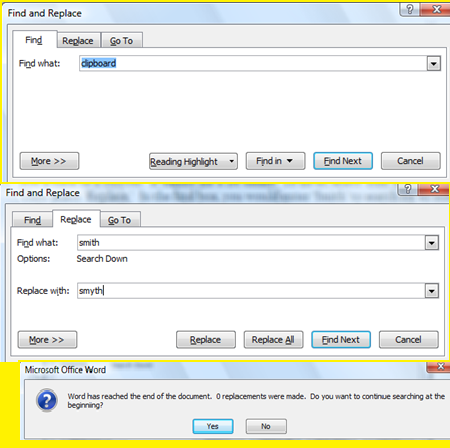
Find and Replace
There may be times when you have written or are reading a document and want to find a specific word or phrase, perhaps a distinct word that you wanted to revisit. To find it easily, select ‘Find’ from the ‘Home’ ribbon. From the dialog box that appears, type in the word you are seeking. If there are multiple instances of this word, you can keep clicking ‘Find Next’ until you find the correct instance.
Along those same lines is the ‘Replace’ function. Suppose you were typing a letter to Mr. Smith and you just realized his name is spelled ‘Smyth.’ You can look for all instances of ‘Smith,’ whether there is one or one thousand and replace it with the name ‘Smyth’ with just a click of a button. It makes life a lot easier! To do so, select ‘Edit’ from the toolbar. Then select ‘Replace.’ In the find box, you would enter ‘Smith’ to search for all instances and then in the ‘Replace with’ box, you would enter ‘Smyth.’ For this particular situation, you would select ‘Replace All’ but for other situations, you may only want to replace it one time, so you would just select ‘Replace.’
Once you select ‘Replace All,’ you will see a message that lets you know how many replacements were made.
Just click on the ‘OK’ button and you are finished!
Bullets and Numbering
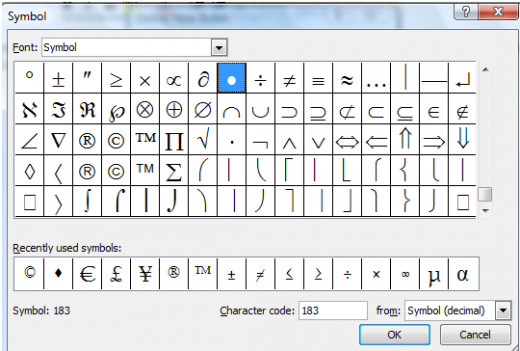
Symbols
More Formatting!
Bullets and Numbering
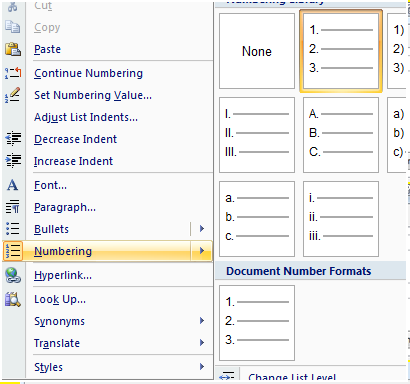
To begin adding or numbers to a document for a formatted list either right click where you want the numbering and choose from the screen that appears or click on the numbering icon in the ‘Home’ menu.
You can also format the appearance of bullets you choose. To do this,
Choose the bullets icon from the ‘Home’ menu or right click on the location you would like the bullets and choose bullets.
To change the type of bullets, click on ‘Define New Bullet.’ From the screen that appears, you can choose to use a picture, symbol or type of font.
- Move your cursor around the screen to choose a bullet you like. For even more options, click on the down arrow in the Font screen.
- Once you have found the bullet you want, click ‘OK.’ Then Click ‘OK’ again to return to your document.
- This same method can be used for numbering; however, the screen will appear a little differently.
- Click on the Numbers tab and then click on ‘Define New Numbers.’
- Click on Number Style to change it what type of number style appears.
- Click on Font to change the font style of the numbers.
- You can also choose your alignment for your numbers in this screen.
- Click ‘Ok’ and then click ‘Ok’ again to return to your document.
Justification and Indentation
Depending on what you are writing, you may want to justify the text to the left or to the right. To do this, following these instructions.
- Select the ‘Home’ ribbon. In that ribbon, under the heading of Paragraph, you will see all of your alignment options.
- You can also right click in your desired location and click ‘Paragraph. On this screen you will also be able to modify indentation position and spacing.
Inserting Page Breaks
To insert breaks in your document:
- Position your cursor where you want to make the page break.
- Select the Insert ribbon>>Page Break.
- To insert a new blank page, click on the Insert ribbon and then select ‘Blank Page.’
Inserting Page Numbers
To insert a page number into your document:
- Click on the Insert ribbon>>Page Number to display the following screen.
- Choose where you want to position the page number and choose the alignment as well.
- If your first page is a cover page, you may not want to start numbering on the first page.If this is the case, select the Page Layout tab>Page Setup> Layout. Under Headers and Footers, select ‘Different First Page.’ Then select ‘Ok.’
- To format page numbers, click on ‘Format Page Numbers.’
Inserting Date and Time
- To Insert Date & Time, click on Insert ribbon>>Date and Time.
- Select the format of the date or time you wish to insert.
- Click ‘OK.’
- If you don't want this date to change every time you open the document, uncheck ‘Update automatically.’ For example, if you have inserted the date on a contract as “Contract Date,” you wouldn’t want that to change to the current date if you open the document to view it two years from the actual “Contract Date.”
Columns
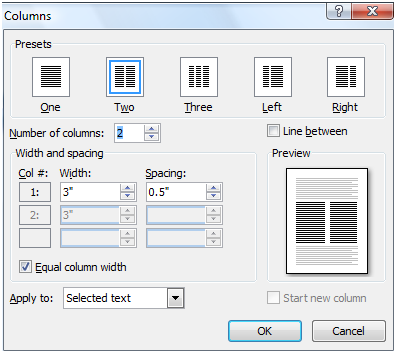
Columns
To have your document print in two columns, follow these easy instructions.
- Type your document
- Highlight the text you want to convert into columns.
- Select the Page Layout ribbon header>Columns. A dialog box appears.
- Choose how many columns you want.
- If you want separate width and spacing for each column, you can specify this under ‘More Columns.'
- You also have the option to ‘Apply to: “This section,” meaning the text that you highlighted, “This point forward, “or the “Whole document.”
- Congratulations! You just created a column.
Word Count
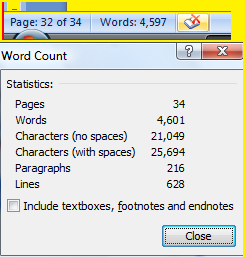
Extras
Word Count
Whether you are writing a report for school, or a column for your businesses’ newspaper, this feature will save you a lot of time! All you have to do to count how many words are in your document is:
- Look at the bottom of your screen in the status bar.
- For more detail, go to Review> then click the Word Count icon in the Proofing section.
Help!
This section is designed to familiarize you with the available Help menu that is included with Word. It is a very concise tool for helping you do many of the functions available. At the very least, it will explain how the functions are utilized.
Once you click on ‘Help’ which is the question mark in the top left corner of your screen you will be brought to the following screen where you can ‘Search for’ help in the search line.
Once you enter your item in the search line, a new dialog box will appear with some choices to choose from that most closely resembles the issue or question you are having. Make your selection and then follow the instructions on the screen.
If you want to know about your Word program, including the service pack that is included, which version it is, who it is licensed to, etc., you can add the ‘About’ section to the quick access bar. To do so, click on the Office button>Word Options>Customize> Commands not in the Ribbon>Add. This is helpful if you are ever trying to ask for assistance, but do not know which version you are using. The person that is assisting you may need to know this information, as each version differs from the next, so it will help narrow down the issue at hand.
Hope this hub has helped you learn the beginning basics of Microsoft Word. Good luck and have fun!
Now you're ready for Step II!


