- HubPages»
- Technology»
- Computers & Software»
- Computer Software»
- Office Software Suites»
- Microsoft Office
Techie Corner-Microsoft Word II- A Little More Advanced

Congratulations!

Microsoft Word II- A Little More Advanced
Congratulations! If you've gotten this far, then you've read my hub, Microsoft Word- Instructions for the Novice. You're on your way to becoming proficient in Word!
Let's get started, shall we?
Inserting Files and Objects into Documents
There may be situations when you need to include documents into your document. For example, suppose you are presenting a report at your company meeting and wanted to include another document you were preparing. Rather than present an entire page that needs to be printed separately, you can incorporate it into the main document so that it prints the same each and every time.
To do so, from the main menu, click on Insert. Then click on Object>Text from file. From the dialog box that appears, choose the folder that it is located in. Finally, choose the document you wish to insert and then click ‘Insert.’
That is all there is to it! You will now have your other document automatically inserted into your new document.
You can use these same conventions to insert an object, such as a Microsoft Excel spreadsheet or a slide from a PowerPoint presentation. To insert an object, choose Object from the Insert Menu. From the screen that appears, choose either ‘Create New’ or ‘Create from File.’
If you choose ‘Create New,’ you will be asked to choose which type of object you would like to create. Choose from the supplied list in the dialog box that appears.
If you choose ‘Create from File,’ you will be able to browse and search for a particular file.
Import Bookmark
Suppose you are reading a long document, maybe an apology letter or a manuscript. Either way, if it is too long to complete in one night, you can set bookmarks to return to that section at a later date.
To use the bookmark function, go to the section you wish to bookmark and select Insert>Bookmark.
A screen will appear. Type the name of your new bookmark (no spaces) and then click Add. The dialog box will then disappear.
When you need to go back to the bookmark section, all you need to do is one of two things:
From the main menu, choose Find> Goto. From the screen that appears, choose Bookmark. Then enter the bookmark name in the drop down box that appears and choose ‘Go To.’
The second way to arrive at your bookmark is from the main menu choose Insert>Bookmark. Your preset bookmark (or bookmarks) should appear in the white box. Highlight the one you wish to go to and then choose ‘Go To.’ It is a great way to keep track of large documents and reference specific portions at a later time.
Insert Pictures, Clip Art and Word Art
One of the fun aspects of Microsoft is its ability to insert pictures or creative, advanced lettering into a document. Take a regular document and turn it into a piece of art. (Just be sure not to publish any document that has Word Art included without permission from Microsoft ™). To insert an image into Word, select ‘Insert’ from the main menu. Choose ‘Picture.’ A dialog box will appear enabling you to choose which location and which picture you wish to insert.
Clip Art is a built in feature of most (if not all) of Microsoft Office’s products. It enables you to choose from hundreds of pictures incorporated into the Word program as well as be brought to a link on the Internet with thousands of available pictures in multiple topics. To access these pictures, choose Insert>ClipArt from the ribbon.
Just type in the Search field the type of picture you are looking for and then specify where to search. Then press ‘Go.’ Once you find the picture you are seeking, click ‘insert’ or ‘copy’ and it will be brought into your document.
You can also search for your own saved pictures from a file; from a scanner or a camera (if the scanner or camera is physically attached to the computer and you have the appropriate software installed to download pictures from a device).
If you choose to create a new drawing or autoshapes, you can choose from the toolbar usually located on the bottom of the screen many different options, such as caption balloons, colors, shading, shadows, highlighting, arrows, block arrows, text boxes, line shapes, sizes and much more.
Don’t be afraid to experiment with these tools. Have fun with it…the potential for excitement is endless! (A little too enthusiastic? Thought so. Sorry about that)!
To complement your newly designed document, add some flair by utilizing Word Art. This is also accessed by choosing Insert>Picture>Word Art. Experiment with the different styles of Word Art, type in your text, font, font size and color and you’re on your way!
Modify Graphics within a Document
Now that you have inserted your picture, how do you modify its size and properties? If the size of the picture is small, you may want to expand it. To do so, just click on the picture until the four corners are highlighted with black squares on the corners. If you hover your mouse over it, an arrow will appear enabling you to ‘drag’ the picture diagonally to evenly position the picture, or drag it upward, or sideways to make it a bit larger. Be careful, however, as the picture may become distorted.
In addition, if you right click on the picture, a menu will appear with a few different options. From there, you can modify colors, lines, layout and web alternate text. (Since web browsers cannot ‘read’ pictures, you can add text in place of the picture. For example, if you have a web browser where the user has chosen NOT to display pictures, instead of an X in the place of a picture, alternate text will appear).
If you really want to be creative you can insert a picture inside of a shape. Click on Insert>Shapes. Insert the shape of your choice and drag it onto your document. Right click on the shape and click on ‘Format Autoshape.’
Click on the Colors and Lines Tab and then in the ‘Fill’ section, click on the down arrow by color and choose ‘Fill Effects.’
Go to the picture tab and choose ‘Insert Picture.’ Browse to the picture you wish to insert by choosing ‘Select Picture.’ You now have your picture inserted in the shape you desire!
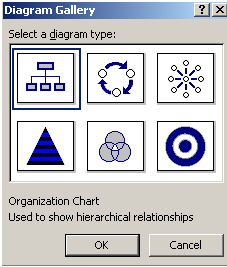
Smart Art

More Features
SmartArt
Office 2007 now has a feature called ‘SmartArt.’ This is a cool feature to help with generating professional looking documents (or even if you just want to play around).
Click on Insert>SmartArt. Note, if you are using an older version of Word (.doc) and have not yet converted to Word 2007, your SmartArt toolbar will appear differently than a 2007 word document (docx). It may appear as:
You can click on an icon and bring up another screen with more options; however, once you convert to Word 2007, this screen will give you more options upfront:
You can click on any of the choices and then insert text in them
Create Headers and Footers
There are many instances where you will need to insert and display headers and footers into your document. Some examples of these are page title, page numbers, date, path of the document, author, the words ‘continued,’ etc. Word has made this setup easy for the user.
To user headers and footers, you just need to click on ‘Insert’ and then click on ‘Header or Footer.’ You will be greeted with the following screen: Here is where you can insert anything you want, even pictures.
Click on the format that best suits your requirements and then you will notice that there is a header (or footer) now on your page. You will also see another menu to choose from located under ‘Header & Footer Tools.
If you hover your mouse over each of the icons, their function will be displayed. Word 2007 has some interesting features in this capacity, such as ‘Quick Parts>Document Property’ which will put clips from your document, such as title, email address, etc., or QuickParts>Building Block Organizer, which will insert sidebars, “urgent” watermarks, and many more. To get familiar with these, just experiment!
If you want to remove header or footer, under Design, click on Header>Remove Header. To edit the header, click on Design, Edit Header.
Page Breaks
When you are creating a document, there may be some instances where you want to create breaks, for instance, insert new page. Suppose you are creating your next chapter, but the LAST page of the current chapter ends at the top of the page. Do you really want to scroll all the way down to the beginning of the next page? To make it easy, you can just insert a new page and Word will do the work for you.
To utilize the page break function, go to Insert>Page Break. This will automatically move your cursor to the beginning of the next page.
If you want to insert a blank page, click on Insert>Blank Page. This will insert a blank page between where your cursor currently is and the next page.
Creating a Hyperlink
When you are utilizing Word for public purposes, you may want to provide links to specific websites. This will enable the reader to quickly click on the link and hop directly to the website.
Another use for a hyperlink is if you are on a local server, you can provide a link to a document located somewhere on the server or create a new document altogether.
Alternatively, you can link up to a certain spot in this present document. An example of that may be a glossary or reference.
Lastly if you are creating a hyperlink for the reader to be able to click on the link, directly open Microsoft Outlook, and automatically insert the specified email address in the ‘To’ line of the email.
To use this tool, from the main menu, go to Insert>Hyperlink. A dialog box will appear in which you can specify which type of hyperlink you would like to insert.
If you are providing a hyperlink to go to a website or file on the server, in the ‘Text to display’ field, type in whatever you want to specify where the user will be going. You can type something like “Click here to go to our website.” To add to that text, you can also click on the ‘ScreenTip’ button. This allows you to provide a tip if the user hovers their mouse over the hyperlink.
Next, you need to provide a full address of where the hyperlink will go. It is here where you need to be specific as something as small as a spelling error will produce an error in the link. To do so, type the full address in the ‘Address’ field, whether it is a website or a file on one of the network drives.
When you click on the link, you will be brought to the website. If you clicked on ‘Go to Yahoos Website!,’ you would be bought to www.yahoo.com.
The next option would be to create a hyperlink in this document. Suppose you wanted the user to refer back to the top of this document. Again, you will click on Insert>Hyperlink and the same dialog box will appear. Instead of choosing the default option on the left, choose ‘Place in this Document,’ and then choose the Title you want.
It will create a link and then once clicked on, will take you back to that section.
Next, if you want the user to create a new document while reading yours, for instance, if you needed the user to take notes at that particular spot. You can click on Insert>Hyperlink and from the dialog box, choose ‘Create New Document.’
In the ‘Text to display’ field, you can type whatever you would like representing what this field should do. In the ‘Name of new document:’ field, select the path and type in what you want the new document to be called. Make sure, however, that you choose the right extension. In the example above, it shows that the new document should be an .htm. In reality, you would most likely want this document to be a Word Document, in which the extension is .doc or docx. Under ‘When to edit’ choose either later or now. Select ‘OK.’
If the user clicks on it, it will automatically open a blank document and name it what you specified.
Lastly, you can create a hyperlink to open up Outlook and automatically insert the email address into the ‘To’ field. Select Insert>Hyperlink from the main menu. In the dialog box, choose ‘Email Address’ from the bottom left. Type in your text to display, the email address of where this email is going and specified subject (if any).
Once you select ‘OK’ it will provide a link as shown below. When you click on it, it will automatically open Outlook or Outlook Express and automatically insert the email address and subject (if applicable).
Mail Merge
Mail Merge and Labels
Construct and Complete a Mail Merge, Mailing Labels
To create a mail merge, you should first have some sort of database structure from which to pull your data. It can be an advanced Access database or a simple Excel spreadsheet. Note, with different versions of Word, this section may vary somewhat, although the premise will be similar.
To start the Mail Merge, go to Mailings>Start Mail Merge. A box will appear below asking which type of merge you would like. For our purpose, we will choose ‘Letters.’
You can either go through this yourself by selecting items on the ribbon one by one, such as ‘Select Recipients, Edit Recipient List, etc. or go through the wizard (Step by Step Mail Merge Wizard located on the bottom portion of the screen). For the purpose of this exercise, use the mail merge wizard.
Notice a new box on the right. In that same box, on the bottom left it will tell you the current step you are on. This will be step 2 of 6.
You can use the current document (if you were currently working on a document that is the form letter you were going to use), start from a template, (if you have a set template that you use), or start from existing document (one that you may have been previously working on). Once you made your selection, choose next (on the bottom). For this example, choose blank document and select ‘Use the Current Document.’
You will now be asked to specify which list you are going to use; existing, Outlook or new list. If you have an existing list, choose it, for example- Excel spreadsheet. From that same box, choose browse to search for the list you are going to supply for this merge.
Once you choose ‘Browse’ and select your list, the following will appear if you chose an Excel spreadsheet. Specify which sheet in the worksheet you will be using. Then choose ‘OK.’
The list of names will then appear:
Now select Ok, then ‘Next.’
In the next screen, you will create the way the address and greeting line will be displayed.
Choose ‘Address block’ from the box on the right-hand side of your screen. The screen that appears asks you to specify certain functions that have to do with the way the address is displayed. Feel free to experiment with this to find which format suits you best.
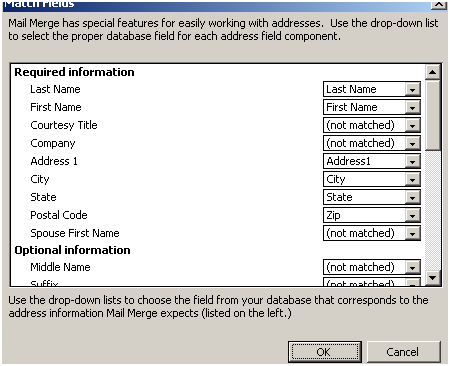
Note the ‘Match Fields’ button. If you are luck, the fields will be pretty straightforward, but in some databases, City may be called something like StrCity, so you may need to check the fields to make sure they are pointing to the correct place. You don’t want to have a field like ‘Birthday’ where the city should be. If you want to check the fields and make sure they are correct, click on that button. A new screen will appear:
If any of the fields to the right do not match the Required Information fields to the left, click on the down arrow and select the correct field. Then select ‘OK.’ Select ‘OK’ one more time and you will be brought back to your original document. You’ll now notice that the words : <<AddressBlock>> now appear. This ‘addressblock’ is actually a place holder for the addresses, for which you can position anywhere on the page.
On that same right-hand box, there is the option to choose how your greeting line will appear. Click on that and the following box will appear:
You can change the formatting in this box to your liking and then click ‘OK.’
You will now see <<GreetingLine>> somewhere underneath the Addressblock.
When you click ‘Next’ the addressblock and the greeting line will actually now show the address as well as the person’s name, as shown below:
Romeo Manning
1212 Testing Rd
Suite 506
Test, NV 32323
Dear Romeo Manning,
You can now preview your letters or make changes. Note the box on the right-hand side of your screen.
When you have made all of your changes, select ‘Complete the merge’ from the bottom right.
If you need to edit letters individually, for example, if in one of the letters you wanted to write something personal, you can now choose to do so by clicking on ‘Edit Individual Letters.’ You can also choose just to print the letters as they are. Then you can close or save and close the document.
Labels are completed similarly; however, the way they are created does vary from the last exercise.
To create labels, choose Mailings>Start Mail Merge>Step by Step Mail Merge Wizard. Click Next.
From the box on the right, choose ‘Labels.’ Click Next. You will then be able to select which type of labels you are going to create. They can be address labels, shipping labels, business cards, etc. For this example, we will choose Avery 5261.
Choose ‘Ok.’ Click next from the box on the right.
You will now be asked to specify which list you are going to use; exiting, Outlook or new list. I will choose existing as we will use the Excel spreadsheet. From that same box, choose browse to search for the list you are going to supply for this merge.
Once you choose ‘Browse’ and select your list, the following will appear if you chose an Excel spreadsheet. Specify which sheet in the worksheet you will be using. Then choose ‘OK.’
The list of names will then appear:
Now select Ok, then ‘’Arrange Your Labels.’
From the screen on the right choose ‘Address Block.’
The screen that appears asks you to specify certain functions that have to do with the way the address is displayed. Feel free to experiment with this to find which format suits you best.
Note the ‘Match Fields’ button. In this example, the fields were pretty straightforward, but in some databases, City may be called something like StrCity, so you may need to check the fields to make sure they are pointing to the correct place. You don’t want to have a field like ‘Birthday’ where the city should be. If you want to check the fields and make sure they are correct, click on that button. A new screen will appear:
If any of the fields to the right do not match the Required Information fields to the left, click on the down arrow and select the correct field. Then select ‘OK.’ Select ‘OK’ one more time and you will be brought back to your original document. You’ll now notice that the words : <<AddressBlock>> now appear in the position of the first label. If this is where you want the address to appear on all of the labels, click on the ‘Update all labels’ button in the box to the right.
Click ‘Next.’
If everything looks decent, click ‘Next.’ From the screen that follows you can print the labels or edit any individually.
Split Windows
Almost Done!
Split Windows
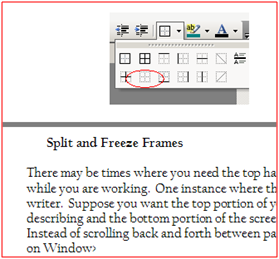
There may be times where you need the top half of the document to always be in sight while you are working. One instance where this may be helpful is if you are a technical writer.
Suppose you want the top portion of your screen to show the dialog box you are describing and the bottom portion of the screen is where you are describing each field. Instead of scrolling back and forth between pages, you can split the page. To do so, click on View>Split. Drag the gray bar where you want the split to begin and then click in that spot. Your screen will now be split into two parts. You will be working on the same document, but in two different screens, so any changes you make to either part will affect the entire document. When you are finished using the split, click Window>Remove Split.
Insert Table of Contents
If you are writing a report for school, or creating your first book, you are going to want to insert reference pages, or tables of contents. Word makes it easy for you to do so. When you are typing your document, the default format that is used is ‘Normal.’
For items that you wish to appear in your Table of Contents, you need to change their style to some type of header(Headers go in order, such as Header 1 is the main header, Header 2 falls under table 1, etc). In order to do that, first look on your Home toolbar. All you need to do is highlight the heading to be changed and click the type of heading you wish. Notice the drop down arrow which will provide more choices for you. As you run your mouse over each heading, look at your text as it will show how the text will appear if you choose that particular heading.
Once you have created your entire header styles, go to the first page of your document and insert a page break> New Page. Next, click References>Table of Contents. From there you will be given a choice of which format you would like to use. Experiment with each to see which one works best.
If you make additional changes to your document and want to update the table, press shift+left click on the table. Press F9 on your keyboard and the following box will appear. Select your option, either update only the page numbers or update entire table. Then select Ok.
Change Language
If you wish to change the default language in Microsoft Office, you will need to take a few steps to do so.
First, go to start>Programs>Microsoft Office>Microsoft Office Tools>Microsoft office 2007 Language Options. (Or whichever version you are using. You may need to have the Office CD to install the needed drivers for this feature).
In the drop down box under ‘Choose the language that defines default behavior in Microsoft Office applications’ choose the one that you wish to be your default language in Microsoft Office.
To enable languages, highlight the language of your choice from the left (Available Languages) and click on the add button to bring it into the right column (Enabled Languages). This will enable you to use spell check/editing for these enabled languages.
When you want to use spell check for the non-default language, select the text you wish to check. Select Review>Set Language from the main menu.
From the dialog box that appears, choose the language of your choice for this text. Click on Review>Spelling and Grammar when you are ready to check your work.
Track Changes
One of the things that make Word helpful is the ability to track changes. Have you ever had to share the workload of creating a document and wanted to submit to your counterpart exactly what changes you have made?
Word has a function that will outline and highlight each and every change made. If you want to accept the changes, you just click on it and then on the toolbar, select ‘Accept Change.’ If you want to Accept ALL changes, on the toolbar, click ‘Accept All Changes’ the same rule holds true for a single deletion or ALL Deletions.
To start the tracking of changes, select Review>Track Changes from the main menu. Once you make changes, the modified or added text turned to red. This indicates a change made to the document.
The toolbar in the top right hand side of the screen provides options to accept or reject the changes.
This concludes Microsoft Word – Step II. As with most new things, practice is the one of the best ways to improve upon your skills.
Experiment with what you have learned and you can quickly claim to have proficiency in Word!
Related

Techie Corner:Microsoft Word - Instructions for the Novice
Techie Corner: Easy Steps to PowerPoint- It Only Looks Scary!
")
How to Use Word Processing Software (NVQ Diploma in Business and Administration & IT)
How To Convert Texts To Table | Microsoft Word 2007, 2010 Tutorial

How to Easily Create Android Apps With B4X