How to Create Headers and Footers in a Word Document


Write for Hubpages and earn money! Signup is free.
- HubPages
HubPages is your online space to share your advice, reviews, useful tips, opinions and insights with hundreds of other authors. HubPages is completely free, and you can even earn online ad revenue!
Different Headers in the Same Document
There are several ways to create and use headers and footers in a Word document, however this article will cover the Page Layout, Breaks, Next Page feature. By using this feature, you can even include a cover page in a document and still use headers and footers without them appearing on the cover page. This feature is really handy when you have different numbered chapters in the same Word file, versus having a separate file for Chapter 1, a separate file for Chapter 2, etc. All of these steps outlined for the headers are the same steps for the footers. After we discuss the headers, there is a section on different page numbering in footers as well. Also, if you like, be sure to take the Pop Quiz provided at the end.
For this article we will pretend we have a cover page and separate sections in the same Word file. The cover page will not have a page number, however Header #1 will be page 2, and Header #2 will be on page 3. On your cover page, cursor down near the bottom of the page. Turn on your Reveal Codes and insert a Next Page break.
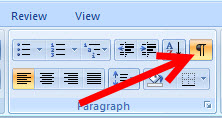
Turn on your Reveal Codes (the icon looks like a paragraph mark) to see where the page breaks are appearing.
Then click on Page Layout, Breaks, then Next Page.

A Next Page break will look like this:

Once you insert the Next Page break, go to your next page and double click at the top where you want your header to appear (this will be Header #1). It should open up right away as shown below. The first photo below shows what happens when you double-click the top of the page and the blank header opens up. Go ahead and type your header. The second photo below shows the header completed.


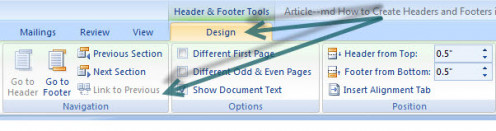
The next thing you need to do to prevent your header on the previous page (which right now is the cover page), is to click on “Design” and make sure this header is not linked to previous header, as shown by the green arrows below. Link to Previous is greyed out, which means anything you type in this first header will not appear on your Cover page, or any other page previous to this one. To exit out of the header, either double-click on the body of the document, or go to Design at the top toolbar and click on Close Header and Footer.
Different Header #2
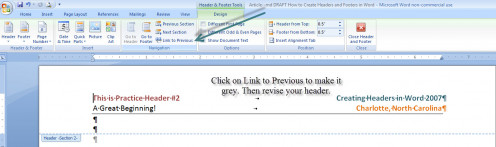
Let’s say you want to create a different header going forward (we will call this next header Practice Header #2). Go towards the bottom of page 2 (we are assuming you have a page full of information. Cursor down to the very last sentence/word on page 2). Again click on Page Layout, Breaks, Next Page. On the top of Page 3 you will double-click in the white space, then go to Design, and click on Link to Previous to make it grayed out as shown below. You will notice in the lower left-hand side of the open header where it says Header –Section 2-. You are ready to revise this header. The header below has already been revised to say Practice Header #2. Click on Design, Close Header and Footer.
A note on using the Page Layout, Breaks, Next Page feature: if a section break is accidentally deleted or moved to the next page, your headers and footers will change as well. For example, if we delete the section break on the page of Header #1, then Header #2 will appear on those page. I have found it is best to keep the Reveal Codes turned on when using these breaks because it is easier to keep track of them.
Different Page Numbering in Footers
The concept is the same as creating different headers. For this example we will assign a footer page number for Header #1 as 1-1, and assign a footer page number for Header #2 as 2-1. Let me break it down more clearly:
- Header #1 = Footer page numbering starts at 1-1
- Header #2 = Footer page numbering starts at 2-1

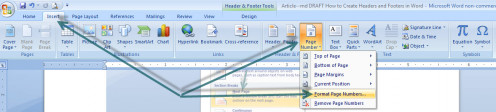
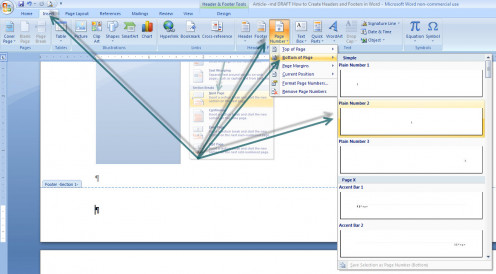
Click on Insert, Page Number and then choose Format Page Numbers, as shown below.
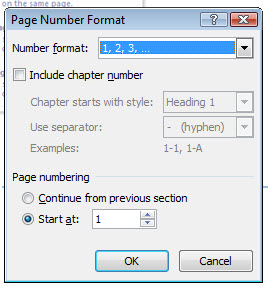
Once you click on Format Page Numbers, this screen shown below will appear. The number format has a few options to choose from. For this example we will choose the first option as shown. The Page Numbering section at the bottom, click on “Start at:” and choose 1. We want to start with page 1 in this format. Click on OK.
Now we will choose the footer format for the page number. Click on Insert, Page Number, Bottom of Page, and choose whatever format you wish. For this example Plain Number 2 is chosen. You are almost finished with the page numbering for the section of Header #1.
Once Plain Number 2 has been chosen, Word will automatically insert this page number into the footer as shown below. Then you will manually type 1- in front of the page number 1. The 1- that you type indicates this is Chapter 1. At this point section Header #1 page numbering will automatically continue as 1-1, 1-2, 1-3, etc.

Footer Page Numbering for Section Header #2
Go to the page where you want page numbering to begin for Header #2. Repeat the process. Keep in mind that a section Next Page break should already be in place. When you double-click at the bottom you should see the Link to Previous section grayed out. If it is not, then click on it to gray it out, because you don’t want your Header #2 footer page number to override the Header #1 page number that we just completed.
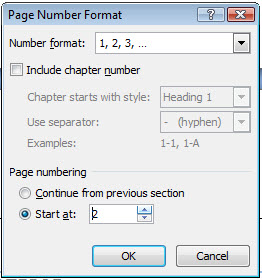
Double-click where you want to start page numbering for Header #2 -- which will be at the bottom of the page (click on the white space). Then click Insert, Page Number, Format Page Numbers, and at the bottom of the box click on “Start at: 2” as shown below, and then click OK:
Take a Pop Quiz on Headers and Footers
view quiz statisticsThen click Insert, Page Number, Bottom of Page, and click on Plain Number 2. You will have to manually type in 2- before the page number. At this point section Header #2 page numbering will automatically continue as 2-1, 2-2, 2-3, etc.
Continue this process for each section. Remember that at the end of every section (before a new section begins), you must add a new section break by clicking on Home, Page Layout, Breaks, Next Page.
If you need additional assistance or have any questions or comments please feel free to let me know below in the comments or via email. I will be glad to help. Thank you for reading. If you are so inclined, be sure to take the Pop Quiz provided.
Other Informative Hubs
- How to Create and Format Tables in Word
Add eye-catching tables to any Word document. Learn how to create and format tables in Word to jazz up an otherwise plain document. - Business Communication and Etiquette Skills
We've all been there during this journey we call life. Every so often we must deal with sticky people and sticky situations and wisdom navigating these situations is always a blessing. Welcome to Corporate Communication Etiquette. - How to Annoy Your Coworkers
There are many reasons why people love working at home. They love the work and don’t like the bad office politics, the interruptions, or many annoying behaviors that are distracting during a work day in the cubicle life. Some behaviors are just plain
© 2013 Michelle Dee